
Inter-VDOM routing
In the past, virtual domains (VDOMs) were separate from each other—there was no internal communication. Any communication between VDOMs involved traffic leaving on a physical interface belonging to one VDOM and re-entering the FortiGate unit on another physical interface belonging to another VDOM to be inspected by firewall policies in both directions.
Inter-VDOM routing changes this. With VDOM links, VDOMs can communicate internally without using additional physical interfaces.
Inter-VDOM routing is the communication between VDOMs. VDOM links are virtual interfaces that connect VDOMs. A VDOM link contains a pair of interfaces with each one connected to a VDOM, and forming either end of the inter-VDOM connection.
This chapter contains the following sections:
- Benefits of inter-VDOM routing
- Getting started with VDOM links
- Dynamic routing over inter-VDOM links
- HA virtual clusters and VDOM links
- Example of inter-VDOM routing
Benefits of inter-VDOM routing
Inter-VDOM routing has a number of advantages over independent VDOM routing. These benefits include:
- Freed-up physical interfaces
- More speed than physical interfaces
- Continued support for secure firewall policies
- Configuration flexibility
Freed-up physical interfaces
Tying up physical interfaces on the FortiGate unit presents a problem. With a limited number of interfaces available, configuration options for the old style of communication between VDOMs are very limited. VLANs can be an answer to this, but they have some limitations.
For example, the FortiGate-800 has 8 physical ethernet ports. If they are assigned 2 per VDOM (one each for external and internal traffic) there can only be 4 VDOMs at most configured, not the 10 VDOMs the license will allow. Adding even one additional interface per VDOM to be used to communicate between VDOMs leaves only 2 VDOMs for that configuration, since it would required 9 interfaces for 3 VDOMs. Even using one physical interface for both external traffic and inter-VDOM communication would severely lower the available bandwidth for external traffic on that interface.
With the introduction of inter-VDOM routing, traffic can travel between VDOMs internally, freeing up physical interfaces for external traffic. Using the above example we can use the 4 VDOM configuration and all the interfaces will have their full bandwidth.
More speed than physical interfaces
Internal interfaces are faster than physical interfaces. Their speed depends on the FortiGate unit CPU and its load. That means that an inter-VDOM link interface will be faster than a outbound physical interface connected to another inbound physical interface.
Inter-VDOM links are CPU bound, and cannot be part of an accelerated pair of interfaces.
However, while one virtual interface with normal traffic would be considerably faster than on a physical interface, the more traffic and more internal interfaces you configure, the slower they will become until they are slower than the physical interfaces. CPU load can come from other sources such as AV or content scanning. This produces the same effect—internal interfaces such as inter-VDOM links will be slower.
Continued support for secure firewall policies
VDOMs help to separate traffic based on your needs. This is an important step in satisfying regulations that require proof of secure data handling. This is especially important to health, law, accounting, and other businesses that handle sensitive data every day.
By keeping things separate, traffic has to leave the FortiGate unit and re-enter to change VDOMs. This forces traffic to go through the firewall when leaving and enter through another firewall, keeping traffic secure.
With inter-VDOM routing, the need for the physical interfaces is greatly reduced. However, firewall policies still need to be in place for traffic to pass through any interface, physical or virtual, and thus provide the same level of security both internally and externally. Configuration of firewall policies is the same for inter-VDOM links as for any other interface, and your data will continue to have the high level of security.
Configuration flexibility
A typical VDOM uses at least two interfaces, typically physical interfaces, one for internal and one for external traffic. Depending on the configuration, more interfaces may be required. This means that the maximum number of VDOMs configurable on a FortiGate unit using physical interfaces is the number of interfaces available divided by two. VLANs can increase the number by providing multiple virtual interfaces over a single physical interface, but VLANs have some limitations. Using physical interfaces for inter-VDOM communication therefore limits the number of possible configurations on your FortiGate unit.
To overcome this limitation, inter-VDOM links can be created within the FortiGate unit. Using virtual interfaces, inter-VDOM links free up the physical interfaces for external traffic. Using VDOM links on a FortiGate unit with 8 physical interfaces, you can have 4 VDOMs communicating with each other (meshed configuration) and continue to have 2 physical interfaces each for internal and external connections. This configuration would have required 20 physical interfaces without inter-VDOM routing. With inter-VDOM routing it only requires 8 physical interfaces, with the other 12 interfaces being internal VDOM links.
Inter-VDOM routing allows you to make use of Standalone VDOM configuration, Management VDOM configuration, and Meshed VDOM configuration without being limited by the number of physical interfaces on your FortiGate unit.
Getting started with VDOM links
Once VDOMs are configured on your FortiGate unit, configuring inter-VDOM routing and VDOM-links is very much like creating a VLAN interface. VDOM-links are managed through the web-based manager or CLI. In the web-based manager, VDOM link interfaces are managed in the network interface list.
This section includes the following topics:
Viewing VDOM links
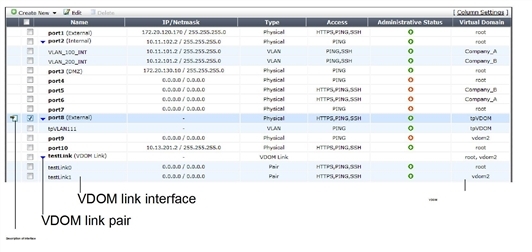
VDOM links are displayed on the network interface list in the web-based manager. You can view VDOM links only if you are using a super_admin account and in global configuration.
To view the network interface list, in the Global menu go to System > Network > Interfaces.
Interface list displaying interface names and information
| Create New | Select the arrow to create a new interface or VDOM link. Interface options include VLAN, Aggregate, Redundant, or loopback interfaces. For more information, see Creating VDOM links. |
| Edit | Select to change interface configuration for the selected interface. This option not available if no interfaces or multiple interfaces are selected. |
| Delete | Select to remove an interface from the list. One or more interfaces must be selected for this option to be available. You cannot delete permanent physical interfaces, or any interfaces that have configuration referring to them. See Deleting VDOM links or see Deleting an interface. |
| Column Settings | Select to change which information is displayed about the interfaces, and in which order the columns appear. Use to display VDOM, VLAN, and other information. |
| Checkbox | Select the checkbox for an interface to edit or delete that interface. Select multiple interfaces to delete those interfaces. Optionally select the check box at the top of the column to select or unselect all checkboxes. |
| Name | The name of the interface. The name of the VDOM link ( vlink1) has an expand arrow to display or hide the pair of VDOM link interfaces. For more information, see Viewing VDOM links. |
| IP/Netmask | The IP address and netmask assigned to this interface. |
| Type | The type of interface such as physical, VLAN, or VDOM link pair. |
| Access | The protocols allowed for administrators to connect to the FortiGate unit. |
| Administrative Status | The status of this interface, either set to up (active) or down (disabled). |
| Virtual Domain | The virtual domain this interface belongs to. For more information on VDOMs, see Virtual Domains in NAT/Route mode. |
Creating VDOM links
VDOM links connect VDOMs together to allow traffic to pass between VDOMs as per firewall policies. Inter-VDOM links are virtual interfaces that are very similar to VPN tunnel interfaces except inter-VDOM links do not require IP addresses. See IP addresses and inter-VDOM links.
To create a VDOM link, you first create the point-to-point interface, and then bind the two interface objects associated with it to the virtual domains.
In creating the point-to-point interface, you also create two additional interface objects by default. They are called vlink10 and vlink11 - the interface name you chose with a 1 or a 0 to designate the two ends of the link.
Once the interface objects are bound, they are treated like normal FortiGate interfaces and need to be configured just like regular interfaces.
The assumptions for this example are as follows:
- Your FortiGate unit has VDOMs enabled and you have 2 VDOMs called
customer1andcustomer2already configured. For more information on configuring VDOMs see Configuring Virtual Domains. - You are using a super_admin account
To configure an inter-VDOM link - web-based manager:
- Go to Global > Network > Interfaces.
- Select Create New > VDOM link, enter the following information, and select OK.
| Name | vlink1 (The name can be up to 11 characters long. Valid characters are letters, numbers, “-”, and “_”. No spaces are allowed.) |
|
| Interface #0 | ||
| Virtual Domain | customer1 | |
| IP/Netmask | 10.11.12.13/255.255.255.0 | |
| Administrative Access | HTTPS, SSL | |
| Interface #1 | ||
| Virtual Domain | customer2 | |
| IP/Netmask | 172.120.100.13/255.255.255.0 | |
| Administrative Access | HTTPS, SSL | |
To configure an inter-VDOM link - CLI:
config global
config system vdom-link
edit vlink1
end
config system interface
edit vlink10
set vdom customer1
next
edit vlink11
set vdom customer2
end
Once you have created and bound the interface ends to VDOMs, configure the appropriate firewall policies and other settings that you require. To confirm the inter-VDOM link was created, find the VDOM link pair and use the expand arrow to view the two VDOM link interfaces. You can select edit to change any information.
IP addresses and inter-VDOM links
Besides being virtual interfaces, here is one main difference between inter-VDOM links and regular interfaces— default inter-VDOM links do not require IP addresses. IP addresses are not required by default because an inter-VDOM link is an internal connection that can be referred to by the interface name in firewall policies, and other system references. This introduces three possible situations with inter-VDOM links that are:
- unnumbered - an inter-VDOM link with no IP addresses for either end of the tunnel
- half numbered - an inter-VDOM link with one IP address for one end and none for the other end
- full numbered - an inter-VDOM link with two IP addresses, one for each end.
Not using an IP address in the configuration can speed up and simplify configuration for you. Also you will not use up all the IP addresses in your subnets if you have many inter-VDOM links.
Half or full numbered interfaces are required if you are doing NAT, either SNAT or DNAT as you need an IP number on both ends to translate between.
You can use unnumbered interfaces in static routing, by naming the interface and using 0.0.0.0 for the gateway. Running traceroute will not show the interface in the list of hops. However you can see the interface when you are sniffing packets, which is useful for troubleshooting.
Deleting VDOM links
When you delete the VDOM link, the two link objects associated with it will also be deleted. You cannot delete the objects by themselves. The example uses a VDOM routing connection called “vlink1”. Removing vlink1 will also remove its two link objects vlink10 and vlink11.
|
|
Before deleting the VDOM link, ensure all policies, firewalls, and other configurations that include the VDOM link are deleted, removed, or changed to no longer include the VDOM link. |
To remove a VDOM link - web-based manager:
- Go to Global > Network > Interfaces.
- Select Delete for the VDOM link vlink1.
To remove a VDOM link - CLI:
config global
config system vdom-link
delete vlink1
end
For more information, see the FortiGate CLI Reference.
NAT to Transparent VDOM links
Inter-VDOM links can be created between VDOMs in NAT mode and VDOMs in Transparent mode, but it must be done through the CLI, as the VDOM link type must be changed from the default PPP to Ethernet for the two VDOMs to communicate. The below example assumes one vdom is in NAT mode and one is Transparent.
|
|
An IP address must be assigned to the NAT VDOM’s interface, but no IP address should be assigned to the Transparent VDOM’s interface. |
To configure a NAT to Transparent VDOM link - CLI:
config global
config system vdom-link
edit vlink1
set type ethernet
end
config system interface
edit vlink10
set vdom (interface 1 name)
set ip (interface 1 ip)
next
edit vlink11
set vdom (interface 2 name)
end
Ethernet-type is not recommended for standard NAT to NAT inter-VDOM links, as the default PPP-type link does not require the VDOM links to have addresses, while Ethernet-type does. VDOM link addresses are explained in IP addresses and inter-VDOM links.
Inter-VDOM configurations
By using fewer physical interfaces to inter-connect VDOMs, inter-VDOM links provide you with more configuration options.
None of these configurations use VLANs to reduce the number of physical interfaces. It is generally assumed that an internal or client network will have its own internal interface and an external interface to connect to its ISP and the Internet.
These inter-VDOM configurations can use any FortiGate model with possible limitations based on the number of physical interfaces. VLANs can be used to work around these limitations.
In the following inter-VDOM diagrams, red indicates the physical FortiGate unit, grey indicate network connections external to the FortiGate unit, and black is used for inter-VDOM links and VDOMs.
This section includes the following topics:
- Standalone VDOM configuration
- Independent VDOMs configuration
- Management VDOM configuration
- Meshed VDOM configuration
Standalone VDOM configuration
The standalone VDOM configuration uses a single VDOM on your FortiGate unit — the root VDOM that all FortiGate units have by default. This is the VDOM configuration you are likely familiar with. It is the default configuration for FortiGate units before you create additional VDOMs.
Standalone VDOM
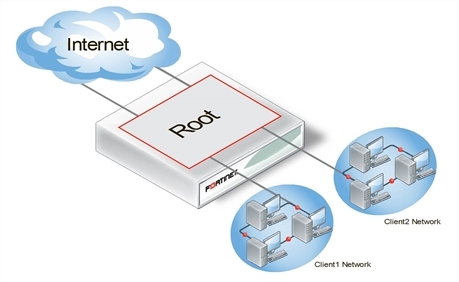
The configuration shown above has no VDOM inter-connections and requires no special configurations or settings.
The standalone VDOM configuration can be used for simple network configurations that only have one department or one company administering the connections, firewalls and other VDOM-dependent settings.
However, with this configuration, keeping client networks separate requires many interfaces, considerable firewall design and maintenance, and can quickly become time consuming and complex. Also, configuration errors for one client network can easily affect other client networks, causing unnecessary network downtime.
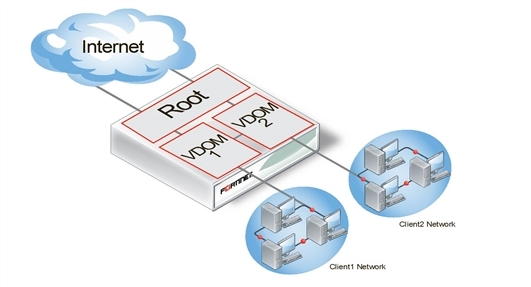
Independent VDOMs configuration
The independent VDOMs configuration uses multiple VDOMs that are completely separate from each other. This is another common VDOM configuration.
Independent VDOMs
This configuration has no communication between VDOMs and apart from initially setting up each VDOM, it requires no special configurations or settings. Any communication between VDOMs is treated as if communication is between separate physical devices.
The independent inter-VDOM configuration can be used where more than one department or one company is sharing the FortiGate unit. Each can administer the connections, firewalls and other VDOM-dependent settings for only its own VDOM. To each company or department, it appears as if it has its own FortiGate unit. This configuration reduces the amount of firewall configuration and maintenance required by dividing up the work.
However, this configuration lacks a management VDOM for VDOMs 1, 2, and 3. This is illustrated in Figure 50. This management VDOM would enable an extra level of control for the FortiGate unit administrator, while still allowing each company or department to administer its own VDOM.
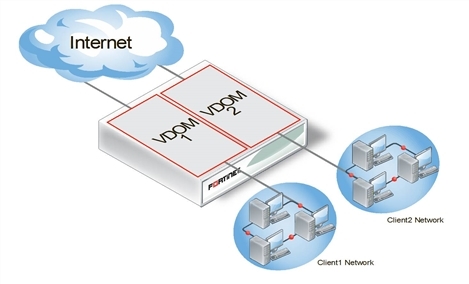
Management VDOM configuration
In the management VDOM configuration, the root VDOM is the management VDOM. The other VDOMs are connected to the management VDOM with inter-VDOM links. There are no other inter-VDOM connections.
Management VDOM configuration
The inter-VDOM links connect the management VDOM to the other VDOMs. This does not require any physical interfaces, and the bandwidth of inter-VDOM links can be faster than physical interfaces, depending on the CPU workload.
Only the management VDOM is connected to the Internet. The other VDOMs are connected to internal networks. All external traffic is routed through the management VDOM using inter-VDOM links and firewall policies between the management VDOM and each VDOM. This ensures the management VDOM has full control over access to the Internet, including what types of traffic are allowed in both directions. There is no communication directly between the non-root VDOMs. Security is greatly increased with only one point of entry and exit. Only the management VDOM needs to be fully managed to ensure network security in this case. Each client network can manage its own configuration without compromising security or bringing down another client network.
The management VDOM configuration is ideally suited for a service provider business. The service provider administers the management VDOM with the other VDOMs as customers. These customers do not require a dedicated IT person to manage their network. The service provider controls the traffic and can prevent the customers from using banned services and prevent Internet connections from initiating those same banned services. One example of a banned service might be Instant Messaging (IM) at a company concerned about intellectual property. Another example could be to limit bandwidth used by file-sharing applications without banning that application completely. Firewall policies control the traffic between the customer VDOM and the management VDOM and can be customized for each customer.
The management VDOM configuration is limited in that the customer VDOMs have no inter-connections. In many situations this limitation is ideal because it maintains proper security. However, some configurations may require customers to communicate with each other, which would be easier if the customer VDOMs were inter-connected.
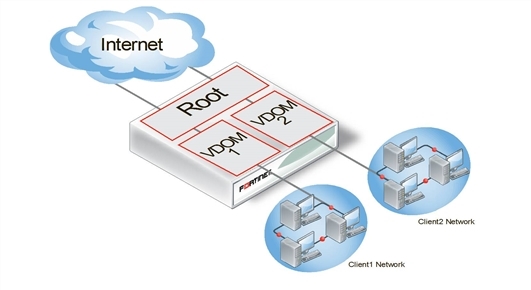
Meshed VDOM configuration
The meshed VDOMs configuration, including partial and full mesh, has VDOMs inter-connected with other VDOMs. There is no special feature to accomplish this—they are just complex VDOM configurations.
Partial mesh means only some VDOMs are inter-connected. In a full mesh configuration, all VDOMs are inter-connected to all other VDOMs. This can be useful when you want to provide full access between VDOMs but handle traffic differently depending on which VDOM it originates from or is going to.
Meshed VDOMs
With full access between all VDOMs being possible, it is extra important to ensure proper security. You can achieve this level of security by establishing extensive firewall policies and ensuring secure account access for all administrators and users.
Meshed VDOM configurations can become complex very quickly, with full mesh VDOMs being the most complex. Ensure this is the proper solution for your situation before using this configuration. Generally, these configurations are seen as theoretical and are rarely deployed in the field.
Dynamic routing over inter-VDOM links
BGP is supported over inter-VDOM links. Unless otherwise indicated, routing works as expected over inter-VDOM links.
If an inter-VDOM link has no assigned IP addresses to it, it may be difficult to use that interface in dynamic routing configurations. For example BGP requires an IP address to define any BGP router added to the network.
In OSPF, you can configure a router using a router ID and not its IP address. In fact, having no IP address avoids possible confusing between which value is the router ID and which is the IP address. However for that router to become adjacent with another OSPF router it will have to share the same subnet, which is technically impossible without an IP address. For this reason, while you can configure an OSPF router using an IP-less inter-VDOM link, it will likely be of limited value to you.
In RIP the metric used is hop count. If the inter-VDOM link can reach other nodes on the network, such as through a default route, then it may be possible to configure a RIP router on an inter-VDOM link. However, once again it may be of limited value due to limitations.
As stated earlier, BGP requires an IP address to define a router — an IP-less inter-VDOM link will not work with BGP.
In Multicast, you can configure an interface without using an IP address. However that interface will be unable to become an RP candidate. This limits the roles available to such an interface.
HA virtual clusters and VDOM links
FortiGate HA is implemented by configuring two or more FortiGate units to operate as an HA cluster. To the network, the HA cluster appears to function as a single FortiGate unit, processing network traffic and providing normal security services such as firewall, VPN, IPS, virus scanning, web filtering, and spam filtering.
Virtual clustering extends HA features to provide failover protection and load balancing for a FortiGate unit operating with virtual domains. A virtual cluster consists of a cluster of two FortiGate units operating with virtual domains. Traffic on different virtual domains can be load balanced between the cluster units.
With virtual clusters (vclusters) configured, inter-VDOM links must be entirely within one vcluster. You cannot create links between vclusters, and you cannot move a VDOM that is linked into another virtual cluster. If your FortiGate units are operating in HA mode, with multiple vclusters when you create the vdom-link, the CLI command config system vdom-link includes an option to set which vcluster the link will be in.
What is virtual clustering?
Virtual clustering is an extension of the FGCP for FortiGate units operating with multiple VDOMS enabled. Virtual clustering operates in active-passive mode to provide failover protection between two instances of a VDOM operating on two different cluster units. You can also operate virtual clustering in active-active mode to use HA load balancing to load balance sessions between cluster units. Alternatively, by distributing VDOM processing between the two cluster units you can also configure virtual clustering to provide load balancing by distributing sessions for different VDOMs to each cluster unit.
Virtual clustering and failover protection
Virtual clustering operates on a cluster of two (and only two) FortiGate units with VDOMs enabled. Each VDOM creates a cluster between instances of the VDOMs on the two FortiGate units in the virtual cluster. All traffic to and from the VDOM stays within the VDOM and is processed by the VDOM. One cluster unit is the primary unit for each VDOM and one cluster unit is the subordinate unit for each VDOM. The primary unit processes all traffic for the VDOM. The subordinate unit does not process traffic for the VDOM. If a cluster unit fails, all traffic fails over to the cluster unit that is still operating.
Virtual clustering and heartbeat interfaces
The HA heartbeat provides the same HA services in a virtual clustering configuration as in a standard HA configuration. One set of HA heartbeat interfaces provides HA heartbeat services for all of the VDOMs in the cluster. You do not have to add a heartbeat interface for each VDOM.
Virtual clustering and HA override
For a virtual cluster configuration, override is enabled by default for both virtual clusters when you:
- Enable VDOM portioning from the web-based manager by moving virtual domains to virtual cluster 2
- Enter set vcluster2 enable from the CLI config system ha command to enable virtual cluster 2.
Usually you would enable virtual cluster 2 and expect one cluster unit to be the primary unit for virtual cluster 1 and the other cluster unit to be the primary unit for virtual cluster 2. For this distribution to occur override must be enabled for both virtual clusters. Otherwise you will need to restart the cluster to force it to renegotiate.
Virtual clustering and load balancing or VDOM partitioning
There are two ways to configure load balancing for virtual clustering. The first is to set the HA mode to active-active. The second is to configure VDOM partitioning. For virtual clustering, setting the HA Mode to active-active has the same result as active-active HA for a cluster without virtual domains. The primary unit receives all sessions and load balances them among the cluster units according to the load balancing schedule. All cluster units process traffic for all virtual domains.
Note: If override is enabled the cluster may renegotiate too often. You can choose to disable override at any time. If you decide to disable override, for best results, you should disable it for both cluster units.
In a VDOM partitioning virtual clustering configuration, the HA mode is set to active-passive. Even though virtual clustering operates in active-passive mode you can configure a form of load balancing by using VDOM partitioning to distribute traffic between both cluster units. To configure VDOM partitioning you set one cluster unit as the primary unit for some virtual domains and you set the other cluster unit as the primary unit for other virtual domains. All traffic for a virtual domain is processed by the primary unit for that virtual domain. You can control the distribution of traffic between the cluster units by adjusting which cluster unit is the primary unit for each virtual domain.
For example, you could have 4 VDOMs, two of which have a high traffic volume and two of which have a low traffic volume. You can configure each cluster unit to be the primary unit for one of the high volume VDOMs and one of the low volume VDOMs. As a result each cluster unit will be processing traffic for a high volume VDOM and a low volume VDOM, resulting in an even distribution of traffic between the cluster units. You can adjust the distribution at any time. For example, if a low volume VDOM becomes a high volume VDOM you can move it from one cluster unit to another until the best balance is achieved. From the web-based manager you configure VDOM partitioning by setting the HA mode to active-passive and distributing virtual domains between Virtual Cluster 1 and Virtual Cluster 2. You can also configure different device priorities, port monitoring, and remote link failover, for Virtual Cluster 1 and Virtual Cluster 2.
From the CLI you configure VDOM partitioning by setting the HA mode to a-p. Then you configure device priority, port monitoring, and remote link failover and specify the VDOMs to include in virtual cluster 1. You do the same for virtual cluster 2 by entering the config secondary-vcluster command.
Failover protection does not change. If one cluster unit fails, all sessions are processed by the remaining cluster unit. No traffic interruption occurs for the virtual domains for which the still functioning cluster unit was the primary unit. Traffic may be interrupted temporarily for virtual domains for which the failed unit was the primary unit while processing fails over to the still functioning cluster unit. If the failed cluster unit restarts and rejoins the virtual cluster, VDOM partitioning load balancing is restored.
Example of inter-VDOM routing
This example shows how to configure a FortiGate unit to use inter-VDOM routing.
This section contains the follow topics:
- Network topology and assumptions
- Creating the VDOMs
- Configuring the physical interfaces
- Configuring the VDOM links
- Configuring the firewall and Security Profile settings
- Testing the configuration
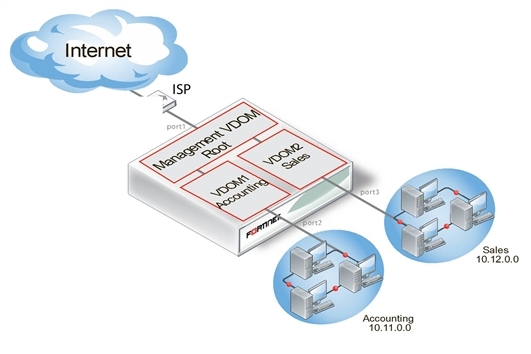
Network topology and assumptions
Two departments of a company, Accounting and Sales, are connected to one FortiGate‑800 unit. To do its work, the Sales department receives a lot of email from advertising companies that would appear to be spam if the Accounting department received it. For this reason, each department has its own VDOM to keep firewall policies and other configurations separate. A management VDOM makes sense to ensure company policies are followed for traffic content.
The traffic between Accounting and Sales will be email and HTTPS only. It could use a VDOM link for a meshed configuration, but we will keep from getting too complex. With the configuration, inter-VDOM traffic will have a slightly longer path to follow than normal—from one department VDOM, through the management VDOM, and back to the other department VDOM. Since inter-VDOM links are faster than physical interfaces, this longer path should not be noticed.
Firewall policies will be in place. For added security, firewall policies will allow only valid office services such as email, web browsing, and FTP between either department and the Internet. Any additional services that are required can be added in the future.
The company uses a single ISP to connect to the Internet. The ISP uses DHCP to provide an IP address to the FortiGate unit. Both departments use the same ISP to reach the Internet.
Other assumptions for this example are as follows:
- Your FortiGate unit has interfaces labelled port1 through port4 and VDOMs are not enabled.
- You are using the super_admin account.
- You have the FortiClient application installed.
- You are familiar with configuring interfaces, firewalls, and other common features on your FortiGate unit.
Management VDOM for two departments
General configuration steps
This example includes the following general steps. For best results, follow the steps in the order given. Also, note that if you perform any additional actions between procedures, your configuration may have different results.
- Creating the VDOMs
- Configuring the physical interfaces
- Configuring the VDOM links
- Configuring the firewall and Security Profile settings
- Testing the configuration
Creating the VDOMs
This procedure enables VDOMs and creates the Sales and Accounting VDOMs.
To create the VDOMs - web-based manager:
- Log in as the super_admin administrator.
- Go to System > Dashboard > Status > System Information > Virtual Domain, and select Enable.
- Log in again.
- Go to System > VDOM > VDOM.
- Select Create New, enter
Accountingfor the VDOM Name, and select OK. - Select Create New, enter
Salesfor the VDOM Name, and select OK.
To create the VDOMs - CLI:
config system global
set vdom enable
end
config system vdom
edit Accounting
next
edit Sales
next
end
Configuring the physical interfaces
Next, the physical interfaces must be configured. This example uses three interfaces on the FortiGate unit - port2 (internal), port3(dmz), and port1(external). port2 and port3 interfaces each have a department’s network connected. port1 is for all traffic to or from the Internet and will use DHCP to configure its IP address, which is common with many ISPs.
To configure the physical interfaces - web-based manager:
- Go to Global > Network > Interfaces.
- Select Edit for the port2 interface, enter the following information, and select OK.
| Alias | AccountingLocal |
| Virtual Domain | Accounting |
| Addressing mode | Manual |
| IP/Netmask | 172.100.1.1/255.255.0.0 |
| Administrative Access | HTTPS, PING, SSH |
| Description | This is the accounting department internal interface. |
- Select Edit for the port3 interface, enter the following information, and select OK.
| Alias | SalesLocal |
| Virtual Domain | Sales |
| Addressing mode | Manual |
| IP/Netmask | 192.168.1.1/255.255.0.0 |
| Administrative Access | HTTPS, PING, SSH |
| Description | This is the sales department internal interface. |
- Select Edit for the port1 interface, enter the following information, and select OK.
| Alias | ManagementExternal |
| Virtual Domain | root |
| Addressing Mode | DHCP |
| Distance | 5 |
| Retrieve default gateway from server | Enable |
| Override internal DNS | Enable |
| Administrative Access | HTTPS, SSH, SNMP |
| Description | This is the accounting department internal interface. |
|
|
When the mode is set to DHCP or PPoE on an interface you can set the distance field. This is the administrative distance for any routes learned through the gateway for this interface. The gateway is added to the static route table with these values. A lower distance indicates a preferred route. |
To configure the physical interfaces - CLI:
config global
config system interface
edit port2
set alias AccountingLocal
set vdom Accounting
set mode static
set ip 172.100.1.1 255.255.0.0
set allowaccess https ping ssh
set description "The accounting dept internal interface"
next
edit port3
set alias SalesLocal
set vdom Sales
set mode static
set ip 192.168.1.1 255.255.0.0
set allowaccess https ping ssh
set description "The sales dept. internal interface"
next
edit port1
set alias ManagementExternal
set vdom root
set mode DHCP
set distance 5
set gwdetect enable
set dns-server-override enable
set allowaccess https ssh snmp
set description “The systemwide management interface.”
end
Configuring the VDOM links
To complete the connection between each VDOM and the management VDOM, you need to add the two VDOM links; one pair is the Accounting - management link and the other is for Sales - management link.
When configuring inter-VDOM links, you do not have to assign IP addresses to the links unless you are using advanced features such as dynamic routing that require them. Not assigning IP addresses results in faster configuration, and more available IP addresses on your networks.
If you require them, or if you simply want to assign IP addresses for clarity can do so.
To configure the Accounting and management VDOM link - web-based manager:
- Go to Global > Network > Interfaces.
- Select the expand arrow to select Create New > VDOM link.
- Enter the following information, and select OK.
| Name | AccountVlnk | |
| Interface #0 | ||
| Virtual Domain | Accounting | |
| IP/Netmask | 0.0.0.0/0.0.0.0 | |
| Administrative Access | HTTPS, PING, SSH | |
| Description | The Accounting VDOM side of the link. | |
| Interface #1 | ||
| Virtual Domain | root | |
| IP/Netmask | 0.0.0.0/0.0.0.0 | |
| Administrative Access | HTTPS, PING, SSH | |
| Description | The Management VDOM side of the link. | |
To configure the Accounting and management VDOM link - CLI:
config global
config system vdom-link
edit AccountVlnk
next
end
config system interface
edit AccountVlnk0
set vdom Accounting
set ip 0.0.0.0 0.0.0.0
set allowaccess https ping ssh
set description “Accounting side of the VDOM link“
next
edit AccountVlnk1
set vdom root
set ip 0.0.0.0 0.0.0.0
set allowaccess https ping ssh
set description “Management side of the VDOM link“
end
To configure the Sales and management VDOM link - web-based manager:
- Go to Global > Network > Interfaces.
- Select the expand arrow and select Create New > VDOM link.
- Enter the following information, and select OK.
| Name | SalesVlnk | |
| Interface #0 | ||
| Virtual Domain | Sales | |
| IP/Netmask | 0.0.0.0/0.0.0.0 | |
| Administrative Access | HTTPS, PING, SSH | |
| Description | The Sales VDOM side of the link. | |
| Interface #1 | ||
| Virtual Domain | root | |
| IP/Netmask | 0.0.0.0/0.0.0.0 | |
| Administrative Access | HTTPS, PING, SSH | |
| Description | The Management VDOM side of the link. | |
To configure the Sales and management VDOM link - CLI:
config global
config system vdom-link
edit SalesVlnk
end
config system interface
edit SalesVlnk0
set vdom Accounting
set ip 0.0.0.0 0.0.0.0
set allowaccess https ping ssh
set description "Sales side of the VDOM link"
next
edit SalesVlnk1
set vdom root
set ip 0.0.0.0 0.0.0.0
set allowaccess https ping ssh
set description "Management side of the VDOM link"
end
end
Configuring the firewall and Security Profile settings
With the VDOMs, physical interfaces, and VDOM links configured the firewall must now be configured to allow the proper traffic. Firewalls are configured per-VDOM, and firewall objects must be created for each VDOM separately.
For this example, the firewall group of services allowed between the internal networks and the Internet are the basic services for web browsing, file transfer, and email. These include: HTTP, HTTPS, SSL, FTP, DNS, NTP, POP3, and SMTP.
The only services allowed between Sales and Accounting are secure web browsing (HTTPS) and email (POP3 and SMTP).
|
|
The limited number of services ensures security between departments. The list of services can be expanded in the future if needed. |
Security profile settings will block all non-essential business websites while logging all web traffic, scan and file filter all web and email protocols, and block game and peer-to-peer applications using application control.
For added security, FortiClient is required on internal computers with AntiVirus scanning configured. This is enforced by Endpoint NAC in firewall policies.
Using firewall addresses makes the firewall policies easier to read. Also if any changes need to be made in the future, you can simply update the addresses without changing the firewall policies. The addresses required are:
AccountingLocal- all traffic from the internal accounting networkAccountingVlnk- all traffic from the VDOM link between accounting and management VDOMsSalesLocal- all traffic from the internal sales networkSalesVlnk- all traffic from the VDOM link between sales and management VDOM.
The Accounting VDOM requires AccountingLocal, AccountingVlnk, and SalesLocal. The Sales VDOM requires SalesLocal, SalesVlnk, and AccountingLocal.
The firewall policies required on the Accounting VDOM are:
- AccountingLocal to Internet
- Internet to AccountingLocal
- SalesLocal to AccountingLocal
- AccountingLocal to SalesLocal
The firewall policies required on the Sales VDOM are:
- SalesLocal to Internet
- Internet to SalesLocal
- SalesLocal to AccountingLocal
- AccountingLocal to SalesLocal
This section includes the following topics:
- Configuring firewall service groups
- Configuring Security Profile settings for the Accounting VDOM
- Configuring firewall settings for the Accounting VDOM
- Configuring Security Profile settings for the Sales VDOM
- Configuring firewall settings for the Sales VDOM
- Configuring firewall settings between the Accounting and Sales VDOMs
Configuring firewall service groups
Service groups are an easy way to manage multiple services, especially if the same services are used on different networks.
The two service groups used here are intended for normal office traffic to the Internet, and for restricted traffic between departments. In both cases network traffic will be limited to the services listed to prevent any potential security risks or bandwidth-robbing applications.
These service groups can be changed as needed to either include additional valid services that are being used on the network, or to exclude services that are not required. Also, custom services can be created as needed for applications that are not listed.
To configure two firewall service groups - web-based manager:
- Open the Accounting VDOM.
- Go to Firewall Objects > Service > Group.
- Select Create New, enter the following information, and select OK.
| Group Name | OfficeServices |
| Members | HTTP, HTTPS, SSL, FTP, DNS, NTP, POP3, PING, SMTP |
- Select Create New, enter the following information, and select OK.
| Group Name | AccountingSalesServices |
| Members | HTTPS, POP3, PING, SMTP |
To configure two firewall service groups - CLI:
config vdom
edit Accounting
config firewall service group
edit OfficeServices
set member HTTP HTTPS SSH FTP DNS NTP POP3 PING SMTP
next
edit AccountingSalesServices
set member HTTPS POP3 PING SMTP
end
end
Configuring Security Profile settings for the Accounting VDOM
Security Profile settings include web filtering, antivirus, application control, and other features. This example just uses those three features to ensure that
- the business environment is free from viruses
- employees do not surf grossly inappropriate websites, and
- employees do not use games or peer-to-peer applications at work.
To configure web filtering for the Accounting VDOM - web-based manager:
- Open the Accounting VDOM.
- Go to Security Profiles > Web Filter > Profile.
- Select Create New.
- Enter
webStrictfor the Name. - Select the arrow to expand the FortiGuard Web Filtering section.
- Block all Categories except Business Oriented, Other, and Unrated.
- Block all Classifications except Image Search..
- Log all Categories and Classifications.
- Select OK.
To configure AntiVirus for the Accounting VDOM - web-based manager:
- Open the Accounting VDOM.
- Go to Security Profiles > AntiVirus > Profile.
- Select Create New.
- Enter
avStrictfor the Name. - Enable Scan for all protocols.
- Enable File filter for all protocols, and select
built-in-patternsfor Option. - Enable logging for both Scan and File Filter.
- Select OK.
To configure application control for the Accounting VDOM - web-based manager:
- Open the Accounting VDOM.
- Go to Security Profiles > Application Control > Application Sensor.
- Select Create New (+ button at top right of page).
- Enter
appStrictfor Name and select OK. - Select Create New.
- In Filters, set Category to game.
- In Applications/Settings, enter the following, and select OK.
| Action | Block |
| Packet Logging | Enable |
- Select Create New.
- In Filters, set Category to p2p.
- In Applications/Settings, enter the following, and select OK.
| Action | Block |
| Packet Logging | Enable |
- Select Apply.
To configure application control for the Accounting VDOM - CLI:
config vdom
edit Accounting
config application list
edit appStrict
config entries
edit 1
set category 2
next
edit 2
set category 8
end
end
end
Configuring firewall settings for the Accounting VDOM
This configuration includes two firewall addresses and two firewall policies for the Accounting VDOM - one for the internal network, and one for the VDOM link with the management VDOM (root).
For added security, all traffic allowed will be scanned. Only valid office traffic will be allowed using the service group OfficeServices. The FortiClient application must be used to ensure additional protection for the sensitive accounting information.
All sales and accounting computers have the FortiClient application installed, so the firewall policies check that FortiClient is installed and that antivirus scanning is enabled.
Note the spelling of AccountVlnk which is due to the eleven character limit on VDOM link names.
To configure firewall addresses - web-based manager:
- Open the Accounting VDOM.
- Select Firewall Objects > Address > Address
- Select Create New, enter the following information, and select OK.
| Address Name | AccountingLocal |
| Type | Subnet/ IP Range |
| Subnet / IP Range | 172.100.0.0 |
| Interface | port1 |
- Select Create New, enter the following information, and select OK.
| Address Name | AccountManagement |
| Type | Subnet/ IP Range |
| Subnet / IP Range | 10.0.1.0 |
| Interface | AccountVlnk |
To configure firewall addresses - CLI:
config vdom
edit Accounting
config firewall address
edit AccountingLocal
set type iprange
set subnet 172.100.0.0
set associated-interface port1
next
edit AccountManagement
set type iprange
set subnet 10.0.1.0
set associated-interface AccountVlnk
end
end
To configure protocol options for Accounting VDOM - web-based manager:
- Open the Accounting VDOM.
- Select Policy > Policy > Protocol Options.
- Select Create New.
- Enter
defaultfor the Name. - Select OK.
To configure the firewall policies from AccountingLocal to the Internet - web-based manager:
- Open the Accounting VDOM.
- Go to Policy > Policy.
- Select Create New, enter the following information, and then select OK.
| Source Interface/Zone | port2 | |
| Source Address | AccountingLocal | |
| Destination Interface/Zone | AccountVlnk | |
| Destination Address | AccountManagement | |
| Schedule | always | |
| Service | OfficeServices | |
| Action | ACCEPT | |
| Enable NAT | enable | |
| Security Features | enabled | |
| Protocol Option | default | |
| Web Filtering | webStrict | |
| AntiVirus Filtering | avStrict | |
| Application Control | appStrict | |
| Enable Endpoint NAC | Enforce_FortiClient_AV | |
- Open the root VDOM.
- Go to Policy > Policy.
- Select Create New, enter the following information, and then select OK.
| Source Interface/Zone | AccountVlnk | |
| Source Address | AccountManagement | |
| Destination Interface/Zone | port2 | |
| Destination Address | all | |
| Schedule | always | |
| Service | OfficeServices | |
| Action | ACCEPT | |
| Enable NAT | enable | |
| Security Features | enabled | |
| Protocol Option | default | |
| Web Filtering | webStrict | |
| AntiVirus Filtering | avStrict | |
| Application Control | appStrict | |
| Enable Endpoint NAC | disabled | |
To configure the firewall policies from AccountingLocal to Internet - CLI:
config vdom
edit Accounting
config firewall policy
edit 1
set srcintf "port2"
set dstintf "AccountVlnk"
set srcaddr "AccountingLocal"
set dstaddr "AccountManagement"
set action accept
set schedule "always"
set service "OfficeServices"
set nat enable
set av-profile avStrict
set webfilter-profile webStrict
set application-list appStrict
set profile-protocol-options default
set endpoint-check enable
set endpoint-profile "FortiClient_installed"
end
end
config vdom
edit root
config firewall policy
edit 2
set srcintf AccountVlnk
set dstintf port1
set srcaddr AccountManagement
set dstaddr all
set action accept
set schedule always
set service OfficeServices
set nat enable
set av-profile "scan"
set webfilter-profile "scan"
set application-list "AppControlList"
set profile-protocol-options default
set endpoint-check disable
end
end
To configure the firewall policies from Internet to AccountingLocal - web-based manager:
- Open the root VDOM.
- Go to Policy > Policy.
- Select Create New, enter the following information, and select OK.
| Source Interface/Zone | port1 | |
| Source Address | all | |
| Destination Interface/Zone | AccountVlnk | |
| Destination Address | AccountManagement | |
| Schedule | always | |
| Service | OfficeServices | |
| Action | ACCEPT | |
| Enable NAT | enable | |
| Security Features | enabled | |
| Protocol Option | default | |
| Web Filtering | webStrict | |
| AntiVirus Filtering | avStrict | |
| Application Control | appStrict | |
| Enable Endpoint NAC | disabled | |
- Open the Accounting VDOM.
- Go to Policy > Policy.
- Select Create New, enter the following information, and select OK.
| Source Interface/Zone | AccountVlnk | |
| Source Address | AccountManagement | |
| Destination Interface/Zone | port2 | |
| Destination Address | AccountingLocal | |
| Schedule | always | |
| Service | OfficeServices | |
| Action | ACCEPT | |
| Enable NAT | enable | |
| Security Features | enabled | |
| Protocol Option | default | |
| Web Filtering | webStrict | |
| AntiVirus Filtering | avStrict | |
| Application Control | appStrict | |
| Enable Endpoint NAC | disabled | |
To configure the firewall policies from Internet to AccountingLocal - CLI:
config vdom
edit root
config firewall policy
edit 3
set srcintf port1
set dstintf AccountVlnk
set srcaddr all
set dstaddr AccountManagement
set action accept
set schedule always
set service OfficeServices
set nat enable
set av-profile avStrict
set webfilter-profile webStrict
set application-list appstrict
set profile-protocol-options default
set endpoint-check disable
end
end
config vdom
edit Accounting
config firewall policy
edit 4
set srcintf AccountVlnk
set dstintf port2
set srcaddr AccountManagement
set dstaddr AccountingLocal
set action accept
set schedule always
set service OfficeServices
set nat enable
set av-profile avStrict
set webfilter-profile webStrict
set application-list appstrict
set profile-protocol-options default
set endpoint-check disable
end
end
Configuring Security Profile settings for the Sales VDOM
Security profile settings include web filtering, antivirus, application control, and other features. This example just uses those three features to ensure that
- the business environment is free from viruses
- employees do not surf grossly inappropriate websites, and
- employees do not use games or peer-to-peer applications at work.
Note that Sales web traffic is different from Accounting, and web filtering is different to account for this.
To configure web filtering for the Sales VDOM - web-based manager:
- Open the Sales VDOM.
- Go to Security Profiles > Web Filter > Profile.
- Select Create New.
- Enter
webStrictfor the Name. - In FortiGuard Categories, select all of the categories except Bandwidth Consuming, General Interest - Business and Unrated.
- In Change Action for Selected Categories select Block.
- Select Apply.
To configure web filtering for the Sales VDOM - CLI:
config vdom
edit Sales
config webfilter profile
edit webStrict
config ftgd-wf
set allow g07 g08 g21 g22 c01 c03
set deny g01 g02 g03 g04 g05 g06 c02 c04 c05 c06 c07
end
set web-ftgd-err-log enable
end
end
To configure AntiVirus for the Sales VDOM - web-based manager:
- Open the Sales VDOM.
- Go to Security Profiles > AntiVirus > Profile.
- Select Create New.
- Enter
avStrictfor the Name. - Enable virus scan for all protocols.
- Select Apply.
To configure AntiVirus for the Sales VDOM - CLI:
config vdom
edit Sales
config antivirus profile
edit "avStrict"
config http
set options scan file-filter
end
config ftp
set options scan file-filter
end
config imap
set options scan file-filter
end
config pop3
set options scan file-filter
end
config smtp
set options scan file-filter
end
config nntp
set options scan file-filter
end
config im
set options scan file-filter
end
set filepattable 1
set av-virus-log enable
set av-block-log enable
end
end
To configure application control for the Sales VDOM - web-based manager:
- Open the Accounting VDOM.
- Go to Security Profiles > Application Control > Application Sensor.
- Select Create New (+ button at top right of page).
- Enter
appStrictfor Name and select OK. - Select Create New.
- In Filters, set Category to game.
- In Applications/Settings, enter the following, and select OK.
| Action | Block |
| Packet Logging | Enable |
- Select Create New.
- In Filters, set Category to p2p.
- In Applications/Settings, enter the following, and select OK.
| Action | Block |
| Packet Logging | Enable |
- Select Apply.
To configure application control for the Sales VDOM - CLI:
config vdom
edit Sales
config application list
edit "appStrict"
config entries
edit 1
set category 2
next
edit 2
set category 8
end
end
end
Configuring firewall settings for the Sales VDOM
Like the Accounting firewall settings, this configuration includes two firewall addresses and two firewall policies for the sales VDOM: one for the internal network, and one for the VDOM link with the management VDOM.
When entering the CLI commands, the number of the firewall policies must be high enough to be a new policy. Depending on the number of firewall policies on your FortiGate unit, this may require starting at a higher number than the 6 required for the default configuration. This number is added automatically when you configure firewall policies using the web manager interface.
The FortiClient application must be used on Sales network computers to ensure additional protection for the sensitive information and for protection against spam.
To configure firewall addresses - web-based manager:
- Open the Sales VDOM.
- Go to Firewall Objects > Address > Address.
- Select Create New, enter the following information, and select OK.
| Address Name | SalesLocal |
| Type | Subnet / IP Range |
| Subnet / IP Range | 172.100.0.0 |
| Interface | port3 |
- Go to Firewall Objects > Addresses.
- Select Create New, enter the following information, and select OK.
| Address Name | SalesManagement |
| Type | Subnet / IP Range |
| Subnet / IP Range | 10.0.1.0 |
| Interface | SalesVlnk |
To configure the firewall addresses - CLI:
config vdom
edit Sales
config fireall address
edit SalesLocal
set type iprange
set subnet 172.100.0.0
set associated-interface port2
next
edit SalesManagement
set type iprange
set subnet 10.0.1.0
set associated-interface SalesVlnk
end
end
To configure the firewall policies from SalesLocal to the Internet - web-based manager:
- Open the Sales VDOM.
- Go to Policy > Policy.
- Select Create New, enter the following information, and select OK.
| Source Interface/Zone | port3 |
| Source Address | SalesLocal |
| Destination Interface/Zone | SalesVlnk |
| Destination Address | SalesManagement |
| Schedule | always |
| Service | OfficeServices |
| Action | ACCEPT |
| Log Allowed Traffic | enabled |
| Enable Endpoint Control Check | disabled |
| Redirect Non-conforming Clients to Download Portal | enabled |
- Open the root VDOM.
- Go to Policy > Policy.
- Select Create New, enter the following information, and select OK.
| Source Interface/Zone | SalesVlnk |
| Source Address | SalesManagement |
| Destination Interface/Zone | external |
| Destination Address | all |
| Schedule | always |
| Service | OfficeServices |
| Action | ACCEPT |
| Protection Profile | scan |
| Log Allowed Traffic | enabled |
| Enable Endpoint Control Check | disabled |
To configure the firewall policies from SalesLocal to the Internet - CLI:
config vdom
edit root
config firewall policy
edit 6
set srcintf port2
set srcaddr SalesLocal
set dstintf SalesVlnk
set dstaddr SalesManagement
set schedule always
set service OfficeServices
set action accept
set profile-status enable
set profile scan
set logtraffic enable
set endpoint-check enable
set endpoint-redir-portal enable
end
end
config vdom
edit Sales
config firewall policy
edit 7
set srcintf SalesVlnk
set srcaddr SalesManagement
set dstintf external
set dstaddr all
set schedule always
set service OfficeServices
set action accept
set profile-status enable
set profile scan
set logtraffic enable
set endpoint-check enable
end
end
To configure the firewall policies from the Internet to SalesLocal - web-based manager:
- Open the root VDOM.
- Go to Policy > Policy.
- Select Create New, enter the following information, and select OK.
| Source Interface/Zone | external |
| Source Address | all |
| Destination Interface/Zone | SalesVlnk |
| Destination Address | SalesManagement |
| Schedule | always |
| Service | OfficeServices |
| Action | ACCEPT |
| Protection Profile | scan |
| Log Allowed Traffic | enabled |
| Enable Endpoint Control Check | disabled |
- Open the Sales VDOM.
- Go to Policy > Policy.
- Select Create New, enter the following information, and select OK.
| Source Interface/Zone | SalesVlnk |
| Source Address | SalesManagement |
| Destination Interface/Zone | port2 |
| Destination Address | SalesLocal |
| Schedule | always |
| Service | OfficeServices |
| Action | ACCEPT |
| Protection Profile | scan |
| Log Allowed Traffic | enabled |
| Enable Endpoint Control Check | disabled |
| Redirect Non-conforming Clients to Download Portal | enabled |
To configure the firewall policies from the Internet to SalesLocal - CLI:
config vdom
edit root
config firewall policy
edit 8
set srcintf external
set srcaddr all
set dstintf SalesVlnk
set dstaddr SalesManagement
set schedule always
set service OfficeServices
set action accept
set profile-status enable
set profile scan
set logtraffic enable
set endpoint-check enable
set endpoint-redir-portal enable
end
end
config vdom
edit Sales
config firewall policy
edit 9
set srcintf SalesVlnk
set srcaddr SalesManagement
set dstintf port2
set dstaddr SalesLocal
set schedule always
set service OfficeServices
set action accept
set profile-status enable
set profile scan
set logtraffic enable
set endpoint-check enable
set endpoint-redir-portal enable
end
end
Configuring firewall settings between the Accounting and Sales VDOMs
Firewall policies are required for any communication between each internal network and the Internet. Policies are also required for the two internal networks to communicate with each other through the management VDOM.
The more limited AccountingSalesServices group of services will be used between Sales and Accounting to ensure the traffic is necessary business traffic only. These policies will result in a partially meshed VDOM configuration. The FortiClient application must be used to ensure additional protection for the sensitive accounting information.
Two firewall policies are required to allow traffic in both directions between Sales and Accounting.
To configure the firewall policy between Sales and Accounting on the management VDOM - web-based manager:
- Open the root VDOM.
- Go to Policy > Policy.
- Select Create New, enter the following information, and select OK.
| Source Interface/Zone | SalesVlnk |
| Source Address | SalesManagement |
| Destination Interface/Zone | AccountVlnk |
| Destination Address | AccountingManagement |
| Schedule | always |
| Service | AccountingSalesServices |
| Action | ACCEPT |
| Protection Profile | scan |
| Log Allowed Traffic | enabled |
| Enable Endpoint Control Check | disabled |
| Redirect Non-conforming Clients to Download Portal | enabled |
- Go to Policy > Policy.
- Select Create New, enter the following information, and select OK.
| Source Interface/Zone | AccountVlnk |
| Source Address | AccountingManagement |
| Destination Interface/Zone | SalesVlnk |
| Destination Address | SalesManagement |
| Schedule | always |
| Service | AccountingSalesServices |
| Action | ACCEPT |
| Protection Profile | scan |
| Log Allowed Traffic | enabled |
| Enable Endpoint Control Check | disabled |
| Redirect Non-conforming Clients to Download Portal | enabled |
To configure the firewall policy between Sales and Accounting on the management VDOM - CLI:
config vdom
edit root
config system firewall policy
edit 9
set srcintf SalesVlnk
set srcaddr SalesManagement
set dstintf AccountVlnk
set dstaddr AccountManagement
set schedule always
set service AccountingSalesServices
set action accept
set profile-status enable
set profile scan
set logtraffic enable
set endpoint-check enable
set endpoint-redir-portal enable
next
edit 10
set srcintf AccountVlnk
set srcaddr AccountManagement
set dstintf SalesVlnk
set dstaddr SalesManagement
set schedule always
set service AccountingSalesServices
set action accept
set profile-status enable
set profile scan
set logtraffic enable
set endpoint-check enable
set endpoint-redir-portal enable
end
end
Testing the configuration
Once the inter-VDOM routing has been configured, tests must be conducted to confirm proper operation. If there are any problems, use the troubleshooting tips to resolve them.
This section includes the following topics:
Testing connectivity
Testing connectivity ensures that physical networking connections as well as FortiGate unit interface configurations, including firewall policies, are properly configured.
The easiest way to test connectivity is to use the ping and traceroute commands to confirm the connectivity of different routes on the network. Include testing:
- from AccountingLocal to Internet
- from Internet to AccountingLocal
- from SalesLocal to Internet
- from Internet to SalesLocal
- from AccountingLocal to SalesLocal.
When using the commands on a Windows computer, go to a command line prompt and enter either ping <IP address> or tracert <IP address>.
When using the commands on a FortiGate unit, go to the CLI and enter either exec ping <IP address> or exec traceroute <IP address>.
Troubleshooting Tips
When there are problems with connectivity, the following troubleshooting tips will help resolve the issues.
- If a multiple hop test, such as traceroute, is not successful then reduce it to a single hop to simplify the test. Test each link of the path to see which hop is down. If all hops are up, check the FortiGate unit policies to ensure they allow basic traffic to flow as expected.
- If ping does not work, confirm that the FortiGate unit interfaces have Ping enabled and also ensure Ping is enabled in the firewall policies. Otherwise the Ping traffic will be blocked.
- If one protocol does not work but others do work, check the FortiGate unit firewall policies for that one protocol to ensure it is allowed.
- If there are unexplained connectivity problems, check the local computer to ensure it does not have a software firewall running that may be blocking traffic. MS Windows computers have a firewall running by default that can cause problems.
For additional troubleshooting, see Troubleshooting Virtual Domains.
Copyright © 2018 Fortinet, Inc. All Rights Reserved. | Terms of Service | Privacy Policy
