
Single Sign-On to Windows AD
The FortiGate unit can authenticate users transparently and allow them network access based on their privileges in Windows AD. This means that users who have logged on to the network are not asked again for their credentials to access network resources through the FortiGate unit, hence the term “Single Sign-On”.
The following topics are included:
- Introduction to Single Sign-On with Windows AD
- Configuring Single Sign On to Windows AD
- FortiOS FSSO log messages
- Testing FSSO
- Troubleshooting FSSO
Introduction to Single Sign-On with Windows AD
Introduced in FortiOS 5.0, Single Sign-On (SSO) support provided by FortiGate polling of domain controllers is simpler than the earlier method that relies on agent software installed on Windows AD network servers. No Fortinet software needs to be installed on the Windows network. The FortiGate unit needs access only to the Windows AD global catalog and event log.
When a Windows AD user logs on at a workstation in a monitored domain, the FortiGate unit
- detects the logon event in the domain controller’s event log and records the workstation name, domain, and user,
- resolves the workstation name to an IP address,
- uses the domain controller’s LDAP server to determine which groups the user belongs to,
- creates one or more log entries on the FortiGate unit for this logon event as appropriate.
When the user tries to access network resources, the FortiGate unit selects the appropriate security policy for the destination. The selection consist of matching the FSSO group or groups the user belongs to with the security policy or policies that match that group. If the user belongs to one of the permitted user groups associated with that policy, the connection is allowed. Otherwise the connection is denied.
Configuring Single Sign On to Windows AD
On the FortiGate unit, security policies control access to network resources based on user groups. With Fortinet Single Sign On, this is also true but each FortiGate user group is associated with one or more Windows AD user groups. This is how Windows AD user groups get authenticated in the FortiGate security policy.
Fortinet Single Sign On sends information about Windows user logons to FortiGate units. If there are many users on your Windows AD domains, the large amount of information might affect the performance of the FortiGate unit.
To configure your FortiGate unit to operate with either a Windows AD or a Novell eDirectory FSSO install, you
- Configure LDAP access to the Windows AD global catalog. See Configuring LDAP server access.
- Configure the LDAP Server as a Single Sign-On server. See Configuring the LDAP Server as a Single Sign-On server.
- Add Active Directory user groups to FortiGate FSSO user groups. See Creating Fortinet Single Sign-On (FSSO) user groups.
- Create security policies for FSSO-authenticated groups. See Creating security policies.
- Optionally, specify a guest protection profile to allow guest access. See Enabling guest access through FSSO security policies
Configuring LDAP server access
The FortiGate unit needs access to the domain controller’s LDAP server to retrieve user group information.
The LDAP configuration on the FortiGate unit not only provides access to the LDAP server, it sets up the retrieval of Windows AD user groups for you to select in FSSO. The LDAP Server configuration (in User & Device > Authentication > LDAP Servers) includes a function to preview the LDAP server’s response to your distinguished name query. If you already know the appropriate Distinguished Name (DN) and User DN settings, you may be able to skip some of the following steps.
To add an LDAP server - web-based manager:
- Go to User & Device > Authentication > LDAP Servers and select Create New.
- Enter the Server IP/Name and Server Port (default 389).
- In the Common Name Identifier field, enter sAMAccountName.The default common name identifier is
cn. This is correct for most LDAP servers. However some servers use other identifiers such asuid. - In the Distinguished Name field, enter your organization distinguished name. In this example, Distinguished Name is dc=techdoc,dc=local
- Select Fetch DN, this will fetch the Windows AD directory.
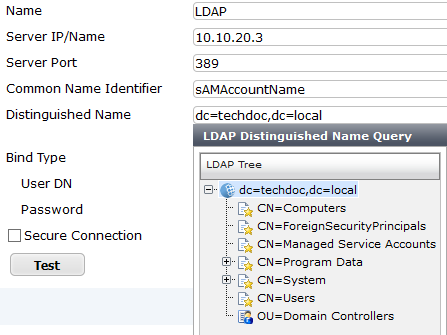
- Set Bind Type to Regular.
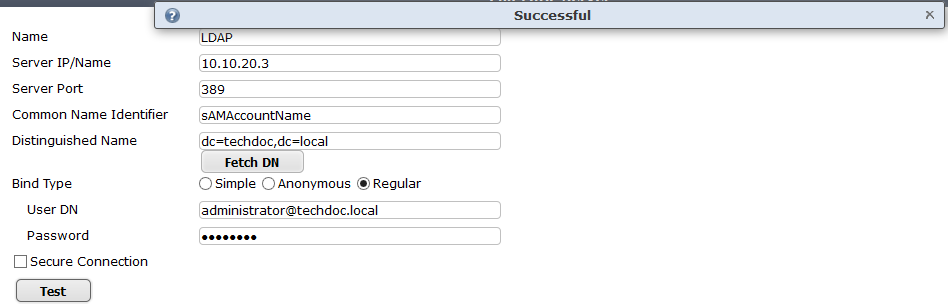
- In the User DN field, enter the administrative account name that you created for FSSO.
For example, if the account is administrator, enter “administrator@techdoc.local”.
- Enter the administrative account password in the Password field.
- Optionally select Secure Connection.
- In the Protocol field, select LDAPS or STARTTLS.
- In the Certificate field, select the appropriate certificate for authentication.
Note that you need to configure the Windows AD for secure connection accordingly.
- Select OK.
- Test your configuration by selecting the Test button. A successful message confirming the right settings appears.
To configure LDAP for FSSO - CLI example:
config user ldap
edit LDAP
set server 10.10.20.3
set cnid sAMAccountName
set dn dc=techdoc,dc=local
set type regular
set username administrator@techdoc.local
set password <your_password>
next
end
Configuring the LDAP Server as a Single Sign-On server
The LDAP server must be added to the FortiGate Single Sign-On configuration.
To add the LDAP server as a Single Sign-On server:
- Go to User & Device > Authentication > Single Sign-On and select Create New.
- Enter
| Type | Poll Active Directory Server |
| Server IP/Name | Server Name or IP address of the Domain Controller |
| User | A Domain user name |
| Password | The user’s password |
| LDAP Server | Select the LDAP server you added earlier. |
| Enable Polling | Select |
- Select OK.
Creating Fortinet Single Sign-On (FSSO) user groups
You cannot use Windows or Novell groups directly in FortiGate security policies. You must create FortiGate user groups of the FSSO type and add Windows or Novell groups to them.
To create a user group for FSSO authentication - web-based manager:
- Go to User & Device > User > User Groups and select Create New.
The New User Group dialog box opens. - In the Name box, enter a name for the group, FSSO_Internet_users for example.
- In Type, select Fortinet Single Sign-On (FSSO).
- In Members, select the required FSSO groups.
- Select OK.
To create the FSSO_Internet-users user group - CLI
config user group
edit FSSO_Internet_users
set group-type fsso-service
set member CN=Engineering,cn=users,dc=office,dc=example,dc=com CN=Sales,cn=users,dc=office,dc=example,dc=com
end
Default FSSO group
SSO_Guest_users is a default user group enabled when FSSO is configured. It allows guest users on the network who do not have an FSSO account to authenticate and have access to network resources. See Enabling guest access through FSSO security policies.
Creating security policies
Policies that require FSSO authentication are very similar to other security policies. Using identity-based policies, you can configure access that depends on the FSSO user group. This allows each FSSO user group to have its own level of access to its own group of services
In this situation, Example.com is a company that has its employees and authentication servers on an internal network. The FortiGate unit intercepts all traffic leaving the internal network and requires FSSO authentication to access network resources on the Internet. The following procedure configures the security policy for FSSO authentication. FSSO is installed and configured including the RADIUS server, FSSO Collector agent, and user groups on the FortiGate
For the following procedure, the internal interface is port1 and the external interface connected to the Internet is port2. There is an address group for the internal network called company_network. The FSSO user group is called fsso_group, and the FSSO RADIUS server is fsso_rad_server.
To configure an FSSO authentication security policy - web-based manager:
- Go to Policy & Objects > Policy > IP4 and select Create New.
- Enter the following information.
| Incoming Interface | port1 |
| Source Address | company_network |
| Source User(s) | fsso_group
|
| Outgoing Interface | port2 |
| Destination Address | all |
| Schedule | always |
| Service | HTTP, HTTPS, FTP, and Telnet |
| Action | ACCEPT |
| NAT | ON |
| UTM Security Profiles | ON for AntiVirus, IPS, Web Filter, and Email Filter, all using default profiles. |
| Log Allowed Traffic | ON. Select Security Events. |
- Select OK.
- Ensure the FSSO authentication policy is higher in the policy list than more general policies for the same interfaces.
To create a security policy for FSSO authentication - CLI:
config firewall policy
edit 0
set srcintf port1
set dstintf port2
set srcaddr company_network
set dstaddr all
set action accept
set groups fsso_group
set schedule always
set service HTTP HTTPS FTP TELNET
set nat enable
end
Here is an example of how this FSSO authentication policy is used. Example.com employee on the internal company network logs on to the internal network using their RADIUS username and password. When that user attempts to access the Internet, which requires FSSO authentication, the FortiGate authentication security policy intercepts the session, checks with the FSSO Collector agent to verify the user’s identity and credentials, and then if everything is verified the user is allowed access to the Internet.
Enabling guest access through FSSO security policies
You can enable guest users to access FSSO security policies. Guests are users who are unknown to Windows AD and servers that do not logon to a Windows AD domain.
To enable guest access in your FSSO security policy, add an identity-based policy assigned to the built-in user group SSO_Guest_Users. Specify the services, schedule and UTM profiles that apply to guest users — typically guests have access to a reduced set of services. See Creating security policies.
FortiOS FSSO log messages
There are two types of FortiOS log messages — firewall and event. FSSO related log messages are generated from authentication events. These include user logon and log off events, and NTLM authentication events. These log messages are central to network accounting policies, and can also be useful in troubleshooting issues. For more information on firewall logging, see Enabling security logging. For more information on logging, see the FortiOS Handbook Logging and Reporting guide.
Enabling authentication event logging
For the FortiGate unit to log events, that specific type of event must be enabled under logging.
When VDOMs are enabled certain options may not be available, such as CPU and memory usage events. You can enable event logs only when you are logged on to a VDOM; you cannot enable event logs globally.
To ensure you log all the events needed, set the minimum log level to Notification or Information. Firewall logging requires Notification as a minimum. The closer to Debug level, the more information will be logged.
To enable event logging:
- Go to Log&Report > Log Config > Log Settings.
- In Event Logging, select
| System activity event | All system-related events, such as ping server failure and gateway status. |
| User activity event | All administration events, such as user logins, resets, and configuration updates. |
- Select Apply.
List of FSSO related log messages
| Message ID | Severity | Description |
|---|---|---|
| 43008 | Notification | Authentication was successful |
| 43009 | Notification | Authentication session failed |
| 43010 | Warning | Authentication locked out |
| 43011 | Notification | Authentication timed out |
| 43012 | Notification | FSSO authentication was successful |
| 43013 | Notification | FSSO authentication failed |
| 43014 | Notification | FSSO user logged on |
| 43015 | Notification | FSSO user logged off |
| 43016 | Notification | NTLM authentication was successful |
| 43017 | Notification | NTLM authentication failed |
For more information on logging, see the FortiOS Handbook Logging and Reporting guide.
Testing FSSO
Once FSSO is configured, you can easily test to ensure your configuration is working as expected. For additional FSSO testing, see Troubleshooting FSSO.
- Logon to one of the stations on the FSSO domain, and access an Internet resource.
- Connect to the CLI of the FortiGate unit, and if possible log the output.
- Enter the following command:diagnose debug authd fsso list
- Check the output. If FSSO is functioning properly you will see something similar to the following:
----FSSO logons----
IP: 192.168.1.230 User: ADMINISTRATOR Groups: VLAD-AD/DOMAIN USERS
IP: 192.168.1.240 User: ADMINISTRATOR Groups: VLAD-AD/DOMAIN USERS
Total number of users logged on: 2
----end of FSSO logons----
The exact information will vary based on your installation.
- Check the FortiGate event log, for FSSO-auth action or other FSSO related events with FSSO information in the message field.
- To check server connectivity, run the following commands from the CLI:
FGT# diagnose debug enable
FGT# diagnose debug authd fsso server-status
FGT# Server Name Connection Status
----------- -----------------
SBS-2003 connected
Troubleshooting FSSO
When installing, configuring, and working with FSSO some problems are quite common. A selection of these problems follows including explanations and solutions.
Some common Windows AD problems include:
- General troubleshooting tips for FSSO
- Users on a particular computer (IP address) can not access the network
- Guest users do not have access to network
General troubleshooting tips for FSSO
The following tips are useful in many FSSO troubleshooting situations.
- Ensure all firewalls are allowing the FSSO required ports through.
FSSO has a number of required ports that must be allowed through all firewalls or connections will fail. These include: ports 139, 389 (LDAP), 445, 636 (LDAP). - Ensure there is at least 64kbps bandwidth between the FortiGate unit and domain controllers. If there is insufficient bandwidth, some FSSO information might not reach the FortiGate unit. The best solution is to configure traffic shaping between the FortiGate unit and the domain controllers to ensure that the minimum bandwidth is always available.
Users on a particular computer (IP address) can not access the network
Windows AD Domain Controller agent gets the username and workstation where the logon attempt is coming from. If there are two computers with the same IP address and the same user trying to logon, it is possible for the authentication system to become confused and believe that the user on computer_1 is actually trying to access computer_2.
Windows AD does not track when a user logs out. It is possible that a user logs out on one computer, and immediate logs onto a second computer while the system still believes the user is logged on the original computer. While this is allowed, information that is intended for the session on one computer may mistakenly end up going to the other computer instead. The result would look similar to a hijacked session.
Solutions
- Ensure each computer has separate IP addresses.
- Encourage users to logout on one machine before logging onto another machine.
- If multiple users have the same username, change the usernames to be unique.
- Shorten timeout timer to flush inactive sessions after a shorter time.
Guest users do not have access to network
A group of guest users was created, but they don’t have access.
Solution
The group of the guest users was not included in a policy, so they do not fall under the guest account. To give them access, associate their group with a security policy.
Additionally, there is a default group called SSO_Guest_Users. Ensure that group is part of an identity-based security policy to allow traffic.
Copyright © 2018 Fortinet, Inc. All Rights Reserved. | Terms of Service | Privacy Policy
