
VLAN Configuration
Using Virtual Local Area Networks (VLANs) allows you to get the most out of using your FortiSwitch unit by using ID tags to logically separate a LAN into smaller broadcast domains. A single LAN can contain many unique VLANs, which allows different policies to be created for different types of users and segments traffic so that it is only sent to and from the intended VLAN.
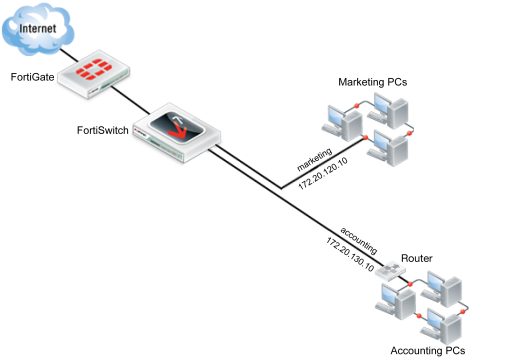
For example, if a company has one LAN which is to be used for both the marketing and the accounting department, this LAN can be segmented into two VLANs. This allows the traffic from each department to be isolated, so information packets sent to the marketing department are only sent on the marketing VLAN. It also allowed different policies to be created, so that security can be increased for the accounting department without also increasing it for the marketing department.
Now that your FortiSwitch unit is managed by your FortiGate unit, a VLAN can be configured on the FortiSwitch, using the FortiGate.
The following instructions will create a VLAN to be used by the marketing team for network and Internet access. The PCs used by the marketing team will connect to ports 3-6 on the FortiSwitch unit.
Setting up a VLAN requires:
- Creating the VLAN.
- Assigning ports on the FortiSwitch unit to the VLAN.
Creating VLANs
Using the web-based manager
Creating the VLAN
- Go to WiFi & Switch Controller > Switch Network > Virtual Switch and select Create New. Change the following settings:
| Name | marketing |
| Color |

|
| IP/Network Mask | 172.20.120.10/255.255.255.0 |
- Enable DHCP Server. Set the IP range to 172.20.120.11-172.20.120.254.
- Select OK.
The entry marketing is now shown on the list of Virtual Switches. A marketing interface has also been added, which can be seen by going to System > Network > Interfaces.
Assigning FortiSwitch Ports to the VLAN
- Go to WiFi & Switch Controller > Managed Devices > Managed FortiSwitch
- Highlight the FortiSwitch unit and select Edit Managed FortiSwitch.
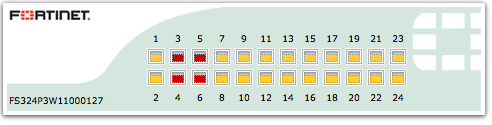
- Click and drag a box around ports 3-6 to select them.
- Select marketing from the Assign to list.
Ports 3-6 on the FortiSwitch have now been assigned to the marketing VLAN and will appear in red.
Using the CLI
- Create the marketing VLAN.
config switch-controller vlan
edit marketing
set color 32
end
- Set the VLAN’s IP address.
config system interface
edit marketing
set ip 172.20.120.14 255.255.255.0
end
- Enable a DHCP Server.
config system dhcp server
edit 1
set default-gateway 172.20.120.10
set dns-service default
set interface marketing
config ip-range
set start-ip 172.20.120.11
set end-ip 172.20.120.254
end
set netmask 255.255.255.0
end
- Assign ports 3-6 to the VLAN.
config switch-controller managed-switch
edit FS224D3W14000370
config ports
edit port3
set vlan marketing
next
edit port4
set vlan marketing
next
edit port5
set vlan marketing
next
edit port6
set vlan marketing
end
end
Setting up a security policy for the VLAN
The following instructions configure a basic security policy for the marketing VLAN that will allow all traffic from the marketing VLAN to have access to the Internet.
Using the web-based manager
- Go to Policy & Objects > Policy > IPv4 and select Create New. Change the following settings:
| Incoming Interface | marketing |
| Source Address | all |
| Outgoing Interface | wan1 |
| Destination Address | all |
| Schedule | always |
| Service | ALL |
| Action | ACCEPT |
| Enable NAT | Enable |
| Logging Options | Log all Sessions |
- Select OK.
With this security policy in place, all computers connected to the marketing VLAN can now access the Internet.
Using the CLI
Create a security policy for the marketing VLAN.
config security policy
edit 2
set srcintf marketing
set dstintf wan1
set srcaddr all
set dstaddr all
set action accept
set schedule always
set service ALL
set logtraffic all
set nat enable
end
Copyright © 2018 Fortinet, Inc. All Rights Reserved. | Terms of Service | Privacy Policy
