
Secure Internet browsing
This example sets up an SSL VPN tunnel that provides remote users the ability to access the Internet while traveling, and ensures that they are not subject to malware and other dangers, by using the corporate firewall to filter all of their Internet traffic. Essentially, the remote user will connect to the corporate FortiGate unit to surf the Internet.
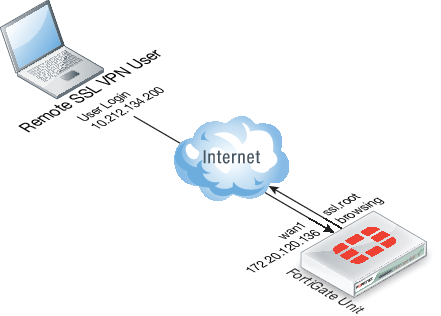
Using SSL VPN and FortiClient SSL VPN software, you create a means to use the corporate FortiGate to browse the Internet safely.
Creating an SSL VPN IP pool and SSL VPN web portal
- Go to VPN > SSL > Portals and select tunnel-access.
- For Source IP Pools select SSLVPN_TUNNEL_ADDR1.
- Select OK.
Creating the SSL VPN user and user group
- Create the SSL VPN user and add the user to a user group configured for SSL VPN use.
- Go to User & Device > User > User Definition and select Create New to add the user:
| User Name | twhite |
| Password | password |
- Select OK.
- Go to User & Device > User > User Groups and select Create New to add
twhiteto a group calledSSL VPN:
| Name | SSL VPN |
| Type | Firewall |
- Move twhite to the Members list.
- Select OK.
Creating a static route for the remote SSL VPN user
Create a static route to direct traffic destined for tunnel users to the SSL VPN tunnel.
- Go to Router > Static > Static Routes and select Create New to add the static route.
For low-end FortiGate units, go to System > Network > Routing and select Create New.
| Destination IP/Mask | 10.212.134.0/255.255.255.0 |
| Device | ssl.root |
|
|
The Destination IP/Mask matches the network address of the remote SSL VPN user. |
- Select OK.
Creating security policies
Create an SSL VPN security policy with SSL VPN user authentication to allow SSL VPN traffic to enter the FortiGate unit. Create a normal security policy from ssl.root to wan1 to allow SSL VPN traffic to connect to the Internet.
|
|
Users and user groups are added to the SSL VPN under VPN > SSL > Settings, by adding a rule to the Authentication/Portal Mapping section. However, you must also add these users and user groups to the SSL VPN security policy. |
- Go to Policy & Objects > Policy > IPv4 and select Create New.
- Add an SSL VPN security policy as below, and click OK.
| Incoming Interface | wan1 |
| Source Address | all |
| Source User(s) | SSL VPN |
| Outgoing Interface | ssl.root |
- Select Create New to add a security policy that allows remote SSL VPN users to connect to the Internet:
| Incoming Interface | ssl.root |
| Source Address | all |
| Source User(s) | SSL VPN |
| Outgoing Interface | wan1 |
| Destination Address | all |
| Schedule | always |
| Service | ALL |
| Action | ACCEPT |
- Select OK.
Configuring authentication rules
- Go to VPN > SSL > Settings and select Create New under Authentication/Portal Mapping.
- Add an authentication rule for the remote user:
| Users/Groups | Tunnel |
| Portal | tunnel-access |
- Select OK and Apply.
Results
Using the FortiClient SSLVPN application, access the VPN using the address https://172.20.120.136:443/ and log in as twhite. Once connected, you can browse the Internet.
From the FortiGate web-based manager, go to VPN > Monitor > SSL-VPN Monitor to view the list of users connected using SSL VPN. The Subsession entry indicates the split tunnel which redirects to the Internet.
Copyright © 2018 Fortinet, Inc. All Rights Reserved. | Terms of Service | Privacy Policy
