
RIP background and concepts
This section contains:
Background
Routing Information Protocol (RIP) is a distance-vector routing protocol intended for small, relatively homogeneous networks. Its widespread use started when an early version of RIP was included with BSD v4.3 Linux as the routed daemon. The routing algorithm used by RIP, the Bellman–Ford algorithm, first saw widespread use as the initial routing algorithm of the ARPANET.
RIP benefits include being well suited to smaller networks, is in widespread use, near universal support on routing hardware, quick to configure, and works well if there are no redundant paths. However, RIP updates are sent out node-by-node so it can be slow to find a path around network outages. RIP also lacks good authentication, can not choose routes based on different quality of service methods, and can create network loops if you are not careful.
The FortiGate implementation of RIP supports RIP version 1 (see RFC 1058), RIP version 2 (see RFC 2453), and the IPv6 version RIPng (see RFC 2080).
RIP v1
In 1988 RIP version 1, defined in RFC 1058, was released. The RFC even states that RIP v1 is based on Linux routed due to it being a “defacto standard”.
It uses classful addressing and uses broadcasting to send out updates to router neighbors. There is no subnet information included in the routing updates in classful routing, and it does not support CIDR addressing — subnets must all be the same size. Also, route summarization is not possible.
RIP v1 has no router authentication method, so it is vulnerable to attacks through packet sniffing, and spoofing.
RIP v2
In 1993, RIP version 2 was developed to deal with the limitations of RIP v1. It was not standardized until 1998. This new version supports classless routing, and subnets of various sizes.
Router authentication was added in RIP v2 — it supports MD5. MD5 hashes are an older encryption method, but this is much improved over no security at all.
In RIP v2 the hop count limit remained at 15 to be backwards compatible with RIP v1.
RIP v2 uses multicasting to send the entire routing table to router neighbors, thereby reducing the traffic for devices that are not participating in RIP routing.
Routing tags were added as well, which allow internal routes or redistributed routes to be identified as such.
RIPng
RIPng, defined in RFC 2080, is an extension of RIP2 designed to support IPv6. However, RIPng varies from RIPv2 in that it is not fully backwards compatible with RIPv1.
- RIPng does not support RIPv1 update authentication, it relies on IPsec
- RIPng does not allow attaching tags to routes as in RIPv2
- RIPng requires specific encoding of the next hop for a set of route entries, unlike RIPv2 that encodes the next-hop into each route entry.
Parts and terminology of RIP
Before you can understand how RIP functions, you need to understand some of the main concepts and parts of RIP.
This section includes:
- RIP and IPv6
- Default information originate option
- Update, Timeout, and Garbage timers
- Authentication and key-chain
- Access Lists
RIP and IPv6
RIP Next Generation (RIPng) is a new version of RIP was released that includes support for IPv6.
The FortiGate unit command config router ripng is almost the same as config router rip, except that IPv6 addresses are used. Also if you are going to use prefix or access lists with RIPng, you must use the config router access-list6 or config prefix-list6 versions of those commands.
If you want to troubleshoot RIPng, it is the same as with RIP but specify the different protocol, and use IPv6 addresses. This applies to commands such as get router info6 when you want to see the routing table, or other related information.
If you want to route IPv4 traffic over an IPv6 network, you can use the command config system ip6-tunnel to configure the FortiGate unit to do this. The IPv6 interface is configured under config system interface. All subnets between the source and destination addresses must support IPv6. This command is not supported in Transparent mode.
For example, you want to set up a tunnel on the port1 interface starting at 2002:C0A8:3201:: on your local network and tunnel it to address 2002:A0A:A01:: where it will need access to an IPv4 network again. Use the following command:
config system ipv6-tunnel
edit test_tunnel
set destination 2002:A0A:A01::
set interface port1
set source 2002:C0A8:3201::
end
end
The CLI commands associated with RIPng include:
config router ripng
config router access-list6
config router prefix-list6
config system ipv6-tunnel
get router info6 *
Default information originate option
This is the second advanced option for RIP in the web-based manager, right after metric. Enabling default-information-originate will generate and advertise a default route into the FortiGate unit’s RIP-enabled networks. The generated route may be based on routes learned through a dynamic routing protocol, routes in the routing table, or both. RIP does not create the default route unless you use the always option.
Select Disable if you experience any issues or if you wish to advertise your own static routes into RIP updates.
You can enable or disable default-information-originate in Router > Dynamic > RIP, under Advanced Options, or use the CLI.
The CLI commands associated with default information originate include:
config router rip
set default-information-originate
end
Update, Timeout, and Garbage timers
RIP uses various timers to regulate its performance including an update timer, a timeout timer, and a garbage timer. The FortiGate unit default timer settings (30, 180, and 120 seconds respectively) are effective in most configurations — if you change these settings, ensure that the new settings are compatible with local routers and access servers.
|
|
The Timeout period should be at least three times longer than the Update period. If the Update timer is smaller than Timeout or Garbage timers, you will experience an error. |
You can set the three RIP timers in Router > Dynamic > RIP, under Advanced Options, or use the CLI.
The CLI commands associated with garbage, timeout, and update timers include:
config router rip
set timeout-timer
set update-timer
set garbage-timer
end
Update timer
The update timer determines the interval between routing updates. Generally, this value is set to 30 seconds. There is some randomness added to help prevent network traffic congestion, which could result from all routers simultaneously attempting to update their neighbors. The update timer should be at least three times smaller than the timeout timer, otherwise you will experience an error.
If you are experiencing significant RIP traffic on your network, you can increase this interval to send fewer updates per minute. However, ensure you increase the interval for all the routers on your network or you will experience time outs that will degrade your network speed.
Timeout timer
The timeout timer is the maximum amount of time (in seconds) that a route is considered reachable while no updates are received for the route. This is the maximum time the FortiGate unit will keep a reachable route in the routing table while no updates for that route are received. If the FortiGate unit receives an update for the route before the timeout period expires, the timer is restarted. The timeout period should be at least three times longer than the depute period, otherwise you will experience an error.
If you are experiencing problems with routers not responding in time to updates, increase this timer. However, remember that longer timeout intervals result in longer overall update periods — it may be considerable time before the time the FortiGate unit is done waiting for all the timers to expire on unresponsive routes.
Garbage timer
The garbage timer is the amount of time (in seconds) that the FortiGate unit will advertise a route as being unreachable before deleting the route from the routing table. If this timer is shorter, it will keep more up-to-date routes in the routing table and remove old ones faster. This will result in a smaller routing table which is useful if you have a very large network, or if your network changes frequently.
Authentication and key-chain
RIP version 2 uses authentication keys to ensure that the routing information exchanged between routers is reliable. RIP version 1 has no authentication. For authentication to work both the sending and receiving routers must be set to use authentication, and must be configured with the same keys.
The sending and receiving routers need to have their system dates and times synchronized to ensure both ends are using the same keys at the proper times. However, you can overlap the key lifetimes to ensure that a key is always available even if there is some difference in the system times.
A key chain is a list of one or more authentication keys including the send and receive lifetimes for each key. Keys are used for authenticating routing packets only during the specified lifetimes. The FortiGate unit migrates from one key to the next according to the scheduled send and receive lifetimes.
Key-chain is a CLI router command. You use this command to manage RIP version 2 authentication keys. You can add, edit or delete keys identified by the specified key number.
This example shows how to configure a key-chain with two keys that are valid sequentially in time. This example creates a key-chain called “rip_key” that has a password of “fortinet”. The accepted and send lifetimes are both set to the same values — a start time of 9:00am February 23, 2010 and an end time of 9:00am March 17, 2010. A second key is configured with a password of “my_fortigate” that is valid from March 17, 2010 9:01am to April 1 2010 9:00am. This “rip_key” keychain is then used on the port1 interface in RIP.
config router key-chain
edit "rip_key"
config key
edit 1
set accept-lifetime 09:00:00 23 02 2010 09:00:00 17 03 2010
set key-string "fortinet"
set send-lifetime 09:00:00 23 02 2010 09:00:00 17 03 2010
next
edit 2
set accept-lifetime 09:01:00 17 03 2010 09:00:00 1 04 2010
set key-string "my_fortigate"
set send-lifetime 09:01:00 17 03 2010 09:00:00 1 04 2010
next
end
end
config router rip
config interface
edit port1
set auth-keychain “rip_key”
end
end
The CLI commands associated with authentication keys include:
config router key-chain
config router rip
config interface
edit <interface>
set auth-keychain
set auth-mode
set auth-string
end
end
Access Lists
Access lists are filters used by FortiGate unit RIP and OSPF routing. An access list provides a list of IP addresses and the action to take for them — essentially an access list makes it easy to group addresses that will be treated the same into the same group, independent of their subnets or other matching qualities. You add a rule for each address or subnet that you want to include, specifying the action to take for it. For example if you wanted all traffic from one department to be routed a particular way, even in different buildings, you can add all the addresses to an access list and then handle that list all at once.
Each rule in an access list consists of a prefix (IP address and netmask), the action to take for this prefix (permit or deny), and whether to match the prefix exactly or to match the prefix and any more specific prefix.
The FortiGate unit attempts to match a packet against the rules in an access list starting at the top of the list. If it finds a match for the prefix, it takes the action specified for that prefix. If no match is found the default action is deny.
Access lists greatly speed up configuration and network management. When there is a problem, you can check each list instead of individual addresses. Also its easier to troubleshoot since if all addresses on one list have problems, it eliminates many possible causes right away.
If you are using the RIPng or OSPF+ IPv6 protocols you will need to use access-list6, the IPv6 version of access list. The only difference is that access-list6 uses IPv6 addresses.
For example, if you want to create an access list called test_list that only allows an exact match of 10.10.10.10 and 11.11.11.11, enter the command:
config router access-list
edit test_list
config rule
edit 1
set prefix 10.10.10.10 255.255.255.255
set action allow
set exact-match enable
next
edit 2
set prefix 11.11.11.11 255.255.255.255
set action allow
set exact-match enable
end
end
Another example is if you want to deny ranges of addresses in IPv6 that start with the IPv6 equivalents of 10.10.10.10 and 11.11.11.11, enter the command access-list6 as follows:
config router access-list6
edit test_list_ip6
config rule
edit 1
set prefix6 2002:A0A:A0A:0:0:0:0:0:/48
set action deny
next
edit 2
set prefix6 2002:B0B:B0B:0:0:0:0:0/48
set action deny
end
end
To use an access_list, you must call it from a routing protocol such as RIP. The following example uses the access_list from the earlier example called test_list to match routes coming in on the port1 interface. When there is a match, it will add 3 to the hop count metric for those routes to artificially increase . Enter the following command:
config router rip
config offset-list
edit 5
set access-list test_list
set direction in
set interface port1
set offset 3
set status enable
end
If you are setting a prefix of 128.0.0.0, use the format 128.0.0.0/1. The default route, 0.0.0.0/0 can not be exactly matched with an access-list. A prefix-list must be used for this purpose
How RIP works
As one of the original modern dynamic routing protocols, RIP is straightforward. Its routing algorithm is not complex, there are some options to allow fine tuning, and it’s relatively simple to configure RIP on FortiGate units.
From RFC 1058:
Distance vector algorithms are based on the exchange of only a small amount of information. Each entity (gateway or host) that participates in the routing protocol is assumed to keep information about all of the destinations within the system. Generally, information about all entities connected to one network is summarized by a single entry, which describes the route to all destinations on that network.
This section includes:
- RIP versus static routing
- RIP metric — hop count
- The Bellman–Ford routing algorithm
- Passive versus active RIP interfaces
- RIP packet structure
RIP versus static routing
RIP was one of the earliest dynamic routing protocols to work with IP addresses. As such, it is not as complex as more recent protocols. However, RIP is a big step forward from simple static routing.
While RIP may be slow in response to network outages, static routing has zero response. The same is true for convergence — static routing has zero convergence. Both RIP and static routing have the limited hop count, so its not a strength or a weakness. Count to infinity can be a problem, but typically can be fixed as it happens or is the result of a network outage that would cause even worse problems on static routing network.
This compares to static routing where each time a packet needs to be routed, the FortiGate unit can only send it to the next hop towards the destination. That next hop then forwards it, and so on until it arrives at its destination. RIP keeps more routing information on each router so your FortiGate unit can send the packet farther towards its destination before it has to be routed again towards its destination. RIP reduces the amount of table lookups and therefore fewer network resources than static routing. Also since RIP is updated on neighboring routes it is aware of new routes or dead routes that static routing would not be aware of.
Overall, RIP is a large step forward when compared to static routing.
RIP metric — hop count
RIP uses hop count as the metric for choosing the best route. A hop count of 1 represents a network that is connected directly to the FortiGate unit, while a hop count of 16 represents a network that cannot be reached. Each network that a packet travels through to reach its destination usually counts as one hop. When the FortiGate unit compares two routes to the same destination, it adds the route having the lowest hop count to the routing table. As you can see in RIP packet structure, the hop count is part of a RIP v2 packet.
Similarly, when RIP is enabled on an interface, the FortiGate unit sends RIP responses to neighboring routers on a regular basis. The updates provide information about the routes in the FortiGate unit’s routing table, subject to the rules that you specify for advertising those routes. You can specify how often the FortiGate unit sends updates, the period of time a route can be kept in the routing table without being updated, and for routes that are not updated regularly you can specify the period of time that the unit advertises a route as unreachable before it is removed from the routing table.
If hops are weighted higher than one, it becomes very easy to reach the upper limit. This higher weighting will effectively limit the size of your network depending on the numbers used. Merely changing from the default of 1.0 to 1.5 will lower the effective hop count from 15 to 10. This is acceptable for smaller networks, but can be a problem as your network expands over time.
In RIP, you can use the offset command to artificially increase the hop count of a route. Doing this will make this route less preferred, and in turn it will get less traffic. Offsetting routes is useful when you have network connections of different bandwidths, different levels of reliability, or different costs. In each of these situations you still want the redundancy of multiple route access, but you don’t want the bulk of your traffic using these less preferred routes. For an example of RIP offset, see Access Lists.
The Bellman–Ford routing algorithm
The routing algorithm used by RIP was first used in 1967 as the initial routing algorithm of the ARPANET. The Bellman–Ford algorithm is distributed because it involves a number of nodes (routers) within an Autonomous system, and consists of the following steps:
- Each node calculates the distances between itself and all other nodes within the AS and stores this information as a table.
- Each node sends its table to all neighboring nodes.
- When a node receives distance tables from its neighbors, it calculates the shortest routes to all other nodes and updates its own table to reflect any changes.
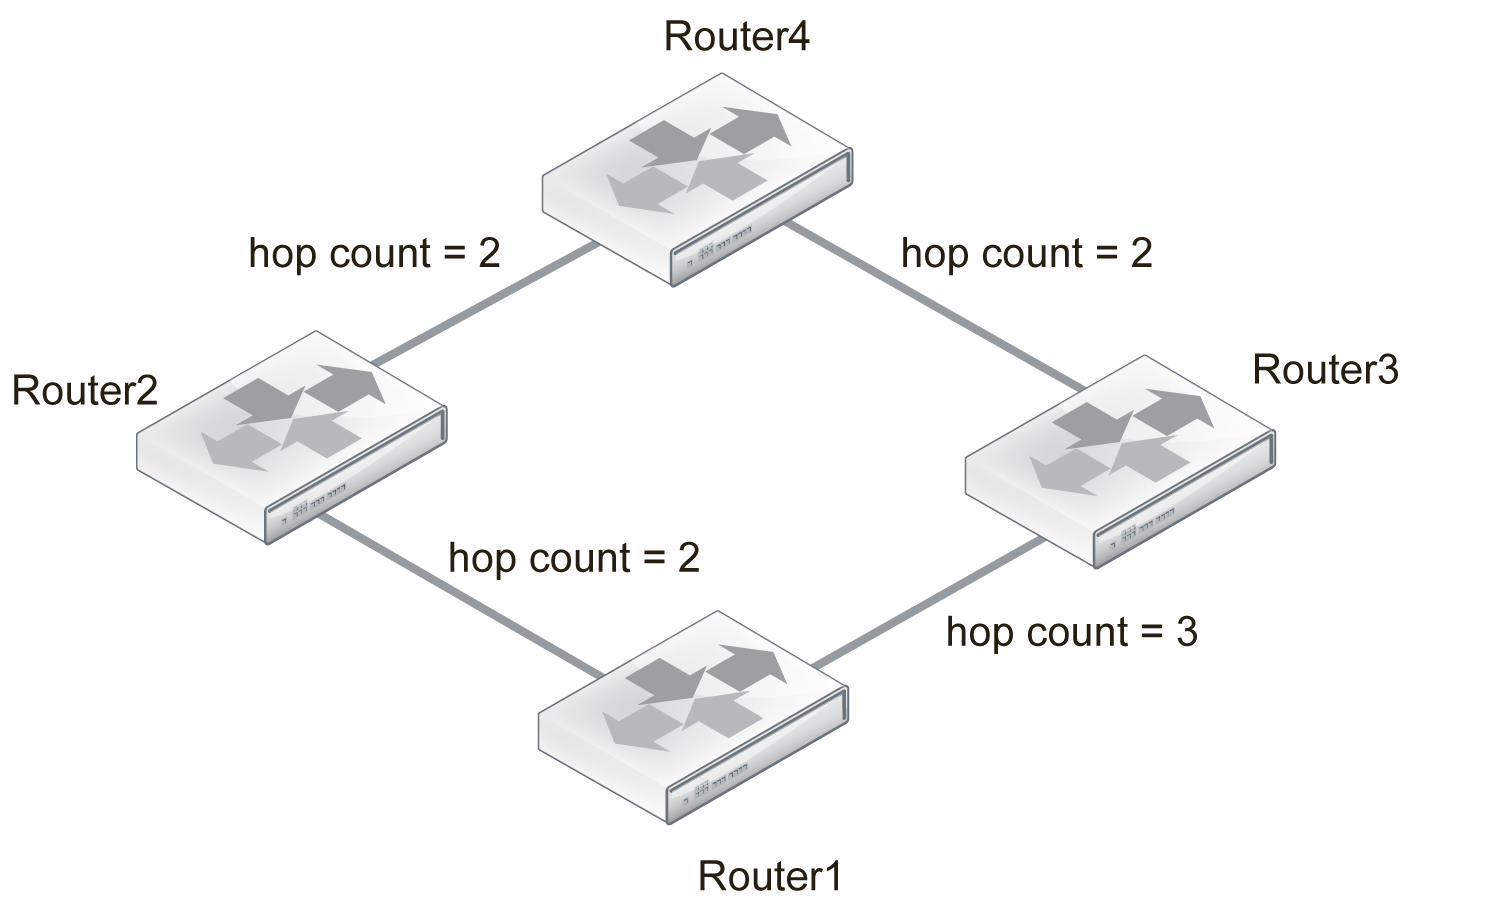
To examine how this algorithm functions let’s look at a network with 4 routers — routers 1 through 4. The distance from router1 to router2 is 2 hops, 1 to 3 is 3 hops, and 2 to 3 is 4 hops. Router4 is only connected to routers 2 and 3, each distance being 2 hops.
- Router1 finds all the distance to the other three routers — router 2 is 2, router 3 is 3. Router1 doesn’t have a route to router 4.
- Routers 2 through 4 do the same calculations from their point of views.
- Once router 1 gets an update from router 2 or 3, it will get their route to router 4. At that point it now has a route to router 4 and installs that in its local table.
- If router1 gets an update from router3 first, it has a hop count of 5 to reach router4. But when router2 sends its update, router1 will go with router2’s shorter 4 hops to reach router4. Future updates don’t change this unless they are shorter than 4 hops, or the routing table route goes down.
RIP algorithm example in 4 steps
Step 1
Router1 finds the distance to other
routers in the network.
It currently has no route to Router4.
Router1 routing table:
- Distance to Router2 = 2 hops.
- Distance to Router3 = 3 hops.
Step 2
All routers do the same as Router1, and send out updates containing their routing table.
Note that Router1 and Router4 do not update each other, but rely on Router2 and Router3 to pass along accurate updates.
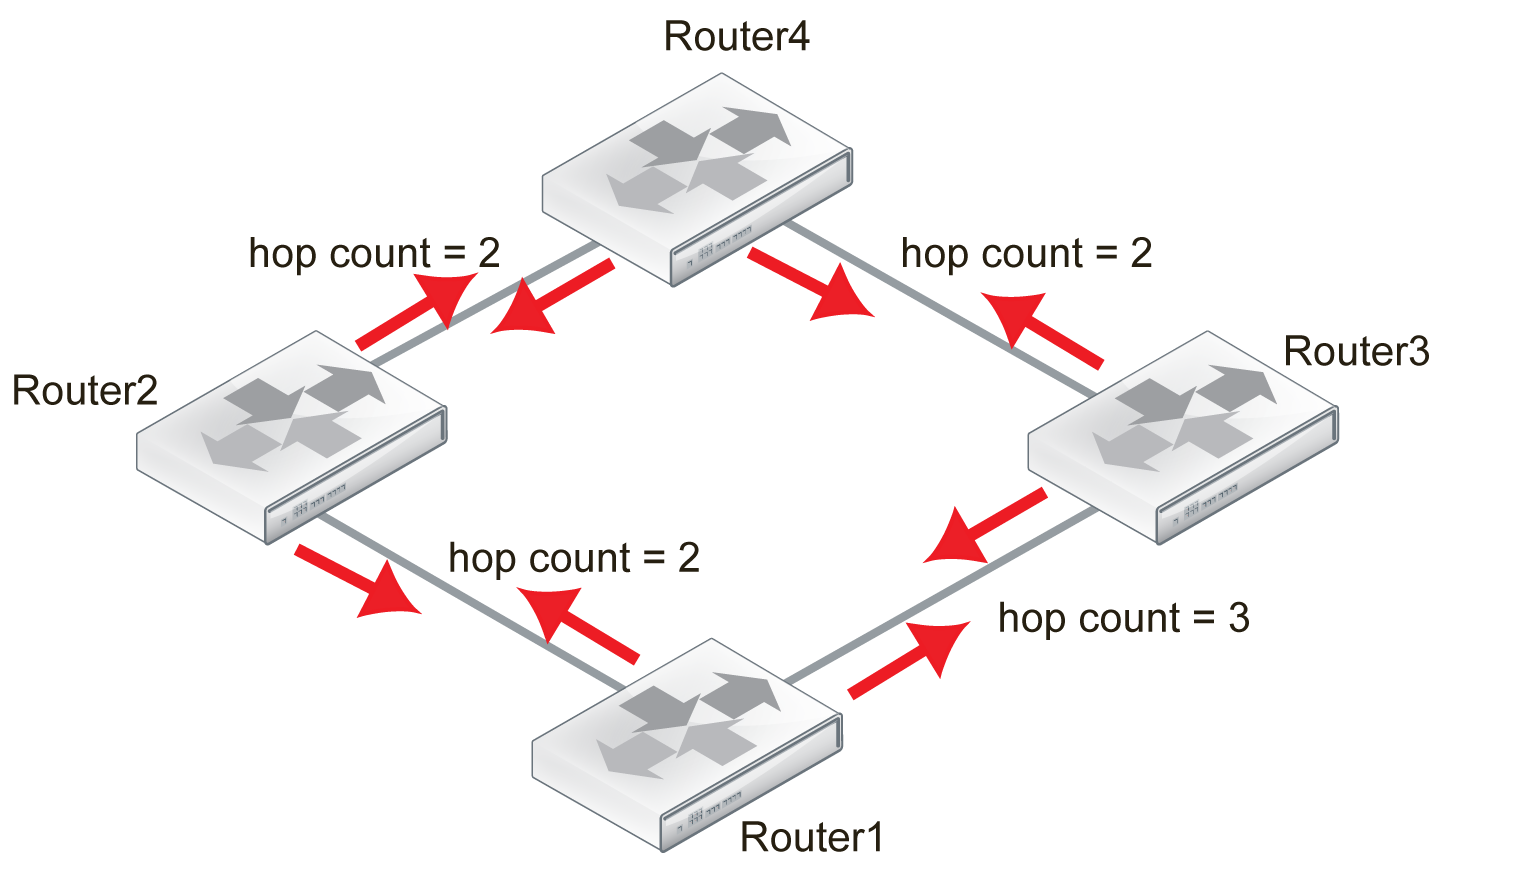
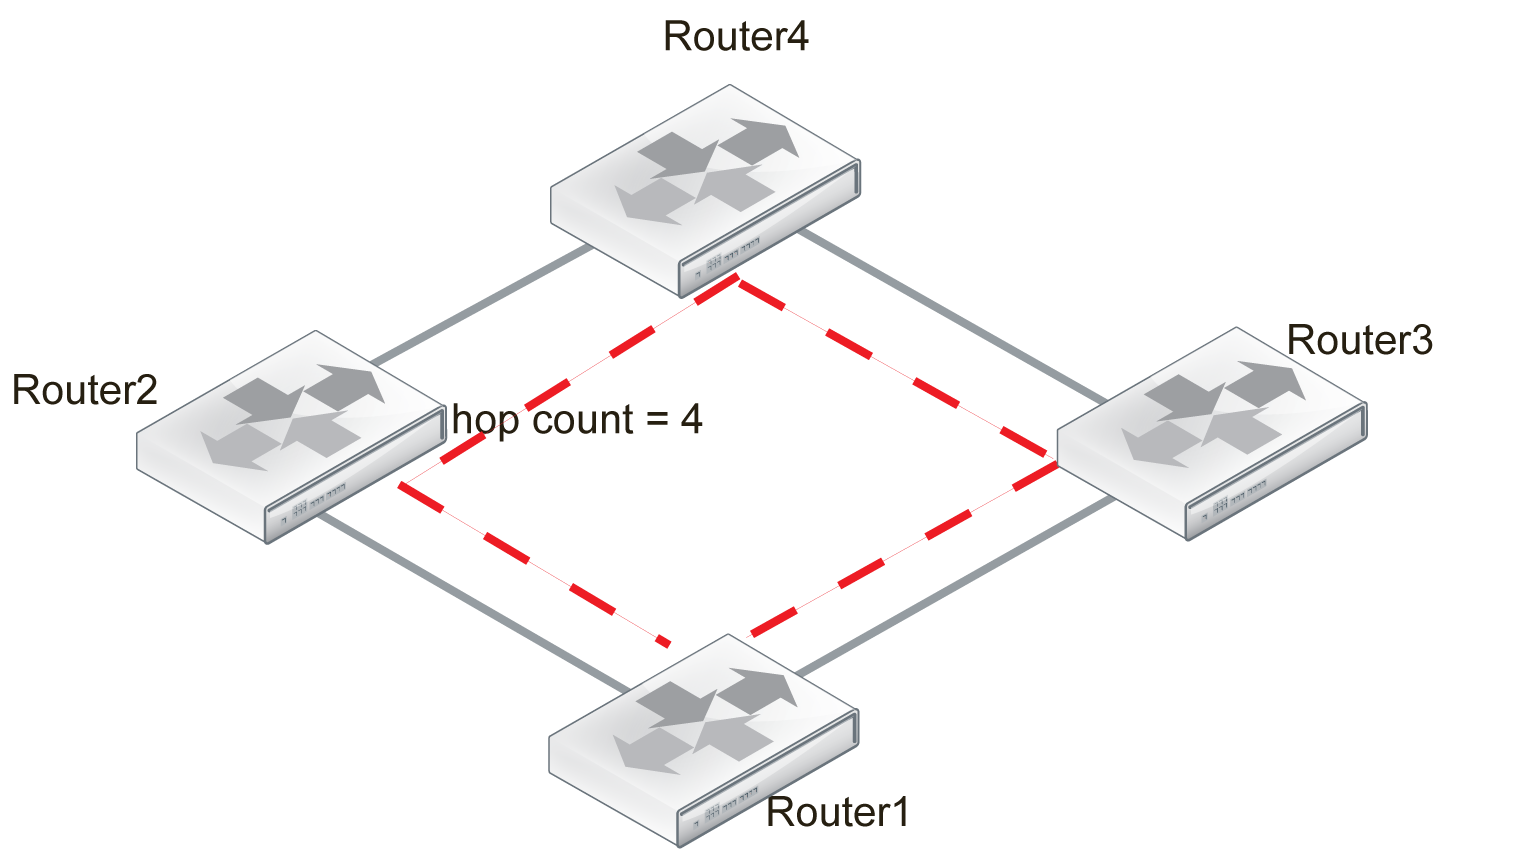
Step 3
Each router looks at the updates it has received, and adds any new or shorter routes to its table.
Router1 updated table:
- Distance to Router2 = 2 hops.
- Distance to Router3 = 3 hops.
- Distance to Router4 = 4 or 5 hops.
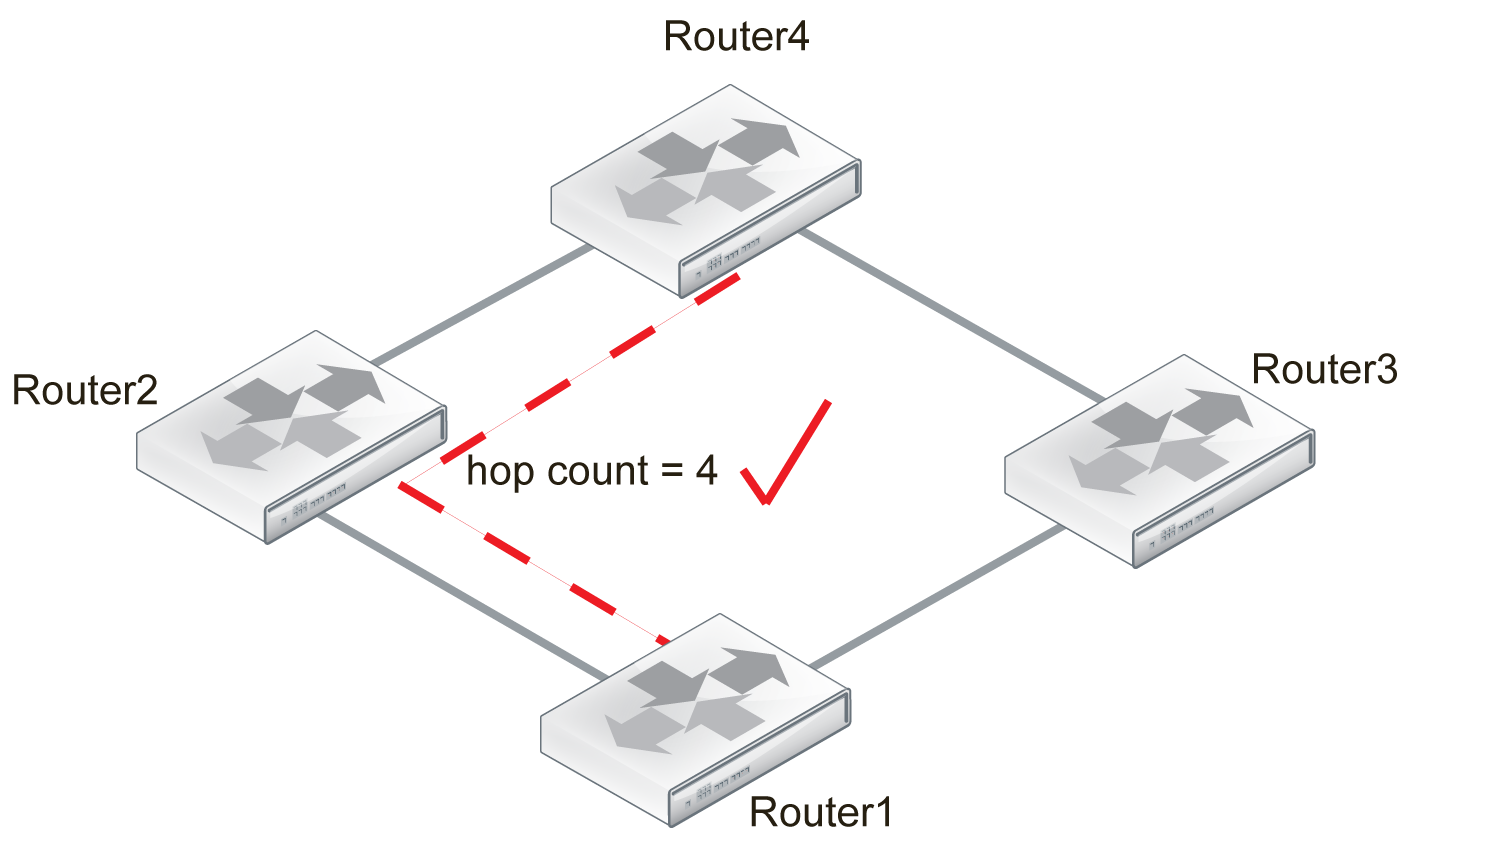
Step 4
Router1 installs the shortest route to Router4, and the other routes to it are removed from the routing table.
Router1 complete table:
- Distance to Router2 = 2 hops.
- Distance to Router3 = 3 hops.
- Distance to Router4 = 4 hops.
The good part about the Bellman-Ford algorithm in RIP is that the router only uses the information it needs from the update. If there are no newer, better routes than the ones the router already has in its routing table, there is no need to change its routing table. And no change means no additional update, so less traffic. But even when there is update traffic, the RIP packets are very small so it takes many updates to affect overall network bandwidth. For more information about RIP packets, see RIP packet structure.
The main disadvantage of the Bellman–Ford algorithm in RIP is that it doesn’t take weightings into consideration. While it is possible to assign different weights to routes in RIP, doing so severely limits the effective network size by reducing the hop count limit. Also other dynamic routing protocols can take route qualities, such as reliability or delay, into consideration to provide not only the physically shortest but also the fastest or more reliable routes as you choose.
Another disadvantage of the Bellman-Ford algorithm is due to the slow updates passed from one RIP router to the next. This results in a slow response to changes in the network topology, which in turn results in more attempts to use routes that are down, which wastes time and network resources.
Passive versus active RIP interfaces
Normally the FortiGate unit’s routing table is kept up to date by periodically asking the neighbors for routes, and sending your routing updates out. This has the downside of generating a lot of extra traffic for large networks. The solution to this problem is passive interfaces.
An standard interface that supports RIP is active by default — it both sends and receives updates by actively communicating with its neighbors. A passive RIP interface does not send out updates — it just listens to the updates of other routers. This is useful in reducing network traffic, and if there are redundant routers in the network that would be sending out essentially the same updates all the time.
The following example shows how to create a passive RIP v2 interface on port1, using MD5 authentication and a key-chain called passiveRIPv2 that has already been configured. Note that in the CLI, you enable passive by disabling send-version2-broadcast.
To create a passive RIP interface - web-based manager
- Go to Router > Dynamic > RIP.
- Next to Interfaces, select Create.
- Select port1 as the Interface.
- Select 2 as both the Send Version and Receive Version.
- Select MD5 for Authentication.
- Select the
passiveRIPv2Key-chain. - Select Passive Interface.
- Select OK to accept this configuration, and return to the main RIP display page.
To create a passive RIP v2 interface on port1 using MD5 authentication- CLI
config router rip
config interface
edit port1
set send-version2-broadcast disable
set auth-keychain “passiveRIPv2”
set auth-mode md5
set receive-version 2
set send-version 2
end
end
RIP packet structure
It is hard to fully understand a routing protocol without knowing what information is carried in its packets. Knowing what information is exchanged between routers and how will help you better understand the RIP protocol, and better configure your network for it.
This section provides information on the contents of RIP 1 and RIP 2 packets.
RIP version 1
RIP version 1, or RIP IP packets are 24 bytes in length, with some empty areas left for future expansion.
RIP IP packets
| 1-byte command | 1-byte version | 2-byte zero field | 2-byte AFI | 2-byte zero field |
| 4-byte IP address | 4-byte zero field | 4-byte zero field | 4-byte metric | |
A RIP 1 packet contains the following fields:
- Command — Indicates whether the packet is a request or a response. The request asks that a router send all or part of its routing table. The response can be an unsolicited regular routing update or a reply to a request. Responses contain routing table entries. Multiple RIP packets are used to convey information from large routing tables.
- Version — Specifies the RIP version used. This field can signal different potentially incompatible versions.
- Zero field — This field defaults to zero, and is not used by RFC 1058 RIP.
- Address-family identifier (AFI) — Specifies the address family used. RIP is designed to carry routing information for several different protocols. Each entry has an address-family identifier to indicate the type of address being specified. The AFI for IP is 2.
- IP Address — Specifies the IP address for the entry.
- Metric — This is the number of hops or routers traversed along the route on its trip to the destination. The metric is between 1 and 15 for that number of hops. If the route is unreachable the metric is 16.
RIP version 2
RIP version 2 has more features than RIP 1, which is reflected in its packets which carry more information. All but one of the empty zero fields in RIP 1 packets are used in RIP 2.
RIP 2 packets
| 1-byte command | 1-byte version | 2-byte unused | 2-byte AFI | 2-byte route tag |
| 4-byte IP address | 4-byte subnet | 4-byte next hop | 4-byte metric | |
A RIP 2 packet contains fields described above in RIP 1, as well as the following:
- Unused — Has a value set to zero, and is intended for future use
- Route tag — Provides a method for distinguishing between internal routes learned by RIP and external routes learned from other protocols.
- Subnet mask — Contains the subnet mask for the entry. If this field is zero, no subnet mask has been specified for the entry.
- Next hop — Indicates the IP address of the next hop to which packets for the entry should be forwarded.
Copyright © 2018 Fortinet, Inc. All Rights Reserved. | Terms of Service | Privacy Policy
