
Configure the fixed-address VPN peer
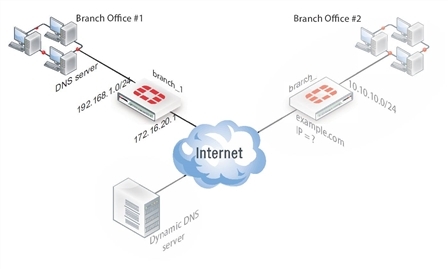
The fixed-address VPN peer, branch_1, needs to retrieve the IP address from the dynamic DNS service to initiate communication with the dynamically-addressed peer, branch_2. It also depends on the peer ID (local ID) to initiate the VPN tunnel with branch_2.
Configure branch_1, the fixed address side
Configuring the fixed-address VPN peer includes:
Configuring branch_1 VPN tunnel settings
Define the Phase 1 parameters needed to establish a secure connection with the remote peer. For more information, see Phase 1 parameters.
To configure branch_1 Phase 1 VPN settings
- Go to VPN > IPsec > Tunnels and create the new custom tunnel or edit an existing tunnel.
- Edit the Phase 1 Proposal (if it is not available, you may need to click the Convert to Custom Tunnel button).
- Enter the following information and select OK.
| Name | Enter branch_1. A name to identify the VPN tunnel. This name appears in Phase 2 configurations, security policies and the VPN monitor. |
| Remote Gateway | Select Dynamic DNS. The remote peer this FortiGate is connecting to has a dynamic IP address. |
| Dynamic DNS | Type the fully qualified domain name of the remote peer (for example, example.com). |
| Interface | Select wan1. The public facing interface on the fixed-address FortiGate unit. |
| Mode | Select Aggressive. |
| Peer Options | Select This peer ID, and enter example.com. This option only appears when the mode is set to Aggressive. The identifier of the FortiGate unit with the dynamic address. |
- Define the Phase 2 parameters needed to create a VPN tunnel with the remote peer. See Phase 2 parameters. Enter these settings in particular:
| Name | Enter branch_1_p2. A name to identify this Phase 2 configuration. |
| Phase 1 | Select branch_1. The name of the Phase 1 configuration that you defined for the remote peer. You can select the name of the remote gateway from the Dynamic DNS part of the list. |
Configuring branch_1 security policies
The branch_1 FortiGate unit has a fixed IP address and will be connecting to the branch_2 FortiGate unit that has a dynamic IP address and a domain name of example.com. Remember if you are using route-based security policies that you must add a route for the VPN traffic.
Defining address ranges for branch_1 security policies
As with branch_2 previously, branch_1 needs address ranges defined as well. See Defining VPN security policies.
- Go to Policy & Objects > Objects > Addresses.
- Select Create New.
- Enter the following information, and select OK.
| Name | Enter branch_2_internal. A meaningful name for the private network behind the branch_2 FortiGate unit. |
| Type | Select Subnet. |
| Subnet / IP Range | Enter 10.10.10.0/24. Include the netmask or specify a specific range. |
| Interface | Select internal. This is the interface on this FortiGate unit that will be handling with this traffic. |
- Define an address name for the IP address and netmask of the private network behind the remote peer.
- Select Create New.
- Enter the following information, and select OK.
| Name | Enter branch_1_internal. A meaningful name for the private network behind the branch_1 peer. |
| Type | Select Subnet. |
| Subnet / IP Range | Enter 192.168.1.0/24. Include the netmask or specify a specific range. |
| Interface | Select any. The interface on this FortiGate unit that will be handling with this traffic. If you are unsure, or multiple interfaces may be handling this traffic use any. |
Creating branch_1 route-based security policies
Define an ACCEPT security policy to permit communications between the source and destination addresses. See Defining VPN security policies.
- Go to Policy & Objects > Policy > IPv4 and select Create New.
- Leave the Policy Type as Firewall and leave the Policy Subtype as Address.
- Enter the following information, and select OK.
| Incoming Interface | Select internal. The interface that connects to the private network behind the branch_1 FortiGate unit. |
| Source Address | Select branch_1_internal. The address name that you defined for the private network behind this FortiGate unit. |
| Outgoing Interface | Select branch_1. The VPN Tunnel (IPsec Interface) you configured earlier. |
| Destination Address | Select branch_2_internal. The address name that you defined for the private network behind the branch_2 peer. |
| Action | Select ACCEPT. |
| Enable NAT | Disable |
| Comments | Internal -> branch2 |
To permit the remote client to initiate communication, you need to define a security policy for communication in that direction.
- Select Create New.
- Leave the Policy Type as Firewall and leave the Policy Subtype as Address.
- Enter the following information, and select OK.
| Incoming Interface | Select branch_1. The VPN Tunnel (IPsec Interface) you configured earlier. |
| Source Address | Select branch_2_internal. The address name that you defined for the private network behind the branch_2 remote peer. |
| Outgoing Interface | Select internal. The interface that connects to the private network behind this FortiGate unit. |
| Destination Address | Select branch_1_internal. The address name that you defined for the private network behind this FortiGate unit. |
| Action | Select ACCEPT. |
| Enable NAT | Disable |
| Comments | branch_2 -> Internal |
Creating branch_1 policy-based security policies
A policy-based security policy allows you the flexibility to allow inbound or outbound traffic or both through this single policy.
This policy-based IPsec VPN security policy allows both inbound and outbound traffic
- Go to Policy & Objects > Policy > IPv4 and select Create New.
- Enter the following information, and select OK.
| Incoming Interface | Select internal. The interface that connects to the private network behind this FortiGate unit. |
| Source Address | Select branch_1_internal. The address name that you defined for the private network behind this FortiGate unit. |
| Outgoing Interface | Select wan1. The FortiGate unit’s public interface. |
| Destination Address | Select branch_2_internal. The address name that you defined for the private network behind the remote peer. |
| VPN Tunnel | Select Use Existing and select branch_1 from the drop-down list. Select Allow traffic to be initiated from the remote site to enable traffic from the remote network to initiate the tunnel. |
- Place this security policy in the policy list above any other policies having similar source and destination addresses.
Copyright © 2018 Fortinet, Inc. All Rights Reserved. | Terms of Service | Privacy Policy
