
VRRP
A Virtual Router Redundancy Protocol (VRRP) configuration can be used as a high availability solution to make sure that a network maintains connectivity with the Internet (or with other networks) even if the default router for the network fails. Using VRRP, if a router or a FortiGate unit fails all traffic to this router transparently fails over to another router or FortiGate unit that takes over the role of the router or FortiGate unit that failed. If the failed router or FortiGate unit is restored, it will once again take over processing traffic for the network. VRRP is described by RFC 3768.
Example VRRP configuration
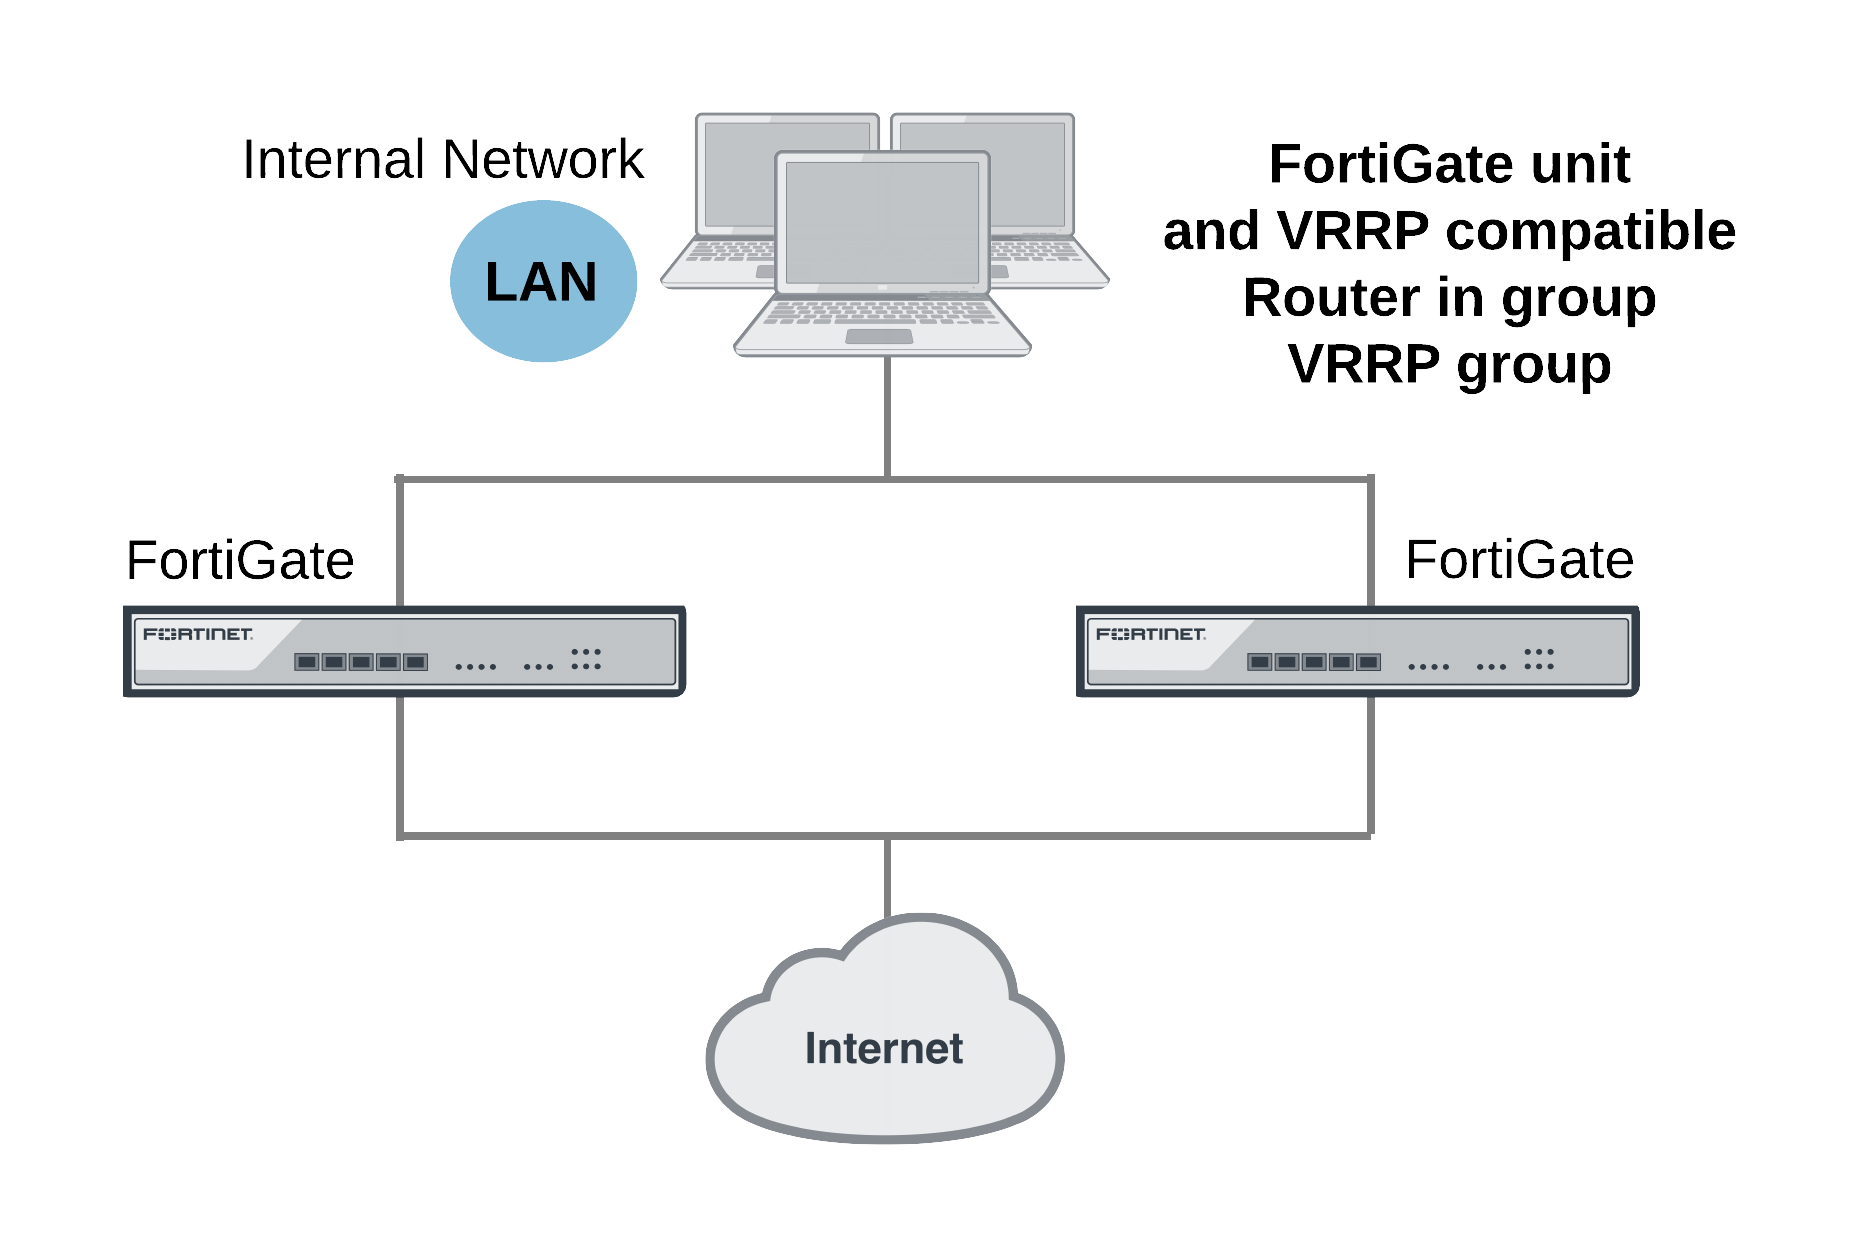
To configure VRRP you create a VRRP group that contains two or more routers. Some or all of these routers can be FortiGate units. You can include different FortiGate models in the same VRRP group. The group members are configured to be the master router and one or more backup routers of the VRRP group. The network directs all traffic to the master’s IP address and MAC address. If the master fails, VRRP dynamically shifts packet forwarding to a backup router. VRRP provides this redundancy without user intervention or additional configuration to any of the devices on the network.
The VRRP redundancy scheme means that devices on the network keep a single IP address for the default gateway and this IP address maps to a well-known virtual MAC address. If the VRRP master fails, one of the backup units becomes the new master and acquires virtual IP and MAC addresses that match the addresses of the master. The network then automatically directs all traffic to the backup unit. VRRP uses the broadcast capabilities of Ethernet networks. A long as one of the routers in a VRRP group is running, ARP requests for the default gateway IP address always receive replies. Additionally, hosts can send packets outside their subnet without interruption.
FortiGate units support VRRP and can be quickly and easily integrated into a network that has already deployed a group of routers using VRRP. You can also create a new VRRP configuration consisting of a FortiGate unit acting as a VRRP master with one or more VRRP-compatible routers acting as backup routers. Some or all of those backup routers can be FortiGate units.
During normal operation the VRRP master unit sends VRRP advertisement messages to the backup units. A backup unit will not attempt to become a master unit while it is receiving these messages. When a FortiGate unit operating as a VRRP master fails, a backup unit takes its place and continues processing network traffic. The backup unit assumes the master unit has failed if it stops receiving the advertisement messages from the master unit. The backup unit with the highest priority becomes the new master unit after a short delay. During this delay the new master unit sends gratuitous ARPs to the network to map the virtual router IP address it its MAC address. As a result, all packets sent to the default route IP address are sent the new master unit. If the backup unit is a FortiGate unit, the network continues to benefit from FortiOS security features. If the backup unit is a router, after a failure traffic will continue to flow, but FortiOS security features will be unavailable until the FortiGate unit is back on line.
During a VRRP failover, as the backup unit starts to forward traffic it will not have session information for all of the failed over in-progress sessions. If the backup unit is operating as a normal FortiGate unit it will not be able to forward this traffic because of the lack of session information. To resolve this problem, immediately after a failover and for a short time as its taking over traffic processing, the backup unit operates with asymmetric routing enabled. This allows the backup unit to re-create all of the in-progress sessions and add them to the session table. While operating with asymmetric routing enabled, the backup unit cannot apply security functions. When the start-time ends the backup unit disables asymmetric routing and returns to normal operation including applying security functions.
Adding a VRRP virtual router to a FortiGate interface
Use the following command to add a VRRP virtual router to the port10 interface of a FortiGate unit. This VRRP virtual router has a virtual router ID of 200, uses IP address 10.31.101.200 and has a priority of 255. Since this is the highest priority this interface is configured to be the master of the VRRP group with ID number 200.
|
|
VRRP can be configured only on physical interfaces or VLAN interfaces. You cannot configure VRRP on hardware-switch interfaces where multiple physical interfaces are combined into a hardware switch interface. |
config system interface
edit port10
config vrrp
edit 200
set vrip 10.31.101.200
set priority 255
end
end
VRRP virtual MAC address
The VRRP virtual MAC address (or virtual router MAC address) is a shared MAC address adopted by the VRRP master. If the master fails the same virtual MAC master fails over to the new master. As a result, all packets for VRRP routers can continue to use the same virtual MAC address. You must enable the VRRP virtual MAC address feature on all members of a VRRP group.
Each VRRP router is associated with its own virtual MAC address. The last part of the virtual MAC depends on the VRRP virtual router ID using the following format:
00-00-5E-00-01-<VRID_hex>
Where <VRID_hex> is the VRRP virtual router ID in hexadecimal format in internet standard bit-order. For more information about the format of the virtual MAC see RFC 3768.
Some examples:
- If the VRRP virtual router ID is 10 the virtual MAC would be 00-00-5E-00-01-0a.
- If the VRRP virtual router ID is 200 the virtual MAC would be 00-00-5E-00-01-c8.
The VRRP virtual MAC address feature is disabled by default. When you enable the feature on a FortiGate interface, all of the VRRP routers added to that interface use their own VRRP virtual MAC address. Each virtual MAC address will be different because each virtual router has its own ID.
Use the following command to enable the VRRP virtual MAC address on the port2 interface:
config system interface
edit port2
set vrrp-virtual-mac enable
end
end
The port2 interface will now accept packets sent to the MAC addresses of the VRRP virtual routers added to this interface.
Using the VRRP virtual MAC address can improve network efficiency especially on large and complex LANs because when a failover occurs devices on the LAN do not have to learn a new MAC address for the new VRRP router.
If the VRRP virtual MAC address feature is disabled, the VRRP group uses the MAC address of the master. In the case of a FortiGate VRRP virtual router this is the MAC address of the FortiGate interface that the VRRP virtual routers are added to. If a master fails, when the new master takes over it sends gratuitous ARPs to associate the VRRP virtual router IP address with the MAC address of the new master (or the interface of the FortiGate unit that has become the new master). If the VRRP virtual MAC address is enabled the new master uses the same MAC address as the old master.
VRRP Groups
A VRRP group includes all the relevant VRRP IDs and tracks the VRRP status to force the status of all group members if a VRRP domain is changed from master to backup. VRRP groups are configured through the CLI. The VRRP group ID can be between 1 and 65535. Use the following command to add a VRRP group to the port20 interface that includes the virtual route identifiers 25, 50, 66 and 70 to VRRP group 10
config system interface
edit port20
config vrrp
edit 25
set vrgrp 10
next
edit 50
set vrgrp 10
next
edit 66
set vrgrp 10v
next
edit 70
set vrgrp 10
end
Using a Second Destination IP (VRDST)
VRRP can now be configured with second destination IP (VRDST) for monitoring. When two IPs are used, VRRP failure will only be reported if both monitored IPs are down.
Use the following command to configure a second destination IP (VRDST) to port14:
config system interface
edit port14
config vrrp
edit 12
set vrdst 10.10.10.20 10.20.20.10
end
Configuring VRRP
To configure VRRP you must configure two or more FortiGate interfaces or routers with the same virtual router ID and IP address. Then these FortiGate units or routers can automatically join the same VRRP group. You must also assign priorities to each of the FortiGate units or routers in the VRRP group. One of the FortiGate units or routers must have the highest priority to become the master. The other FortiGate units or routers in the group are assigned lower priorities and become backup units. All of the units in the VRRP group should have different priorities. If the master unit fails, VRRP automatically fails over to the remaining unit in the group with the highest priority.
You configure VRRP from the FortiGate CLI by adding a VRRP virtual router to a FortiGate interface. You can add VRRP virtual routers to multiple FortiGate interfaces and you can add more than one virtual router to the same interface.
Example VRRP configuration: two FortiGate units in a VRRP group
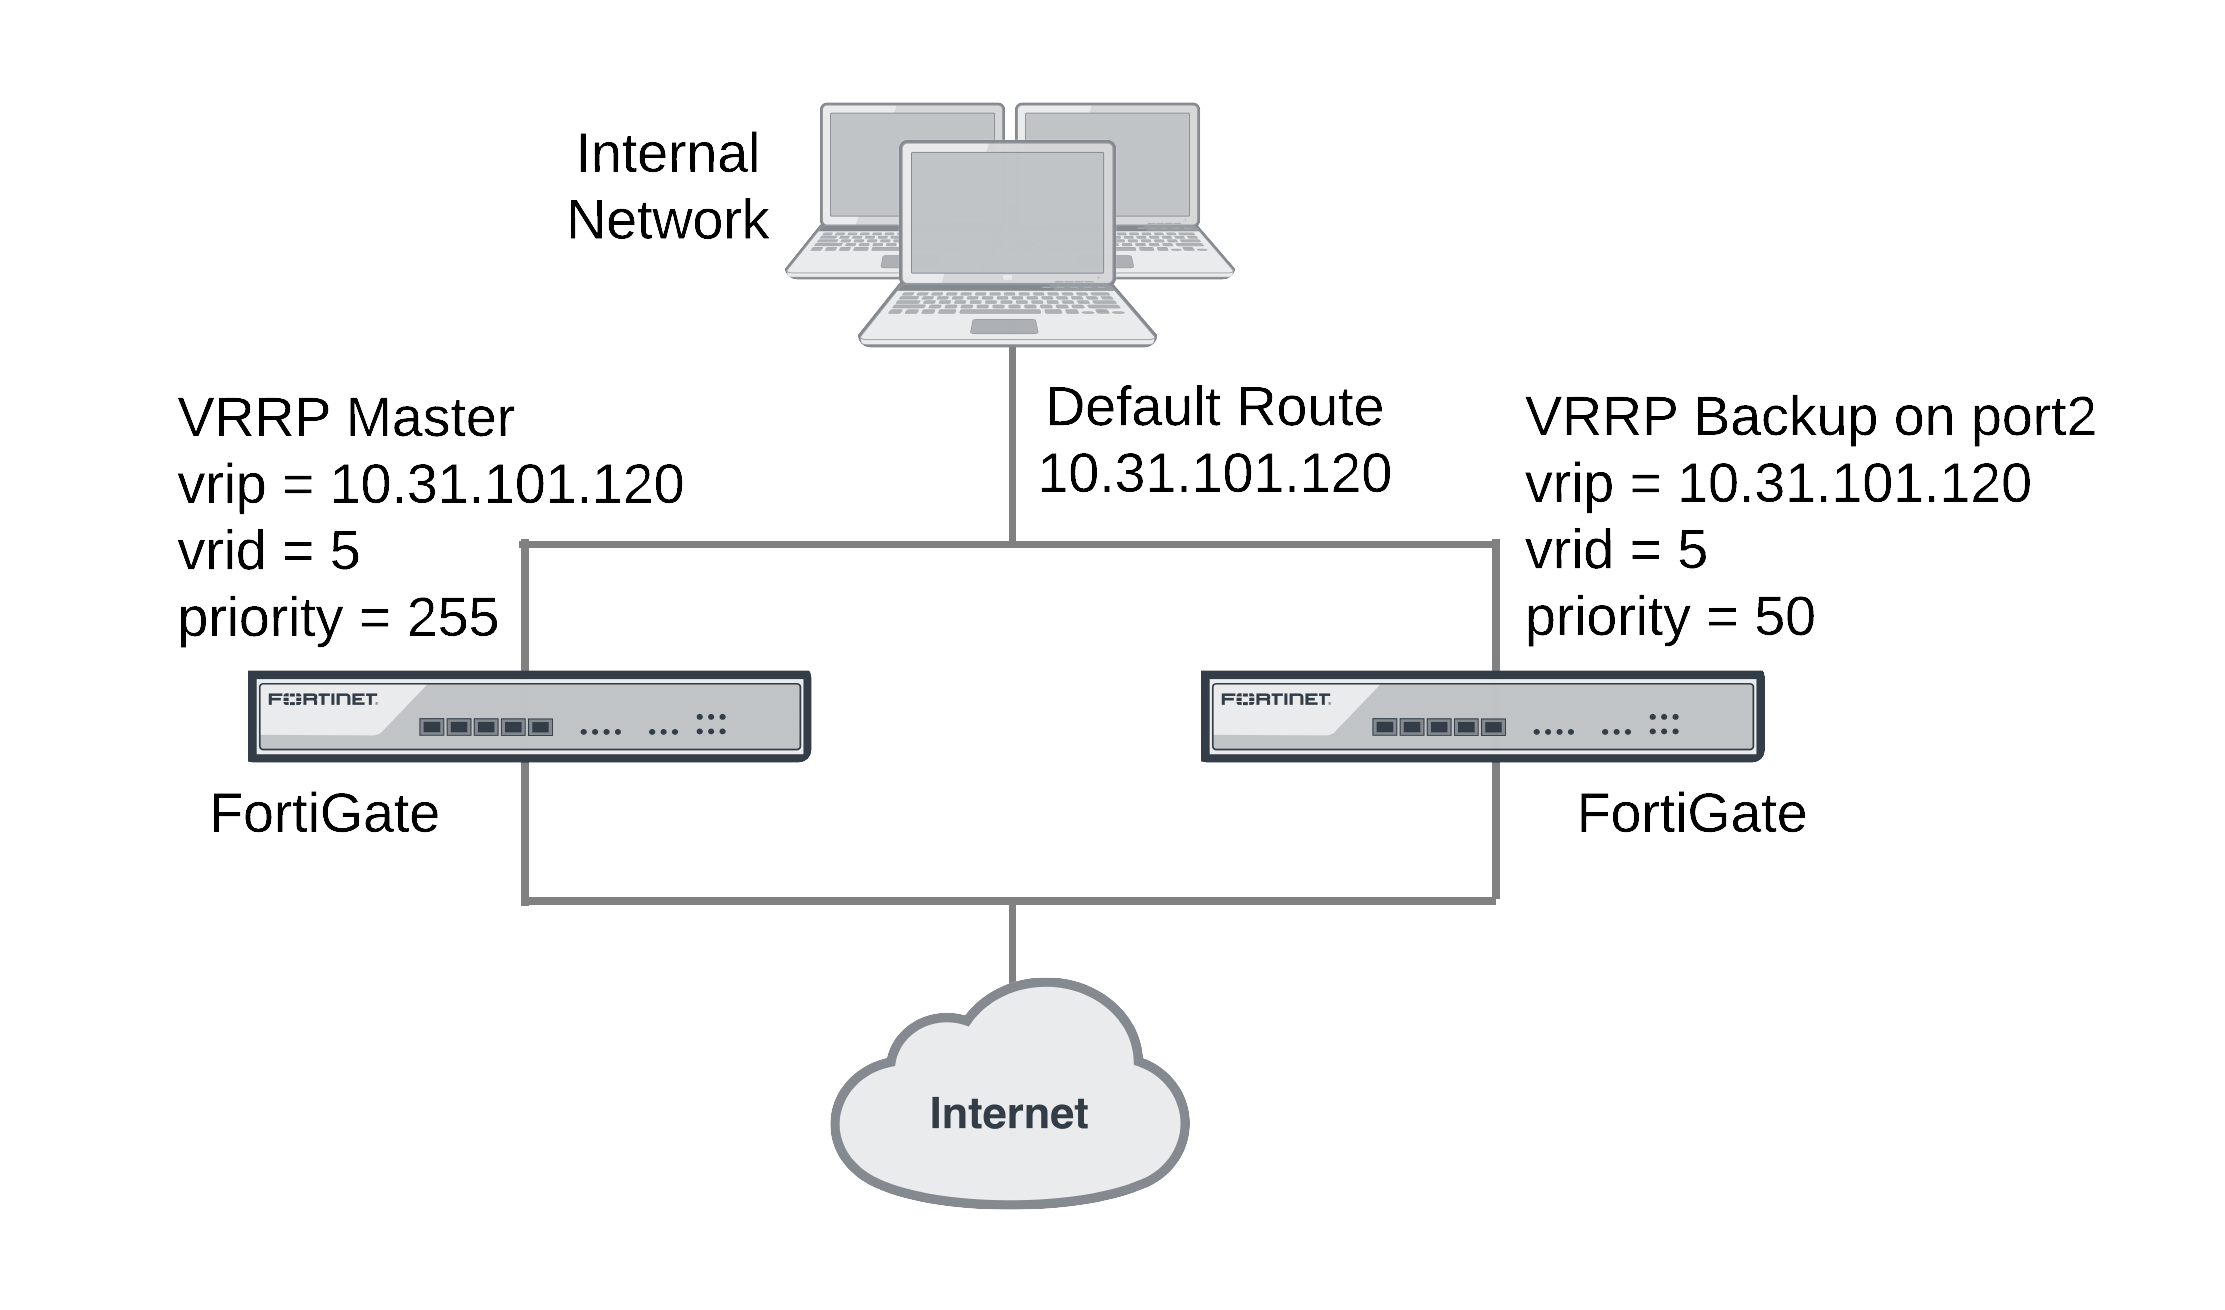
This example includes a VRRP group consisting of two FortiGate units that connect an internal network to the Internet. As shown below, the internal network’s default route is 10.31.101.120.
The FortiGate port2 interfaces connect to the internal network. A VRRP virtual router is added to each FortiGate unit’s port2 interface. The virtual router IP address is 10.31.101.120 (the internal network’s default route) and the virtual router’s ID is 5. The VRRP priority of the master unit is set to 255 and the VRRP priority of the backup unit is 50. The port2 interface of each FortiGate unit should have an IP address that is different from the virtual router IP address and the port2 interface IP addresses should be different from each other.
This example also includes enabling the VRRP virtual MAC address on both FortiGate unit port2 interfaces so that the VRRP group uses the VRRP virtual MAC address.
Example VRRP configuration with two FortiGate units
To configure the FortiGate units for VRRP
- Select one of the FortiGate units to be the VRRP master and the other to be the backup unit.
- From the master unit’s CLI, enter the following command to enable the VRRP virtual MAC address on the port2 interface and add the VRRP virtual router to the port2 interface:
config system interface
edit port2
set vrrp-virtual-mac enable
config vrrp
edit 5
set vrip 10.31.101.120
set priority 255
end
end
- From the backup unit’s CLI, enter the following command to enable the VRRP virtual MAC address on the port2 interface and add the VRRP virtual router to the port2 interface:
config system interface
edit port2
set vrrp-virtual-mac enable
config vrrp
edit 5
set vrip 10.31.101.120
set priority 50
end
end
Example VRRP configuration: VRRP load balancing two FortiGate units and two VRRP groups
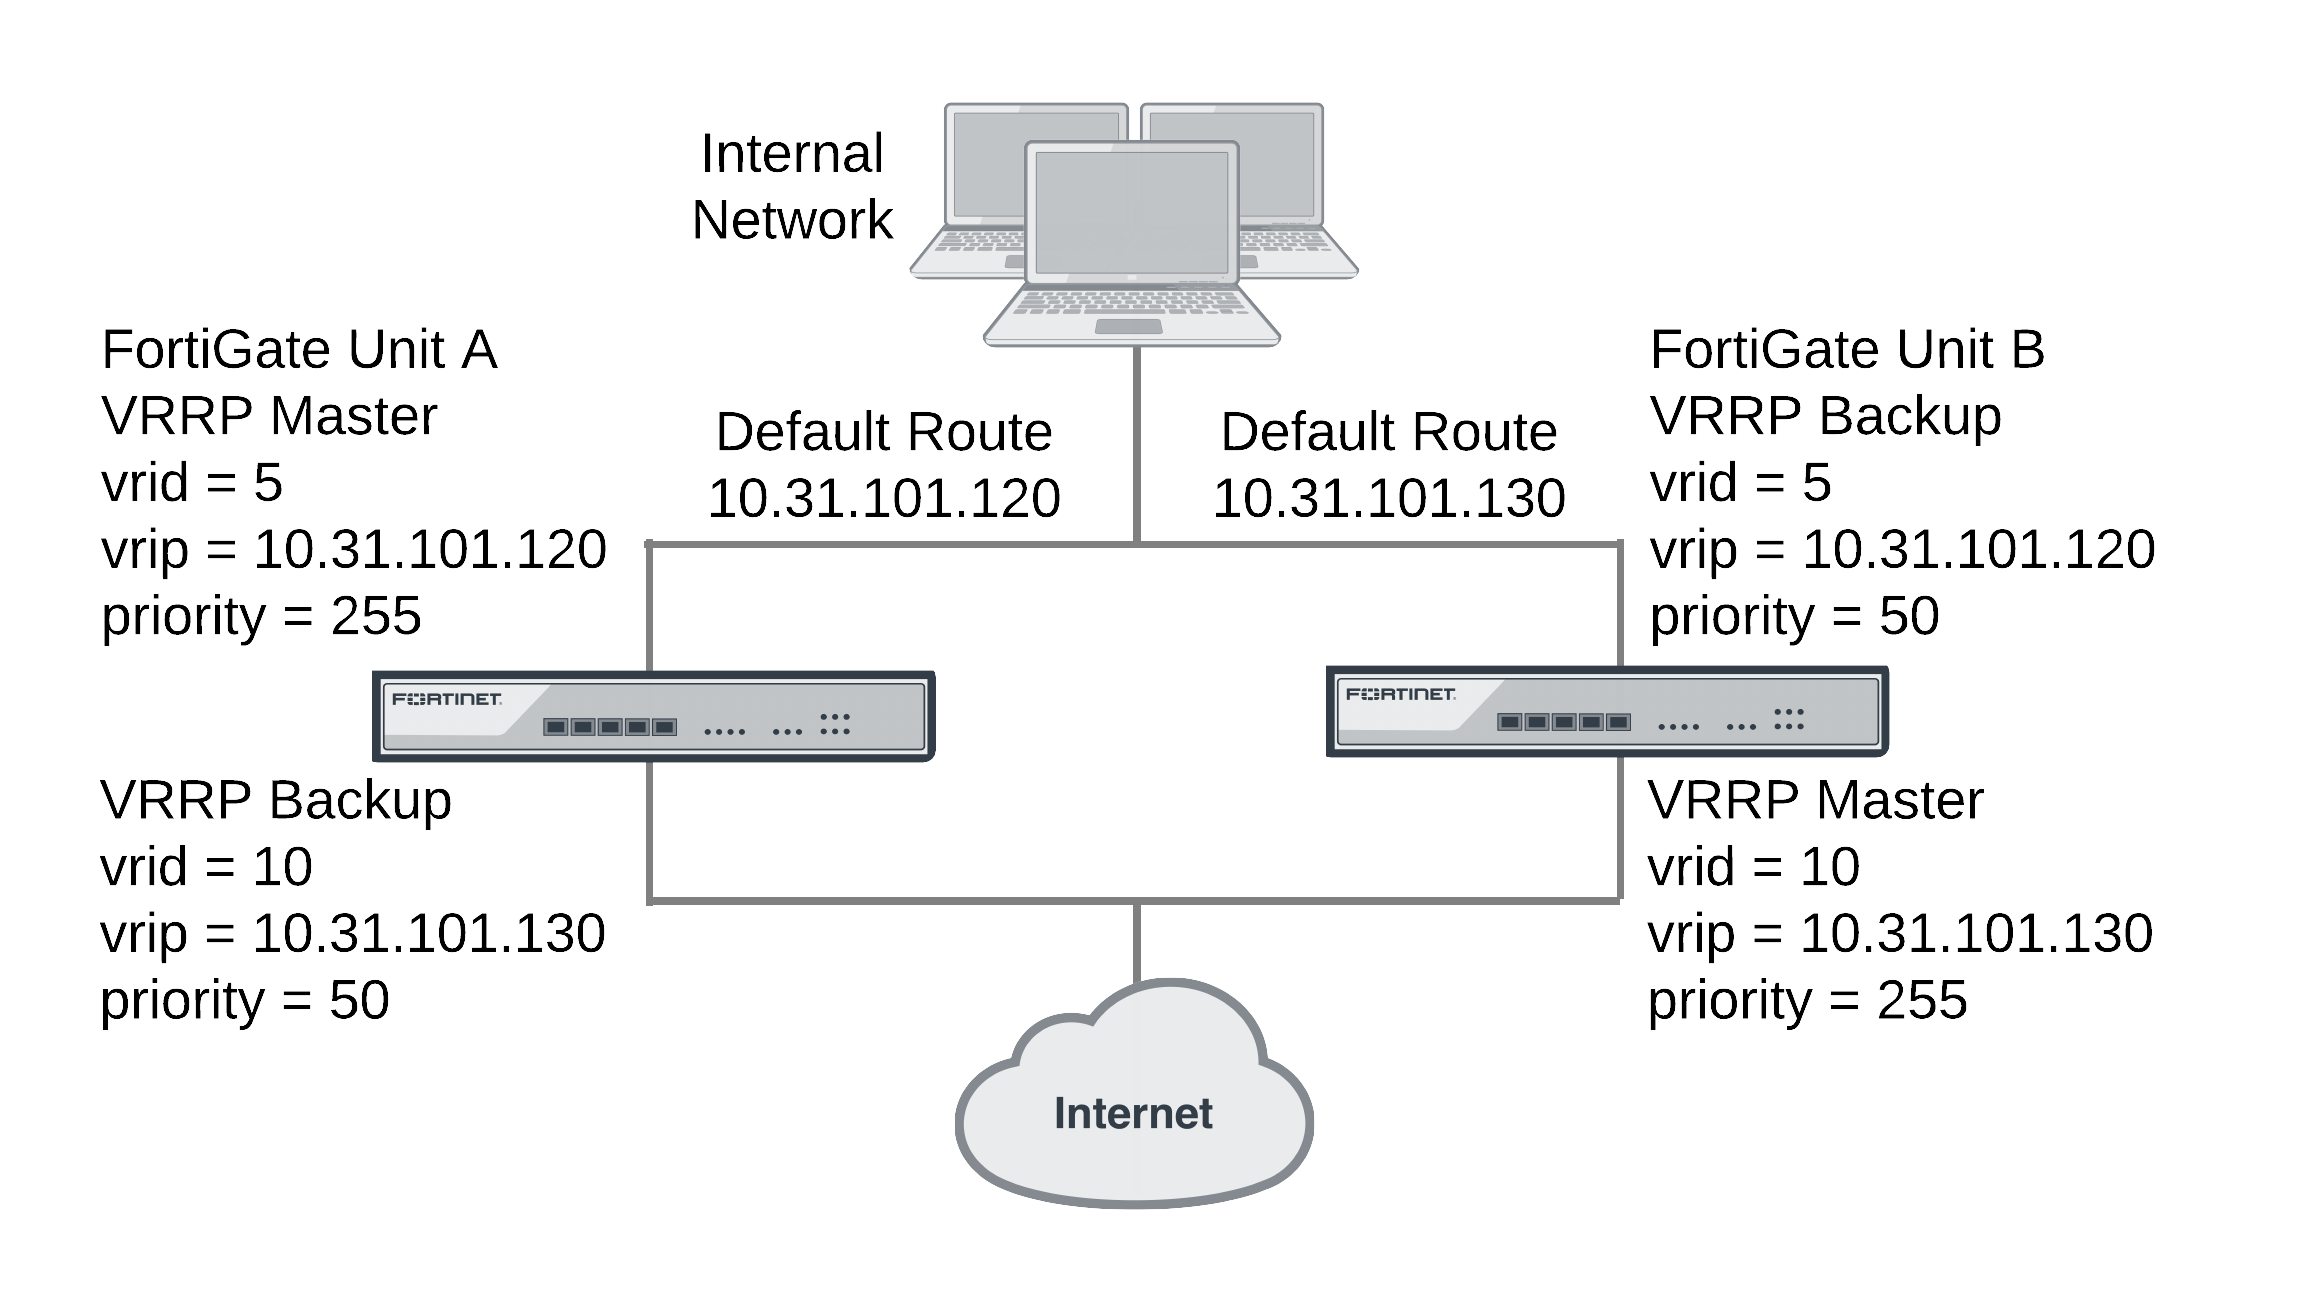
In this configuration two VRRP groups are involved. Each FortiGate unit participates in both of them. One FortiGate unit is the master of one group and the other FortiGate unit is the master of the other group. The network distributes traffic between two different default routes (10.31.101.120 and 10.31.101.130). One VRRP group is configured with one of the default route IP addresses and the other VRRP group get the other default route IP address. So during normal operation both FortiGate units are processing traffic and the VRRP groups are used to load balance the traffic between the two FortiGate units.
If one of the FortiGate units fails, the remaining FortiGate unit becomes the master of both VRRP groups. The network sends all traffic for both default routes to this FortiGate unit. The result is a configuration that under normal operation load balances traffic between two FortiGate units, but if one of the FortiGate units fails, all traffic fails over to the unit that is still operating.
This example also includes enabling the VRRP virtual MAC address on both FortiGate unit port2 interfaces so that the VRRP groups use their VRRP virtual MAC addresses.
Example VRRP configuration with two FortiGate units and two VRRP groups
To configure the FortiGate units
- Log into the CLI of FortiGate unit A.
- Enter the following command to enable the VRRP virtual MAC address feature and add the VRRP groups to the port2 interface of FortiGate unit A:
config system interface
edit port2
set vrrp-virtual-mac enable
config vrrp
edit 50 (32)
set vrip 10.31.101.120
set priority 255
next
edit 100 (64)
set vrip 10.31.101.130
set priority 50
end
end
- Log into the CLI of FortiGate unit B.
- Enter the following command to enable the VRRP virtual MAC address feature and add the VRRP groups to the port2 interface of FortiGate unit B:
config system interface
edit port2
set vrrp-virtual-mac enable
config vrrp
edit 50
set vrip 10.31.101.120
set priority 50
next
edit 100
set vrip 10.31.101.130
set priority 255
end
end
Optional VRRP configuration settings
In addition to the basic configuration settings, you can change to the VRRP configuration to:
- Adjust the virtual router advertisement message interval between 1 and 255 seconds using the
adv-intervaloption. - Adjust the startup time using the
start-timeoption. The default start time is 3 seconds and the range is 1 to 255 seconds. The start time is the maximum time that the backup unit waits between receiving advertisement messages from the master unit. If the backup unit does not receive an advertisement message during this time it assumes the master has failed and becomes the new master unit. In some cases the advertisement messages may be delayed. For example, some switches with spanning tree enabled may delay some of the advertisement message packets. If you find that backup units are attempting to become master units without the master unit failing, you can extend the start time to make sure the backup units wait long enough for the advertisement messages. - Enable or disable individual virtual router configurations using the
statusoption. Normally virtual router configurations are enabled but you can temporarily disable one if its not required. - Enable or disable preempt mode using the
preemptoption. In preempt mode a higher priority backup unit can preempt a lower priority master unit. This can happen if a master has failed, a backup unit has become the master unit, and the failed master is restarted. Since the restarted unit will have a higher priority, if preempt mode is enabled the restarted unit will replace the current master unit. Preempt mode is enabled by default. - Monitor the route to a destination IP address using the
vrdstoption.
Copyright © 2018 Fortinet, Inc. All Rights Reserved. | Terms of Service | Privacy Policy
