
FortiClient dialup-client configuration example
This example demonstrates how to set up a FortiClient dialup-client IPsec VPN that uses preshared keys for authentication purposes. In the example configuration, the DHCP over IPsec feature is enabled in the FortiClient Endpoint Security application so that the FortiClient Endpoint Security application can acquire a VIP address through the FortiGate DHCP server. Both route-based and policy-based solutions are covered.
Example FortiClient dialup-client configuration
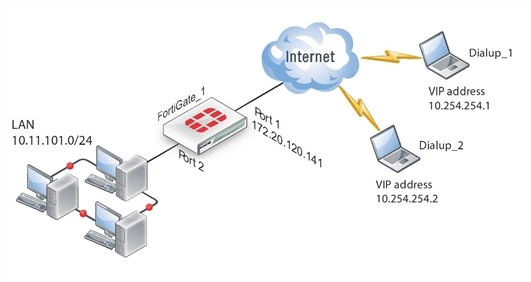
In the example configuration:
- VIP addresses that are not commonly used (in this case, 10.254.254.0/24) are assigned to the FortiClient dialup clients using a DHCP server.
- The dialup clients are have access to the LAN behind FortiGate_1.
- The other network devices are assigned IP addresses as shown above.
Configuring FortiGate_1
When a FortiGate unit receives a connection request from a dialup client, it uses IPsec Phase 1 parameters to establish a secure connection and authenticate the client. Then, if the security policy permits the connection, the FortiGate unit establishes the tunnel using IPsec Phase 2 parameters and applies the IPsec security policy. Key management, authentication, and security services are negotiated dynamically through the IKE protocol.
To support these functions, the following general configuration steps must be performed at the FortiGate unit:
- Define the Phase 1 parameters that the FortiGate unit needs to authenticate the dialup clients and establish a secure connection. See To define the Phase 1 parameters.
- Define the Phase 2 parameters that the FortiGate unit needs to create a VPN tunnel and enable all dialup clients having VIP addresses on the 10.254.254.0/24 network to connect using the same tunnel definition. See To define the Phase 2 parameters.
- Create security policy to control the permitted services and permitted direction of traffic between the IP source address and the dialup clients. See To define the firewall addresses.
- Configure the FortiGate unit to service DHCP requests from dialup clients. See Configuring the FortiClient Endpoint Security application.
To define the Phase 1 parameters
- Go to VPN > IPsec > Tunnels and create the new custom tunnel or edit an existing tunnel.
- Edit the Phase 1 Proposal (if it is not available, you may need to click the Convert to Custom Tunnel button).
- Enter the following information, and select OK:
| Name | todialups |
| Remote Gateway | Dialup User |
| Local Interface | Port 1 |
| Mode | Main |
| Authentication Method | Preshared Key |
| Pre-shared Key | hardtoguess |
| Peer Options | Any peer ID |
| Advanced | Select |
To define the Phase 2 parameters
- Open the Phase 2 Selectors panel.
- Select Advanced, enter the following information, and select OK:
| Name | td_2 |
| Phase 1 | todialups |
| Advanced | DHCP-IPsec |
To define the firewall addresses
- Go to Policy & Objects > Objects > Addresses.
- Select Create New, enter the following information, and select OK:
| Name | internal_net |
| Type | Subnet |
| Subnet/IP Range | 10.11.101.0/24 |
| Interface | Port 2 |
- Select Create New, enter the following information, and select OK:
| Name | dialups |
| Type | IP Range |
| Subnet/IP Range | 10.254.254.1-10.254.254.10 |
| Interface | Route-based VPN: todialups Policy-based VPN: Any |
The security policies for route-based and policy-based VPNs are described in separate sections below.
To define security policies - route-based VPN
- Go to Policy & Objects > Policy > IPv4 and select Create New.
- Leave the Policy Type as Firewall and leave the Policy Subtype as Address.
- Enter the following information, and select OK:
| Incoming Interface | todialups |
| Source Address | dialups |
| Outgoing Interface | Port 2 |
| Destination Address | internal_net |
| Action | ACCEPT |
| Enable NAT | Disable |
- Select Create New.
- Leave the Policy Type as Firewall and leave the Policy Subtype as Address.
- Enter the following information, and select OK:
| Incoming Interface | Port 2 |
| Source Address | internal_net |
| Outgoing Interface | todialups |
| Destination Address | dialups |
| Action | ACCEPT |
| Enable NAT | Disable |
- Select Create New.
- Leave the Policy Type as Firewall and leave the Policy Subtype as Address.
- Enter the following information, and select OK:
| Incoming Interface | Port 2 |
| Source Address | internal_net |
| Outgoing Interface | todialups |
| Destination Address | all |
| Service | DHCP |
| Action | ACCEPT |
| Enable NAT | Disable |
- Place these policies in the policy list above any other policies having similar source and destination addresses.
The policy in step FortiClient dialup-client configuration example is required for DHCP to function properly for policy-based VPNs. You can omit this policy if you change the Destination Address Name to all in the step before. Route-based policies are not affected by this.
To define the security policy - policy-based VPN
- Go to Policy & Objects > Policy > IPv4 and select Create New.
- Enter the following information, and select OK:
| Incoming Interface | Port 2 |
| Source Address | internal_net |
| Outgoing Interface | Port 1 |
| Destination Address | dialups |
| VPN Tunnel | Select Use Existing and select todialups from the drop-down list. |
| Allow traffic to be initiated from the remote site | Enable |
- Place the policy in the policy list above any other policies having similar source and destination addresses.
Configuring the FortiClient Endpoint Security application
The following procedure explains how to configure the FortiClient Endpoint Security application to connect to FortiGate_1 and broadcast a DHCP request. The dialup client uses the VIP address acquired through FortiGate DHCP relay as its IP source address for the duration of the connection.
To configure FortiClient
- Go to Remote Access and select the down-arrow for the VPN connection.
- Select Add new connection and complete following information:
| VPN Type | Select IPsec VPN. |
| Connection Name | Headquarters. |
| Remote Gateway | The port1 IP address. |
| Authentication Method | Select Pre-shared Key. |
| Pre-shared Key | hardtoguess |
| User Name | Enter the user name to connect to the tunnel. |
- Select OK.
Copyright © 2018 Fortinet, Inc. All Rights Reserved. | Terms of Service | Privacy Policy
