
FortiGate-5000 active-active HA cluster with FortiClient licenses
This section describes how to configure an HA cluster of three FortiGate-5001C units that connect an internal network to the Internet. The FortiGate-5001C units each have a FortiClient license installed on them to support FortiClient profiles.
Normally it is recommended that you add FortiClient licenses to the FortiGate units before setting up the cluster. This example; however, describes how to apply FortiClient licenses to the FortiGate units in an operating cluster.
Example network topology
The following diagram shows an HA cluster consisting of three FortiGate‑5001C cluster units (host names slot-3, slot-4, and slot-5) installed in a FortiGate-5000 series chassis with two FortiSwitch-5003B units for heartbeat communication between the cluster units. The cluster applies security features including FortiClient profiles to data traffic passing through it.
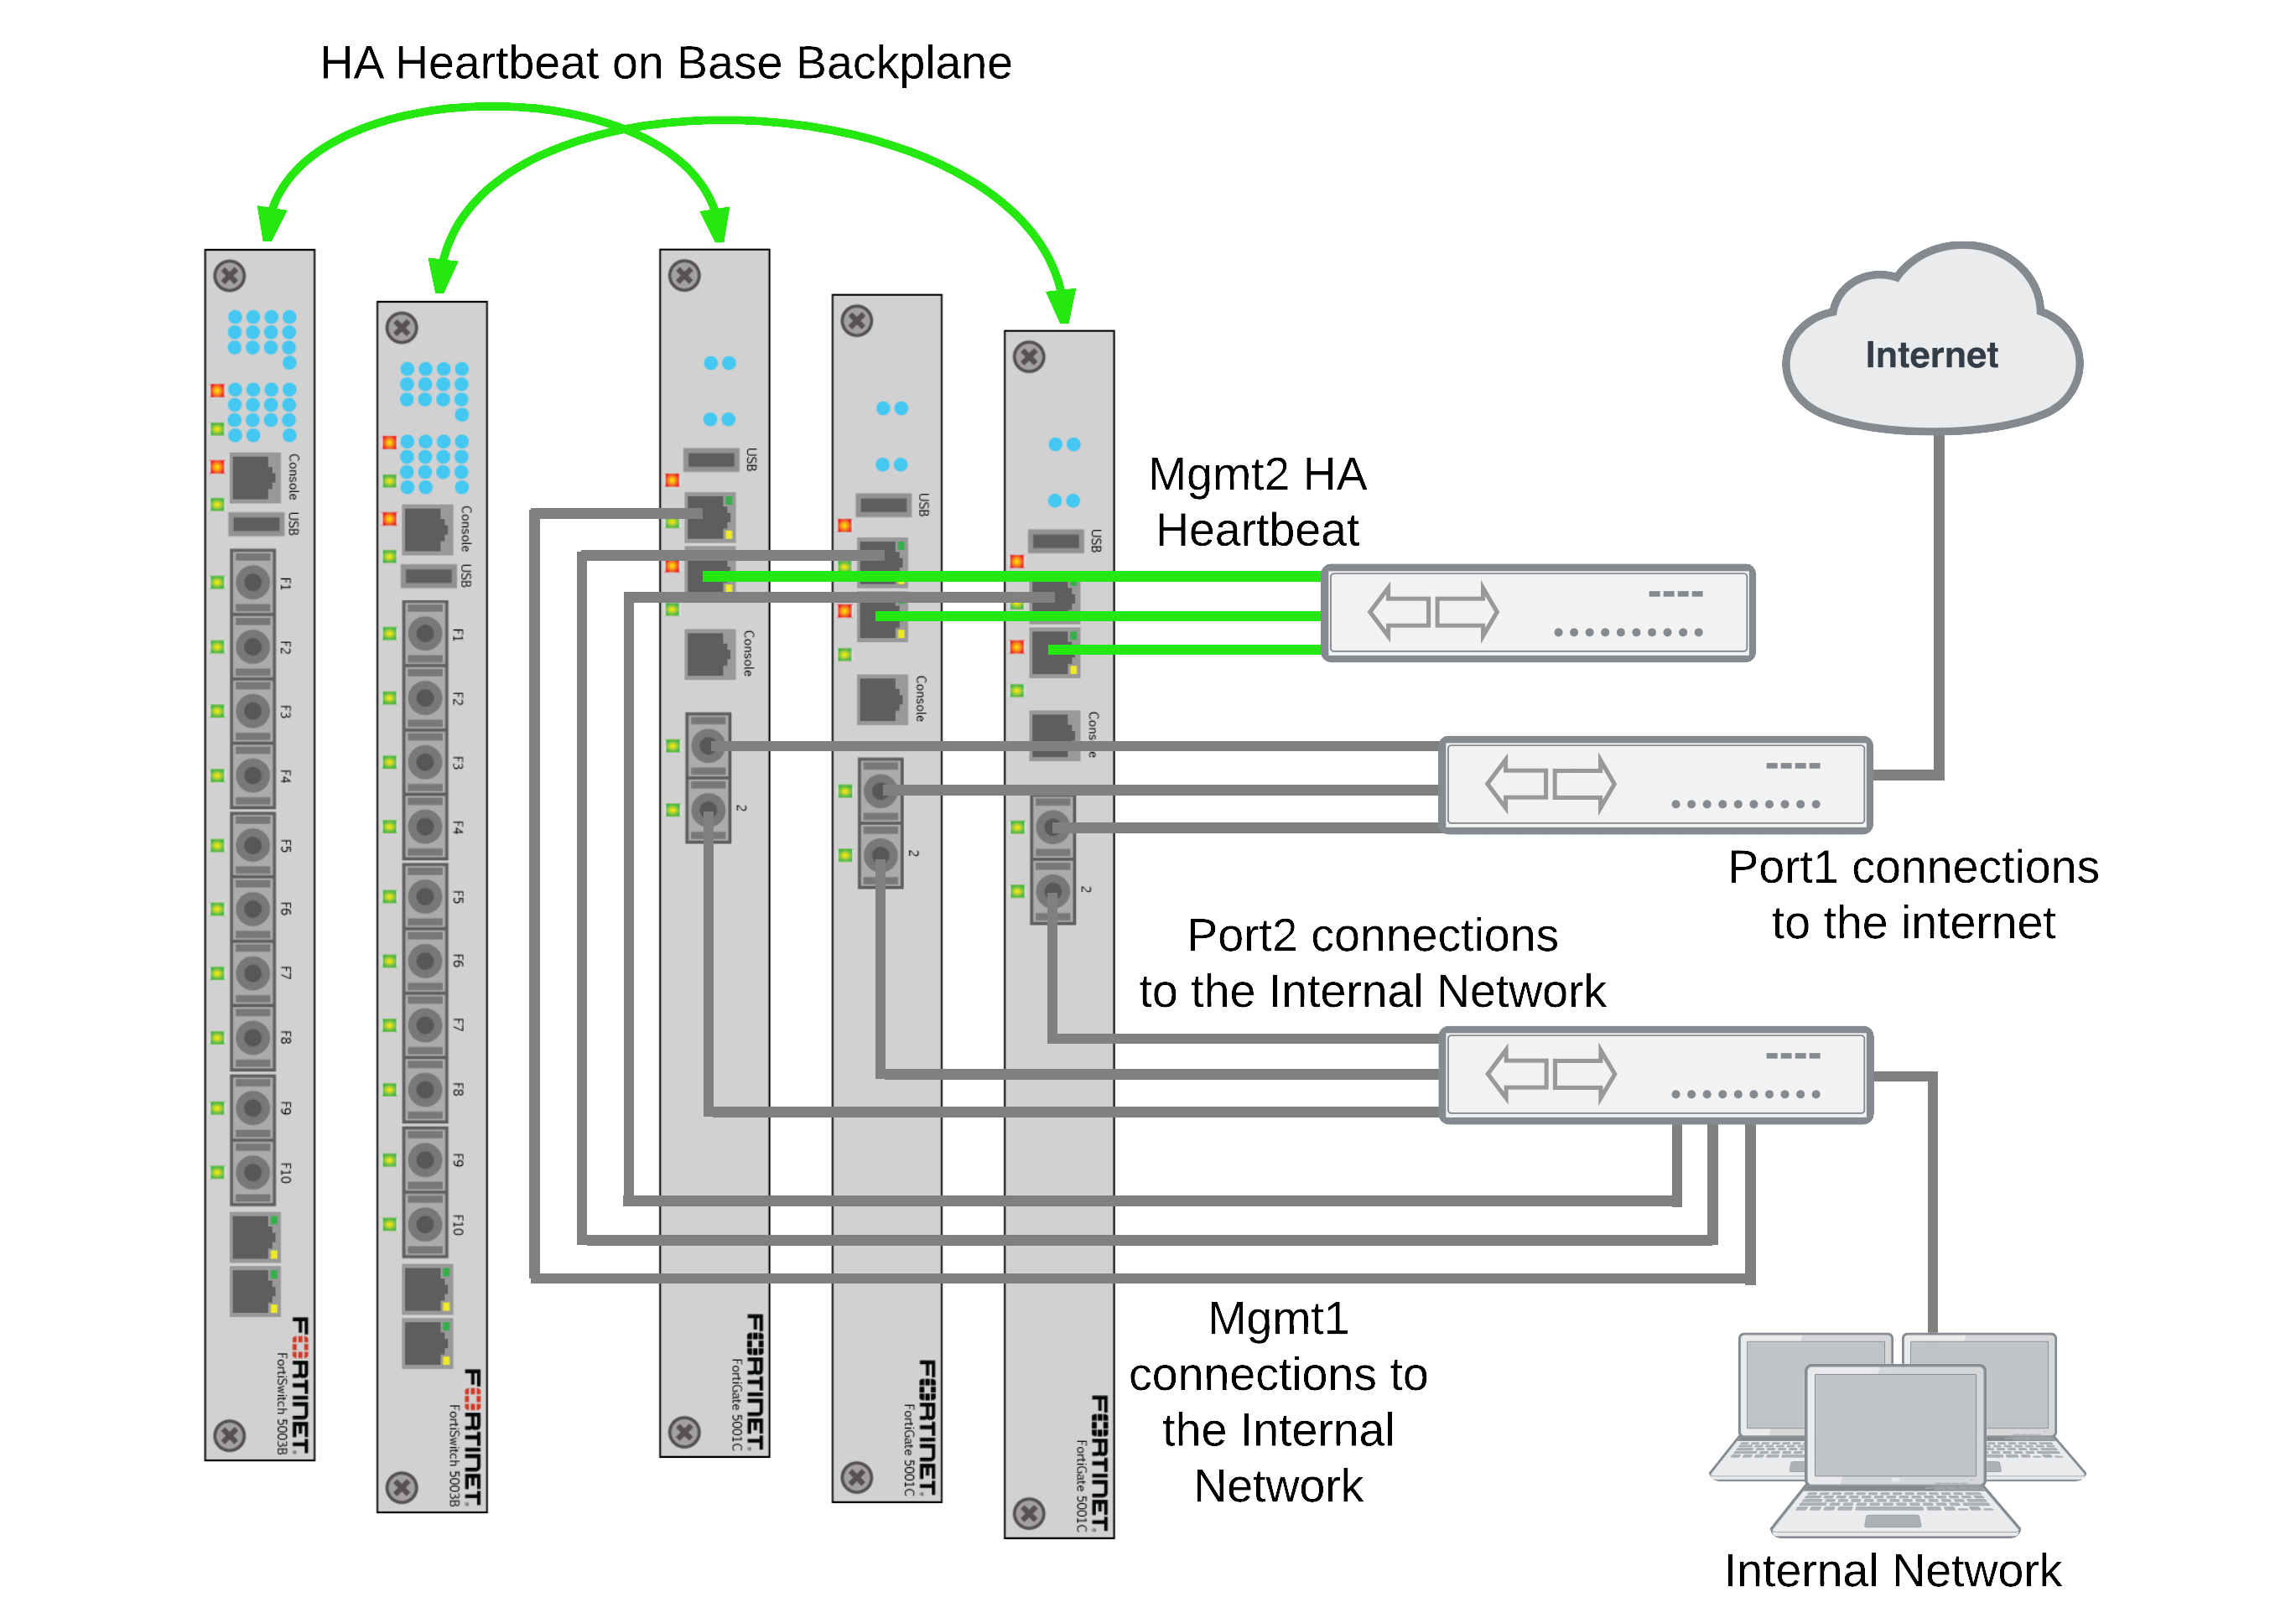
The cluster is managed from the internal network using the FortiGate-5001C mgmt1 interfaces configured as HA reserved management interfaces. Using these reserved management interfaces the overall cluster can be managed and cluster units can be managed individually. Individual management access to each cluster unit makes some operations, such as installing FortiClient licenses, easier and also allows you to view status of each cluster unit.
The reserved management interface of each cluster unit has a different IP address and retains its own MAC address. The cluster does not change the reserved management interface MAC address.
Example network topology
By default base1 and base2 are used for heartbeat communication between the FortiGate units. To use the base1 and base2 interfaces for the HA heartbeat, the example describes how to display the backplane interfaces on the web-based manager before turning on HA.
This example also includes using the mgmt2 interface for heartbeat communication for additional heartbeat redundancy.
To connect the cluster
- Connect the FortiGate-5001C port1 interfaces to a switch and connect that switch to the Internet.
- Connect the FortiGate-5001C port2 interfaces to a switch and connect that switch to the internal network.
- Connect the FortiGate-5001C mgmt1 interfaces to a switch that connects to the engineering network.
- Connect the FortiGate-5001C mgmt2 interfaces to a switch for heartbeat communication between them.
Configuring the FortiGate-5000 active-active cluster - web-based manager
These procedures assume you are starting with three FortiGate-5001C boards and two FortiSwitch-5003B boards installed in a compatible FortiGate-5000 series chassis. The FortiSwitch-5003B boards are in chassis slots 1 and 2 and the FortiGate-5001C boards are in chassis slots 3, 4, and 5 and the chassis is powered on. All devices are in their factory default configuration. No configuration changes to the FortiSwitch-5003B boards are required.
To configure the FortiGate-5001C units
- From the internal network, log into the web-based manager of the FortiGate-5001C unit in chassis slot 3 by connecting to the mgmt1 interface.
|
|
By default the mgmt1 interface of each FortiGate-5001C unit has the same IP address. To log into each FortiGate-5001C unit separately you could either disconnect the mgmt1 interfaces of the units that you don’t want to log into or change the mgmt1 interface IP addresses for each unit by connecting to each unit’s CLI from their console port. |
- Register and apply licenses to the FortiGate unit. This includes FortiCloud activation and entering a license key if you purchased more than 10 Virtual Domains (VDOMS). In this example you will leave FortiClient licensing until after you have formed the cluster.
- You can also install any third-party certificates on the primary FortiGate before forming the cluster. Once the cluster is formed third-party certificates are synchronized to the backup FortiGate.
FortiToken licenses can be added at any time because they are synchronized to all cluster members. - On the System Information dashboard widget, beside Host Name select Change.
- Enter a new Host Name for this FortiGate unit, for example:
| New Name | 5001C-Slot-3 |
- Connect to the CLI and enter the following command to display backplane interfaces on the web-based manager:
config system global
set show-backplane-intf enable
end
- Set the Administrative Status of the base1 and base 2 interfaces to Up.
You can do this from the web-based manager by going to System > Network > Interface, editing each interface and setting Administrative Status to Up.
You can also do this from the CLI using the following command:
config system interface
edit base1
set status up
next
edit base2
set status up
end
- Go to System > Network > Interface and configure the IP address of the mgmt1 interface.
Because mgmt1 will become the reserved management interface for the cluster unit each FortiGate-5001C should have a different mgmt1 interface IP address. Give the mgmt1 interface an address that is valid for the internal network. Once HA with the reserved Management interface is enabled the IP address of the mgmt1 interface can be on the same subnet as the port2 interface (which will also be connected to the Internal network).
After the FortiGate unit is operating in HA mode the mgmt1 interface will retain its original MAC address instead of being assigned a virtual MAC address.
- Go to System > Config > HA and change the following settings:
Set the Mode to Active-Active.
Select Reserve Management Port for Cluster Member and select mgmt1.
Set the group name and password:
| Group Name | example3.com | ||
| Password | HA_pass_3 | ||
Set the Heartbeat interface configuration to use base1, base2 and mgmt2 for heartbeat communication. Set the priority of each heartbeat interface to 50:
| Heartbeat Interface | ||
| Enable | Priority | |
| base1 | Select | 50 |
| base2 | Select | 50 |
| mgmt2 | Select | 50 |
- Select OK.
The FortiGate unit negotiates to establish an HA cluster. When you select OK you may temporarily lose connectivity with the FortiGate unit as the HA cluster negotiates and the FGCP changes the MAC address of the FortiGate unit interfaces. The MAC addresses of the FortiGate‑5001C interfaces change to the following virtual MAC addresses:
- base1 interface virtual MAC:
00-09-0f-09-00-00 - base2 interface virtual MAC:
00-09-0f-09-00-01 - fabric1 interface virtual MAC:
00-09-0f-09-00-02 - fabric2 interface virtual MAC:
00-09-0f-09-00-03 - fabric3 interface virtual MAC:
00-09-0f-09-00-04 - fabric4 interface virtual MAC:
00-09-0f-09-00-05 - fabric5 interface virtual MAC:
00-09-0f-09-00-06 - mgmt1 keeps its original MAC address
- mgmt2 interface virtual MAC:
00-09-0f-09-00-08 - port1 interface virtual MAC:
00-09-0f-09-00-09 - port2 interface virtual MAC:
00-09-0f-09-00-0a
To reconnect sooner, you can update the ARP table of your management PC by deleting the ARP table entry for the FortiGate unit (or just deleting all arp table entries). You may be able to delete the arp table of your management PC from a command prompt using a command similar to
arp -d.You can use the
get hardware nic(ordiagnose hardware deviceinfo nic) CLI command to view the virtual MAC address of any FortiGate unit interface. For example, use the following command to view the port1 interface virtual MAC address (Current_HWaddr) and the port1 permanent MAC address (Permanent_HWaddr):
get hardware nic base1
.
.
.
Current_HWaddr 00:09:0f:09:00:00
Permanent_HWaddr 00:09:0f:71:0a:dc
.
.
.
- Repeat these steps for the FortiGate-5001C units in chassis slots 4 and 5, with the following differences.
Set the mgmt1 interface IP address of each FortiGate-5001C unit to a different IP address.
Set the FortiGate-5001C unit in chassis slot 4 host name to:
| New Name | 5001C-Slot-4 |
Set the FortiGate-5001C unit in chassis slot 5 host name to:
| New Name | 5001C-Slot-5 |
As you configure each FortiGate unit, they will negotiate and join the cluster.
To view cluster status
As you add units to the cluster you can log into the web-based manager of one of the cluster units to view the status of the cluster. The status displays will show each unit as it is added to the cluster.
- Log into the primary unit or any cluster unit and view the system dashboard.
The System Information dashboard widget shows the Cluster Name (example3.com) and the host names and serial numbers of the Cluster Members. The Unit Operation widget shows multiple cluster units.
- Go to System > Config > HA to view the cluster members list.
The list shows three cluster units, their host names, their roles in the cluster, and their priorities. You can check this list at any time to confirm that the cluster is operating normally.
If the cluster members list and the dashboard do not display all of the cluster units, they are not functioning as a cluster.
To troubleshoot the cluster
See FortiGate-5000 active-active HA cluster with FortiClient licenses.
To manage each cluster unit
Because you have configured a reserved management interface, you can manage each cluster unit separately by connecting to the IP address you configured for each unit’s mgmt1 interface. You can view the status of each cluster unit and make changes to each unit’s configuration. For example, as described below, each cluster unit must have its own FortiClient license. You can use the reserved management IP addresses to connect to each cluster unit to install the FortiClient license for that unit.
Usually you would make configuration changes by connecting to the primary unit and changing its configuration. The cluster then synchronizes the configuration changes to all cluster units. If you connect to individual cluster units and change their configuration, those configuration changes are also synchronized to each cluster unit. The exception to this is configuration objects that are not synchronized, such as the host name, FortiClient license and so on.
You can also manage each cluster unit by logging into the primary unit CLI and using the following command to connect to other cluster units:
execute ha manage <cluster-index>
To add basic configuration settings to the cluster
Use the following steps to configure the cluster.
- Log into the cluster web-based manager.
You can log into the primary unit or any one of the cluster units using the appropriate mgmt1 IP address.
- Go to System > Admin > Administrators.
- Edit admin and select Change Password.
- Enter and confirm a new password.
- Select OK.
- Go to System > Network > Interface and edit the port1 interface. Set this interface IP address to the address required to connect to the interface to the Internet.
- Edit the port2 interface and set its IP to an IP address for the internal network.
To add a FortiClient license to each cluster unit
Normally you would add FortiClient licenses to the FortiGate units before forming the cluster. However, you can can use the following steps to add FortiClient licenses to an operating cluster.
Contact your reseller to purchase FortiClient licenses for your cluster units. Each cluster unit must have its own FortiClient license.
When you receive the license keys you can log into https://support.fortinet.com and add a FortiClient license key to each licensed FortiGate unit. Then, as long as the cluster can connect to the Internet the license keys are downloaded from the FortiGuard network to all of the FortiGate units in the cluster.
You can also use the following steps to manually add the license keys to your cluster units from the web-based manager. Your cluster must be connected to the Internet.
- Log into the -web-based manager of each cluster unit using its reserved management interface IP address.
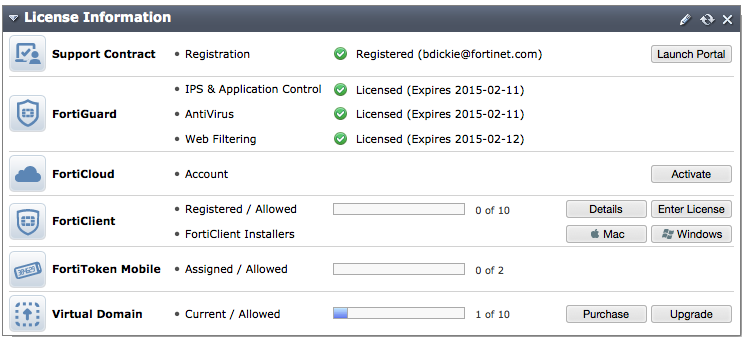
- Go to the License Information dashboard widget and beside FortiClient select Enter License.
- Enter the license key and select OK.
- Confirm that the license has been installed and the correct number of FortiClients are licensed.
- Repeat for all of the cluster units.
You can also use the following command to add the license key from the CLI:
execute FortiClient-NAC update-registration-license <license-number>
You can connect to the CLIs of each cluster unit using their reserved management IP address.
You can also log into the primary unit CLI and use the execute ha manage command to connect to each cluster unit CLI.
Configuring the FortiGate-5000 active-active cluster - CLI
These procedures assume you are starting with three FortiGate-5001C boards and two FortiSwitch-5003B boards installed in a compatible FortiGate-5000 series chassis. The FortiSwitch-5003B boards are in chassis slots 1 and 2 and the FortiGate-5001C boards are in chassis slots 3, 4, and 5 and the chassis is powered on. All devices are in their factory default configuration. No configuration changes to the FortiSwitch-5003B boards are required.
To configure the FortiGate-5005FA2 units
- From the internal network, log into the CLI of the FortiGate-5001C unit in chassis slot 3 by connecting to the mgmt1 interface.
|
|
By default the mgmt1 interface of each FortiGate-5001C unit has the same IP address. To log into each FortiGate-5001C unit separately you could either disconnect the mgmt1 interfaces of the units that you don’t want to log into or change the mgmt1 interface IP addresses for each unit by connecting to each unit’s CLI from their console port. |
You can also use a console connection.
- Register and apply licenses to the FortiGate unit. This includes FortiCloud activation and entering a license key if you purchased more than 10 Virtual Domains (VDOMS). In this example you will leave FortiClient licensing until after you have formed the cluster.
- You can also install any third-party certificates on the primary FortiGate before forming the cluster. Once the cluster is formed third-party certificates are synchronized to the backup FortiGate.
FortiToken licenses can be added at any time because they are synchronized to all cluster members. - Change the host name for this FortiGate unit. For example:
config system global
set hostname 5001C-Slot-3
end
- Enter the following command to display backplane interfaces on the web-based manager:
config system global
set show-backplane-intf enable
end
- Set the Administrative Status of the base1 and base 2 interfaces to Up.
config system interface
edit base1
set status up
next
edit base2
set status up
end
- Add an IP address to the mgmt1 interface.
config system interface
edit mgmt1
set ip 172.20.120.110/24
set allowaccess http https ssl ping
end
Because mgmt1 will become the reserved management interface for the cluster unit each FortiGate-5001C should have a different mgmt1 interface IP address. Give the mgmt1 interface an address that is valid for the internal network. Once HA with the reserved Management interface is enabled the IP address of the mgmt1 interface can be on the same subnet as the port2 interface (which will also be connected to the Internal network).
- Configure HA settings.
config system ha
set mode a-a
set ha-mgmt-status enable
set ha-mgmt-interface mgmt1
set group-name example3.com
set password HA_pass_3
set hbdev base1 50 base2 50 mgmt2 50
end
The FortiGate unit negotiates to establish an HA cluster. When you select OK you may temporarily lose connectivity with the FortiGate unit as the HA cluster negotiates and the FGCP changes the MAC address of the FortiGate unit interfaces. The MAC addresses of the FortiGate‑5001C interfaces change to the following virtual MAC addresses:
- base1 interface virtual MAC:
00-09-0f-09-00-00 - base2 interface virtual MAC:
00-09-0f-09-00-01 - fabric1 interface virtual MAC:
00-09-0f-09-00-02 - fabric2 interface virtual MAC:
00-09-0f-09-00-03 - fabric3 interface virtual MAC:
00-09-0f-09-00-04 - fabric4 interface virtual MAC:
00-09-0f-09-00-05 - fabric5 interface virtual MAC:
00-09-0f-09-00-06 - mgmt1 keeps its original MAC address
- mgmt2 interface virtual MAC:
00-09-0f-09-00-08 - port1 interface virtual MAC:
00-09-0f-09-00-09 - port2 interface virtual MAC:
00-09-0f-09-00-0a
To reconnect sooner, you can update the ARP table of your management PC by deleting the ARP table entry for the FortiGate unit (or just deleting all arp table entries). You may be able to delete the arp table of your management PC from a command prompt using a command similar to
arp -d.You can use the
get hardware nic(ordiagnose hardware deviceinfo nic) CLI command to view the virtual MAC address of any FortiGate unit interface. For example, use the following command to view the port1 interface virtual MAC address (Current_HWaddr) and the port1 permanent MAC address (Permanent_HWaddr):
get hardware nic base1
.
.
.
Current_HWaddr 00:09:0f:09:00:00
Permanent_HWaddr 00:09:0f:71:0a:dc
.
.
.
- Repeat these steps for the FortiGate-5001C units in chassis slots 4 and 5, with the following differences.
Set the mgmt1 interface IP address of each FortiGate-5001C unit to a different IP address.
Set the FortiGate-5001C unit in chassis slot 4 host name to:
config system global
set hostname 5001C-Slot-4
end
Set the FortiGate-5001C unit in chassis slot 5 host name to:
config system global
set hostname 5001C-Slot-5
end
As you configure each FortiGate unit, they will negotiate and join the cluster.
To view cluster status
As you add units to the cluster you can log into the CLI of one of the cluster units using its reserved management interface to view the status of the cluster. The status will show each unit as it is added to the cluster.
For example, the following command output shows the status of the cluster when all three cluster units have been added:
get system ha status
Model: FortiGate-5001C
Mode: a-a
Group: 0
Debug: 0
ses_pickup: disable
Master:128 slot-5 FG-5KC3E13800084 0
Slave :128 slot-4 FG-5KC3E13800051 1
Slave :128 slot-3 FG-5KC3E13800046 2
number of vcluster: 1
vcluster 1: work 169.254.0.1
Master:0 FG-5KC3E13800084
Slave :1 FG-5KC3E13800051
Slave :2 FG-5KC3E13800046
You can use this command to confirm that the cluster is operating normally. For example, if the command shows only two cluster units then one unit has left the cluster for some reason.
To troubleshoot the cluster
See FortiGate-5000 active-active HA cluster with FortiClient licenses.
To manage each cluster unit
Because you have configured a reserved management interface, you can manage each cluster unit separately by connecting to the IP address you configured for each unit’s mgmt1 interface. You can view the status of each cluster unit and make changes to each unit’s configuration. For example, as described below, each cluster unit must have its own FortiClient license. You can use the reserved management IP addresses to connect to each cluster unit to install the FortiClient license for that unit.
Usually you would make configuration changes by connecting to the primary unit and changing its configuration. The cluster then synchronizes the configuration changes to all cluster units. If you connect to individual cluster units and change their configuration, those configuration changes are also synchronized to each cluster unit. The exception to this is configuration objects that are not synchronized, such as the host name, FortiClient license and so on.
You can also manage each cluster unit by logging into the primary unit CLI and using the following command to connect to other cluster units:
execute ha manage <cluster-index>
To add a password for the admin administrative account
- Add a password for the admin administrative account.
config system admin
edit admin
set password <psswrd>
end
To add basic configuration settings to the cluster
Use the following steps to configure the cluster.
- Log into the cluster CLI.
You can log into the primary unit or any one of the cluster units using the appropriate mgmt1 IP address.
- Add a password for the admin administrative account.
config system admin
edit admin
set password <psswrd>
end
- Set the port1 interface IP address to the address required to connect to the interface to the Internet.
config system interface
edit port1
set ip 10.10.10.10/24
end
- Set the port2 interface IP address to the address required to connect to the interface to the internal network.
config system interface
edit port2
set ip 172.20.120.12/24
end
To add a FortiClient license to each cluster unit
Normally you would add FortiClient licenses to the FortiGate units before forming the cluster. However, you can can use the following steps to add FortiClient licenses to an operating cluster.
Contact your reseller to purchase FortiClient licenses for your cluster units. Each cluster unit must have its own FortiClient license.
When you receive the license keys you can log into https://support.fortinet.com and add a FortiClient license key to each licensed FortiGate unit. Then, as long as the cluster can connect to the Internet the license keys are downloaded from the FortiGuard network to all of the FortiGate units in the cluster.
You can also use the following steps to manually add the license keys to your cluster units from the CLI. Your cluster must be connected to the Internet.
- Log into the CLI of each cluster unit using its reserved management interface IP address.
- Enter the following command to the unit’s serial number:
get system status
- Enter the following command to add the license key for that serial number:
execute FortiClient-NAC update-registration-license <license-key>
- Confirm that the license has been installed and the correct number of FortiClients are licensed.
execute forticlient info
Maximum FortiClient connections: unlimited.
Licensed connections: 114
NAC: 114
WANOPT: 0
Test: 0
Other connections:
IPsec: 0
SSLVPN: 0
- Repeat for all of the cluster units.
You can also log into the primary unit CLI and use the execute ha manage command to connect to each cluster unit CLI.
Copyright © 2018 Fortinet, Inc. All Rights Reserved. | Terms of Service | Privacy Policy
