
Virtual Domains
Virtual domains (VDOMs) are a method of dividing a FortiGate unit into two or more virtual units that function as multiple independent units. VDOMs can provide separate firewall policies and, in NAT/Route mode, completely separate configurations for routing and VPN services for each connected network or organization.
This chapter will cover the basics of VDOMs, how they change your FortiGate unit, and how to work with VDOMs.
VDOMs let you split your physical FortiGate unit into multiple virtual units. The resulting benefits range from limiting Transparent mode ports to simplified administration, to reduced space and power requirements.
When VDOMs are disabled on any FortiGate unit, there is still one VDOM active: the root VDOM. It is always there in the background. When VDOMs are disabled, the root VDOM is not visible but it is still there.
The root VDOM must be there because the FortiGate unit needs a management VDOM for management traffic among other things. It is also why when you enable VDOMs, all your configuration is preserved in the root VDOM-because that is where you originally configured it.
This section includes:
Benefits of Virtual Domains
VDOMs provide the following benefits:
- Improving Transparent mode configuration
- Easier administration
- Continued security
- Savings in physical space and power
- More flexible MSSP configurations
Improving Transparent mode configuration
When VDOMs are not enabled and you put your FortiGate unit into Transparent mode, all the interfaces on your unit become broadcast interfaces. The problem with this is that there are no interfaces free to do anything else.
With multiple VDOMs you can have one of them configured in Transparent mode, and the rest in NAT/Route mode. In this configuration, you have an available transparent mode FortiGate unit you can drop into your network for troubleshooting, and you also have the standard NAT for networking.
Easier administration
VDOMs provide separate security domains that allow separate zones, user authentication, firewall policies, routing, and VPN configurations. VDOMs separate security domains and simplify administration of complex configurations—you do not have to manage as many settings at one time. For more information, see Global and per-VDOM settings.
By default, each FortiGate unit has a VDOM named root. This VDOM includes all of the unit’s physical interfaces, modem, VLAN subinterfaces, zones, firewall policies, routing settings, and VPN settings.
Also, you can optionally assign an administrator account restricted to one VDOM. If the VDOM is created to serve an organization, this feature enables the organization to manage its own configuration. For more information, see Administrators in Virtual Domains.
Each physical FortiGate unit requires a FortiGuard license to access security updates. VDOMs do not require any additional FortiGuard licenses, or updating — all the security updates for all the VDOMs are performed once per update at the global level. Combined this can be a potentially large money and time saving feature in your network.
Management systems such as SNMP, logging, alert email, FDN-based updates, and NTP-based time setting use addresses and routing in the management VDOM to communicate with the network. They can connect only to network resources that communicate with the management VDOM. Using a separate VDOM for management traffic enables easier management of the FortiGate unit global settings, and VDOM administrators can also manage their VDOMs more easily. For more information, see Changing the management virtual domain.
Continued security
When a packet enters a VDOM, it is confined to that VDOM and is subject to any firewall policies for connections between VLAN subinterfaces or zones in that VDOM, just like those interfaces on a FortiGate unit without VDOMs enabled.
To travel between VDOMs, a packet must first pass through a firewall policy on a physical interface. The packet then arrives at another VDOM on that same FortiGate unit, but on a different interface, where it must pass through another firewall before entering. It doesn’t matter if the interface is physical or virtual — inter-VDOM packets still require the same security measures as when passing through physical interfaces.
VDOMs provide an additional level of security because regular administrator accounts are specific to one VDOM — an administrator restricted to one VDOM cannot change information on other VDOMs. Any configuration changes and potential errors will apply only to that VDOM and limit any potential down time. Using this concept, you can farther split settings so that the management domain is only accessible by the super_admin and does not share any settings with the other VDOMs.
Savings in physical space and power
To increase the number of physical FortiGate units, you need more rack space, cables, and power to install the new units. You also need to change your network configuration to accommodate the new physical units. In the future, if you need fewer physical units you are left with expensive hardware that is idle.
Increasing VDOMs involves no additional hardware, no additional cabling, and very few changes to existing networking configurations. VDOMs save physical space and power. You are limited only by the size of the VDOM license you buy and the physical resources on the FortiGate unit.
By default, FortiGate units support a maximum of 10 VDOMs in any combination of NAT/Route and Transparent modes. Many FortiGate models support purchasing a license key to increase the maximum number. For more information on VDOM licences, see Virtual Domain Licensing.
More flexible MSSP configurations
If you are a managed security and service provider (MSSP), VDOMs are fundamental to your business. As a service provider you have multiple customers, each with their own needs and service plans. VDOMs allow you to have a separate configuration for each customer, or group of customers; with up to 500 VDOMs configured per FortiGate unit on high end models. See Virtual Domain Licensing.
Not only does this provide the exact level of service needed by each customer, but administration of the FortiGate unit is easier as well - you can provide uninterrupted service generally with immediate changes as required. Most importantly, it allows you to only use the resources that each customer needs. Inter-VDOM links allow you to customize the level of interaction you need between each of your customers and your administrators. See Inter-VDOM routing.
Enabling and accessing Virtual Domains
While Virtual Domains are essentially the same as your regular FortiGate unit for menu configuration, CLI command structure, and general task flow, there are some small differences.
After first enabling VDOMs on your FortiGate unit, you should take the time to familiarize yourself with the interface. This section will help walk you through virtual domains.
This section includes:
- Enabling Virtual Domains
- Viewing the VDOM list
- Global and per-VDOM settings
- Resource settings
- Virtual Domain Licensing
- Logging in to VDOMs
Enabling Virtual Domains
Using the default admin administration account, you can enable or disable VDOM operation on the FortiGate unit.
To enable VDOM configuration - web-based manager:
- Log in with a super_admin account.
- Go to System > Dashboard > Status.
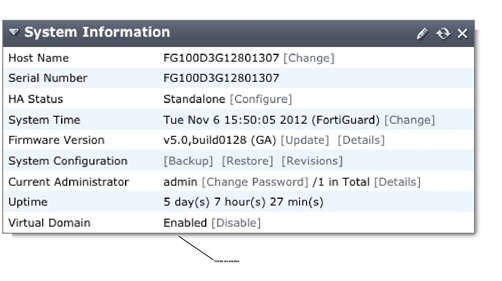
- Under System Information > Virtual Domain, select Enable and confirm your selection.
The FortiGate unit logs off all sessions. You can now log in again as admin. For more information, see Administrators in Virtual Domains.
System Information
To enable VDOM configuration - CLI:
config system global
set vdom-admin enable
end
Changes to the web-based manager and CLI
When Virtual Domains are enabled, your FortiGate unit will change. The changes will be visible in both the web-based manager and CLI, just the web-based manager, or just the CLI.
When enabling VDOMs, the web-based manager and the CLI are changed as follows:
- Global and per-VDOM configurations are separated. This is indicated in the Online Help by Global and VDOM icons. See Global and per-VDOM settings.
- Only admin accounts using the super_admin profiles can view or configure global options. See Administrators in Virtual Domains.
- Admin accounts using the super_admin profile can configure all VDOM configurations.
- All other administrator accounts can configure only the VDOM to which they are assigned.
The following changes are specific to the web-based manager:
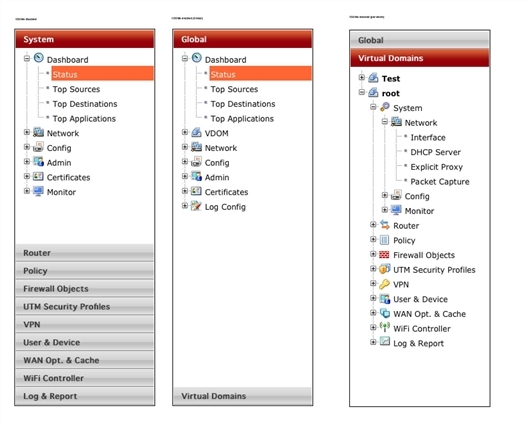
- In the Global view, the System section of the left-hand menu is renamed to Global, and includes a VDOM sub-menu.
- The Log Config menu is moved from Log & Report into the new Global section.
- For admin accounts using the super_admin profile, a new section called Virtual Domains is added at the bottom of the left-hand menu. It lists all the individual VDOMs as expandable menus, with all VDOM specific options in that menu, which allows you to easily select which VDOM to configure, including the root VDOM. See Menu with VDOMs disabled, at the global level, and VDOM level.
Menu with VDOMs disabled, at the global level, and VDOM level
In the CLI, admin accounts using the super_admin profile must specify either the global or a VDOM-specific shell before entering commands:
- To change FortiGate unit system settings, from the top level you must first enter the following CLI before entering commands:
config global
- To change VDOM settings, from the top level you must first enter the following CLI before entering commands for that VDOM:
config vdom
edit <vdom_na
Settings configured outside of a VDOM are called global settings. These settings affect the entire FortiGate unit and include areas such as interfaces, HA, maintenance, some antivirus settings, and some logging settings. In general, any unit settings that should only be changed by the top level administrator are global settings.
Settings configured configwithin a VDOM are called VDOM settings. These settings affect only that specific VDOM and include areas such as operating mode, routing, firewall, VPN, some antivirus, some logging, and reporting.
For more information, see Global and per-VDOM settings.
Viewing the VDOM list
The VDOM list shows all virtual domains, their status, and which VDOM is the management VDOM. It is accessible if you are logged in on an administrator account with the super_admin profile such as the “admin” administrator account.
In the VDOM list you can create or delete VDOMs, edit VDOMs, change the management VDOM, and enable or disable VDOMs.
You can access the VDOM list in Global > VDOM > VDOM.
|
|
The root domain cannot be disabled, even if it is not the management VDOM. |
List of VDOMs
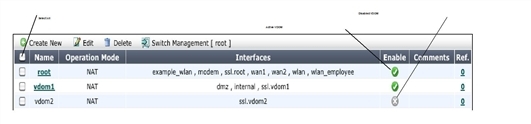
| Create New | Select to add a new VDOM. See Creating a Virtual Domain. |
| Edit | Select to change an existing selected VDOM. |
| Delete | Select to delete the selected VDOM. See Deleting a VDOM. |
| Switch Management | Select to switch the management VDOM. Also shows the current management VDOM. You must select an active non-management VDOM before this option becomes available. See Changing the management virtual domain. |
| Selected | When checked, this checkbox indicates this VDOM has been selected. Nearly all operations such as Edit, Delete, and Switch Management require a VDOM to first be selected. |
| Name | The name of the VDOM. VDOMs are listed in alphabetical order. When the VDOM is active, you can select the VDOM name to enter that VDOM. See Enabling and accessing Virtual Domains. |
| Operation Mode | Indicates the operation mode as either NAT (for NAT/Route mode) or TP (for Transparent mode). |
| Interfaces | The interfaces associated with this VDOM. Each VDOM also includes an interface that starts with “ssl.” that is created by default. |
| Enable | A green checkmark indicates this VDOM is active. See Disabling a Virtual Domain. A grey X indicated this VDOM is disabled. See Disabling a Virtual Domain. |
| Comments | Comments entered when the VDOM was created are displayed here. |
| Ref. | The number of references to this VDOM in the configuration. |
Global and per-VDOM settings
Settings configured outside of a VDOM are called global settings. These settings affect the entire FortiGate unit and include areas such as interfaces, HA, maintenance, some antivirus, and some logging. In general, any unit settings that should only be changed by the top level administrator are global settings.
Settings configured within a VDOM are called VDOM settings. These settings affect only that specific VDOM and include areas such as operating mode, routing, firewall, VPN, some antivirus, some logging settings, and reporting.
When Virtual Domains are not enabled, the entire FortiGate unit is effectively a single VDOM. Per-VDOM limits apply. For some resource types, the global limit cannot be reached with only one VDOM.
Some FortiGate unit documentation indicates which parts of the web-based manager, or the CLI are global and which are per-VDOM using the icons shown below. These icons are also present in the Online Help, available on your FortiGate unit.
Global and VDOM icons

For more information on CLI commands, see the FortiGate CLI Reference.
This section includes:
- Global settings - web-based manager
- Per-VDOM settings - web-based manager
- Global settings - CLI
- Per-VDOM settings - CLI
Global settings - web-based manager
The following table lists commands in the web-based manager that are considered global settings when VDOMs are enabled.
The following configuration settings affect all virtual domains. When virtual domains are enabled, only accounts with the default super_admin profile can access global settings.
Global configuration settings
| System
|
Dashboard > Status - Host name |
| Dashboard > Status - HA Status | |
| Dashboard > Status - System Time | |
| Dashboard > Status - Firmware version | |
| Dashboard > Status - Configuration backup and restore | |
| VDOM > VDOM - list | |
| VDOM > VDOM - edit VDOM (mode and resources) | |
| VDOM > Global Resources | |
| Network > Interfaces | |
| Network > DNS - DNS and DDNS settings | |
| Config > HA | |
| Config > SNMP | |
| Config > Replacement Message - messages and images | |
| Config > FortiGuard - configuration | |
| Config > Advanced - scripts, USB Auto-install, debug log download |
|
| Config > Messaging Servers | |
| Admin > Administrators | |
| Admin > Admin Profile | |
| Admin > Settings - web administration ports, password policy, display settings, timeouts, LCD panel | |
| Certificates - local, remote, and CA certificates, CRLs | |
| Log&Report | Log Config - Log Setting |
Per-VDOM settings - web-based manager
The following table lists commands in the web-based manager that are considered per-VDOM settings when VDOMs are enabled.
VDOM configuration settings
| System | Dashboard > Status - read-only except for administrator password |
| Network > Interfaces (and zones) | |
| Network > DHCP Server | |
| Network > Explicit Proxy | |
| Network > Routing Table (Transparent mode only) | |
| Network > Packet Capture | |
| Config > Replacement Message (messages and images) | |
| Config > Advanced | |
| Monitor > DHCP Monitor | |
| Router | All settings, including dead gateway detection |
| Policy | All settings |
| Firewall Objects | All settings |
| Security Profiles | All settings |
| VPN | All settings |
| User & Device | All settings |
| WiFi Controller | All settings |
| Log&Report | Traffic and Event Logs |
| Reports | |
| FortiCloud | |
| Log Config > Log Setting and Alert E-mail | |
| Logging Monitor |
Global settings - CLI
The following table lists commands in the CLI that are considered global settings when VDOMs are enabled.
From a super_admin profile account, use this command to configure features that apply to the complete FortiGate unit including all virtual domains. Virtual domain configuration (vdom-admin) must be enabled first.
This command syntax shows how you access the commands within config global. For information on these commands, refer to the relevant sections in the CLI Reference. If there are multiple versions of the same command with a “2” or “3” added, the additional commands are not listed but fall under the unnumbered command of the same name.
config global
config antivirus heuristic
config antivirus service
config application name
config dlp settings
config endpoint-control app-detect
config firewall ssl
config gui console
config ips decoder
config ips global
config ips rule
config log fortianalyzer setting
config log fortiguard setting
config log memory global-setting
config log syslogd filter
config log syslogd setting
config log webtrends ...
config spamfilter fortishield
config spamfilter options
config system accprofile
config system admin
config system auto-install
config system autoupdate ...
config system bug-report
config system central-management
config system chassis-loadbalance
config system console
config system custom-language
config system ddns
config system dedicated-mgmt
config system dns
config system dscp-based-priority
config system email-server
config system fips-cc
config system fortiguard
config system fortisandbox
config system fsso-polling
config system geoip-override
config system global
config system ha
config system interface
config system ips-urlfilter-dns
config system lte-modem
config system netflow
config system npu
config system ntp
config system password-policy
config system physical-switch
config system probe-response
config system replacemsg ...
config system replacemsg-image
config system resource-limits
config system session-helper
config system session-sync
config system sflow
config system sms-server
config system snmp ...
config system storage
config system switch-interface
conifg system tos-based-priority
config system vdom-link
config system vdom-property
config system vdom-radius-server
config system virtual-switch
config vpn certificate ...
config wanopt storage
config webfilter fortiguard
config webfilter ips-urlfilter-cache-setting
config wireless-controller global
config wireless-controller timers
config wireless-controller vap
execute FortiClient-NAC
execute backup
execute batch
execute central-mgmt
execute cfg reload
execute cfg save
execute cli check-template-status
execute cli status-msg-only
execute date
execute disconnect-admin-session
execute disk
execute enter
execute erase-disk
execute extender
execute factoryreset
execute factoryreset2
execute formatlogdisk
execute forticlient
execute fortiguard-log
execute fortiguard-message
execute ha ignore-hardware-revision
execute log ...
execute policy-packet-capture
execute reboot
execute report-config
execute restore
execute revision
execute router clear
execute send-fds-statistics
execute set system
execute set-next-reboot
execute sfp-mode-sgmii
execute shutdown
execute switch-controller
execute system
execute tac
execute time
execute update-av
execute update-geo-ip
execute update-ips
execute update-list
execute update-netscan
execute update-now
execute update-src-vis
execute upload
execute usb-disk
execute vpn certificate ...
execute wireless-controller delete-wtp-image
execute wireless-controller list-wtp-image
execute wireless-controller restart-acd
execute wireless-controller upload-wtp-image
get antivirus heuristic
get application name
get dlp settings
get endpoint-control forticlient-registration-sync
get extender modem-status
get extender sys-info
get firewall ipv6-eh-filter
get firewall ssl
get gui console
get hardware cpu
get hardware memory
get hardware nic
get hardware npu
get hardware status
get ips decoder
get ips global
get ips rule
get ips view-map
get log fortianalyzer
get log fortguard
get log memory
get log syslog
get webtrends
get mgmt-data status
get spamfilter fortishield
get spamfilter options
get system accprofile
get system admin
get system auto-install
get system auto-update
get system autoupdate
get system central-management
get system central-mgmt
get system checksum
get system cmdb
get system console
get system custom-language
get system ddns
get system dedicated-mgmt
get system dns
get system dscp-based-priority
get system email-server
get system fips-cc
get system fortianalyzer-connectivity
get system fortiguard
get system fortiguard-log-service
get system fortiguard-service
get system fortisandbox
get system fsso-polling
get system geoip-country
get system geoip-override
get system global
get system ha
get system ha-nonsync-csum
get system info
get system interface
get system ips-urlfilter-dns
get system lte-modem
get system mgmt-csum
get system netflow
get system npu
get system ntp
get system password-policy
get system performance
get system physical-switch
get system probe-response
get system replacemsg
get system replacemsg-image
get system resource-limits
get system session-helper
get system session-helper-info
get system session-info
get system session-sync
get system sflow
get system sms-server
get system snmp
get system source-ip
get system startup-error-log
get system status
get system storage
get system switch-interface
get system tos-based-priority
get system vdom-link
get system vdom-property
get system vdom-radius-server
get system virtual-switch
get test <name of daemon>
get user device-category
get vpn certificate
get wanopt storage
get webfilter fortiguard
get webfilter ftgd-statistics
get webfilter ips-urlfilter-cache-setting
get webfilter status
get wireless-controller client-info
get wireless-controller global
get wireless-controller rf-analysis
get wireless-controller scan
get wireless-controller spectral-info
get wireless-controller status
get wireless-controller timers
get wireless-controller vap
get wireless-controller vap-status
get wireless-controller wtp-status
end
Per-VDOM settings - CLI
The following table lists commands in the CLI that are considered VDOM-specific settings when VDOMs are enabled.
From the super_admin account, you can use the commands below to add and configure virtual domains. The number of virtual domains you can add is dependent on the FortiGate model. Virtual domain configuration (vdom-admin) must be enabled.
Once you add a virtual domain you can configure it by adding zones, firewall policies, routing settings, and VPN settings. You can also move physical interfaces from the root virtual domain to other virtual domains and move VLAN subinterfaces from one virtual domain to another.
By default all physical interfaces are in the root virtual domain. You cannot remove an interface from a virtual domain if the interface is part of any of the following configurations:
- routing
- proxy arp
- DHCP server
- zone
- firewall policy
- redundant pair
- link aggregate (802.3ad) group
Delete these objects, or modify them, to be able to remove the interface.
This command syntax shows how you access the commands within a VDOM. Refer to the relevant sections in this Reference for information on these commands.
config vdom
edit <vdom_name>
config antivirus profile
config antivirus quarantine
config antivirus settings
config application list
config application rule-settings
config dlp filepattern
config dlp fp-doc-source
config dlp fp-sensitivity
config dlp sensor
config endpoint-control profile
config endpoint-control settings
config firewall ... (except ssl)
config ftp-proxy
config icap
config imp2p aim-user
config imp2p icq-user
config imp2p msn-user
config imp2p old-version
config imp2p policy
config imp2p yahoo-user
config ips custom
config ips rule-settings
config ips sensor
config ips settings
config log custom-field
config log disk
config log eventfilter
config log fortianalyzer
config log fortiguard
config log memory
config log setting
config log syslogd
config netscan
config router
config spamfilter bwl
config spamfilter bword
config spamfilter dnsbl
config spamfilter iptrust
config spamfilter mheader
config spamfilter profile
config system 3g-modem
config system admin
config system arp-table
config system dhcp ...
config system dhcp6 ...
config system dns-database
config system dns-server
config system gre-tunnel
config system interface
config system ipip-tunnel
config system ipv6-neighbor-cache
config system ipv6-tunnel
config system modem ..
config system monitors
config system nat64
config sysetm network-visibility
config system object-tag
config system proxy-arp
config system replacemsg-group
config system server-probe
config system session-ttl
config system settings
config system sit-tunnel
config system switch-interface
config system wccp
config system zone
config user ...
config voip
config vpn ...
config wanopt auth-group
config wanopt peer
config wanopt profile
config wanopt settings
config wanopt ssl-server
config wanopt webcache
config web-proxy debug-url
config web-proxy explicit
config web-proxy forward-server
config web-proxy forward-server-group
config web-proxy global
config web-proxy url-match
config webfilter content
config webfilter content-header
config webfilter ftgd-local-cat
config webfilter ftgd-local-rating
config webfilter ftgd-local-warning
config webfilter ips-urlfilter-setting
config webfilter override
config webfilter override-user
config webfilter profile
config webfilter search-engine
config webfilter urlfilter
config wireless-controller ap-status
config wireless-controller setting
config wireless-controller vap
config wireless-controller sids-profile
config wireless-controller wtp
config wireless-controller wtp-profile
execute backup
execute clear system arp table
execute cli check-template-status
execute cli status-msg-only
execute client-reputation
execute dhcp lease-clear
execute dhcp lease-list
execute dhcp6 lease-clear
execute dhcp6 lease-list
execute enter
execute fortitoken ...
execute fortitoken-mobile
execute fsso refresh
execute interface dhcpclient-renew
execute interface pppoe-reconnect
execute log ...
execute log-report reset
execute modem dial
execute modem hangup
execute modem trigger
execute mrouter clear
execute netscan ...
execute ping, ping6
execute ping-options, ping6-options
execute policy-packet-capture
execute report
execute report-config
execute restore
execute revision
execute router clear
execute sfp-mode-sgmii
execute ssh
execute switch-controller
execute tac
execute telnet
execute traceroute
execute tracert6
execute upload
execute usb-device
execute usb-disk
execute vpn ipsec tunnel
execute vpn sslvpn ...
execute wireless-controller reset-wtp
next
edit <another_vdom>
config ...
execute ...
end
For more information, see Global and per-VDOM settings.
Resource settings
Your FortiGate unit has a limited amount of hardware resources such as memory, disk storage, CPU operations. When Virtual Domains are disabled, this limit is not a major concern because all sessions, users, and other processes share all the resources equally.
When using Virtual Domains, hardware resources can be divided differently between Virtual Domains as they are needed. Minimum levels of resources can be specified for each VDOM, so that no Virtual Domain will suffer a complete lack of resources.
For example, if one VDOM has only a web server and logging server connected, and a second VDOM has an internal network of 20 users, these two VDOMs will require different levels of resources. The first VDOM will require many sessions but no user accounts. This compares to the second VDOM where user accounts and management resources are required, but fewer sessions.
Using the global and per-VDOM resource settings, you can customize the resources allocated to each VDOM to ensure the proper level of service is maintained on each VDOM.
This section includes:
Global resource settings
Global Resources apply to the whole FortiGate unit. They represent all of the hardware capabilities of your unit. By default the values are set to their maximum values. These values vary by your model due to each model having differing hardware capabilities.
It can be useful to change the maximum values for some resources to ensure there is enough memory available for other resources that may be more important to your configuration.
To use the earlier example, if your FortiGate unit is protecting a number of web servers and other publicly accessible servers you would want to maximize the available sessions and proxies while minimizing other settings that are unused such as user settings, VPNs, and dial-up tunnels.
Global Resources are only configurable at the global level, and only the admin account has access to these settings.
Note that global resources, such as the log disk quota resource, will only be visible if your FortiGate unit hardware supports those resources, such as having a hard disk to support the log disk resource.
Global Resources- web-based manager
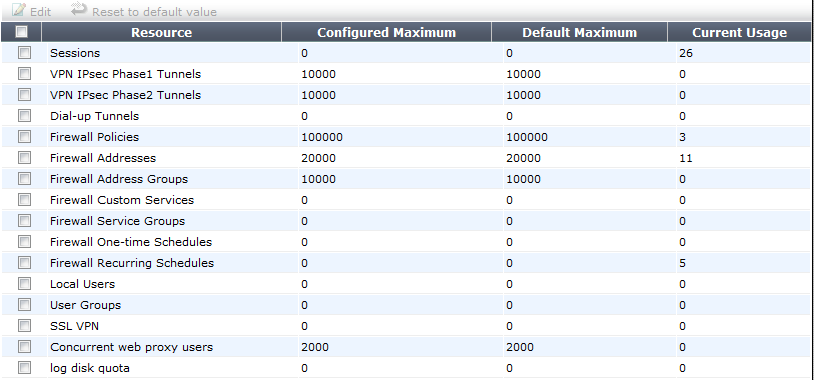
To view global resource settings - web-based manager:
- Select Global > VDOM > Global Resources.
The following information is displayed:
| Edit | Select to edit the Configured Maximum value for a single selected Resource. If multiple Resources are selected, Edit is not available. |
| Reset to default value | Select to return one or more selected Resources to factory default settings. |
| Checkbox | Select a Resource for editing or resetting to default values. |
| Resource | The name of the available global resources. |
| Configured Maximum | The currently configured maximum for this resource. This value can be changed by selecting the Resource and editing it. |
| Default Maximum | The factory configured maximum value for this resource. You cannot set the Configured Maximum higher than the Default Maximum. |
| Current Usage | The amount of this resource that is currently being used. This value is useful for determining when and if you may need to adjust Configured Maximum values for some resources on your FortiGate unit. |
To view global resource settings - CLI:
config global
config system resource-limits
get
When viewing the global resource limits in the CLI, the output appears similar to:
FGT1000A (global) # config system resource-limits
FGT1000A (resource-limits) # get
session : 0
ipsec-phase1 : 10000
ipsec-phase2 : 10000
dialup-tunnel : 0
firewall-policy : 100000
firewall-address : 20000
firewall-addrgrp : 10000
custom-service : 0
service-group : 0
onetime-schedule : 0
recurring-schedule : 0
user : 0
user-group : 0
sslvpn : 0
proxy : 2000
|
|
For explicit proxies, when configuring limits on the number of concurrent users, you need to allow for the number of users based on their authentication method. Otherwise you may run out of user resources prematurely. Each session-based authenticated user is counted as a single user using their authentication membership (RADIUS, LDAP, FSAE, local database etc.) to match users in other sessions. So one authenticated user in multiple sessions is still one user. For all other situations, the source IP address is used to determine a user. All sessions from a single source address are assumed to be from the same user. |
Per-VDOM resource settings
While Global resources apply to resources shared by the whole FortiGate unit, per-VDOM resources are specific to only one Virtual Domain.
By default all the per-VDOM resource settings are set to no limits. This means that any single VDOM can use up all the resources of the entire FortiGate unit if it needs to do so. This would starve the other VDOMs for resources to the point where they would be unable to function. For this reason, it is recommended that you set some maximums on resources that are most vital to your customers.
Each Virtual Domain has its own resource settings. These settings include both maximum, and minimum levels. The maximum level is the highest amount of that resource that this VDOM can use if it is available on the FortiGate unit. Minimum levels are a guaranteed level that this minimum level of the resource will always be available no matter what the other VDOMs may be using.
Figure 6: Per-VDOM resources - web-based manager:
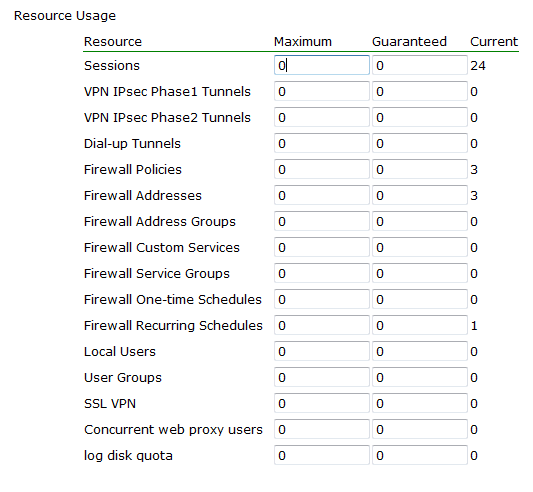
For example, consider a FortiGate unit that has ten VDOMs configured. vdom1 has a maximum of 5000 sessions and a minimum of 1000 sessions. If the FortiGate unit has a global maximum of 20,000 sessions, it is possible that vdom1 will not be able to reach its 5000 session upper limit. However, at all times vdom1 is guaranteed to have 1000 sessions available that it can use. On the other hand, if the remaining nine VDOMs use only 1000 sessions each, vdom1 will be able to reach its maximum of 5000.
To view per-VDOM resource settings - web-based manager:
- Select Global > VDOM > VDOM.
- Select the
rootVDOM, and select Edit. - Adjust the settings in the Resource Usage section of the page.
| Resource | Name of the resource. Includes dynamic and static resources. |
| Maximum | Override the global limit to reduce the amount of each resource available for this VDOM. The maximum must be the same as or lower than the global limit. The default value is 0, which means the maximum is the same as the global limit. Note: If you set the maximum resource usage for a VDOM you cannot reduce the default maximum global limit for all VDOMs below this maximum. |
| Guaranteed | Enter the minimum amount of the resource available to this VDOM regardless of usage by other VDOMs. The default value is 0, which means that an amount of this resource is not guaranteed for this VDOM. |
| Current | The amount of the resource that this VDOM currently uses. |
- Select OK.
To view per-VDOM resource settings - CLI:
config global
config system vdom-property
edit root
get
When viewing the per-VDOM resource limits in the CLI, the output appears similar to the following. Note that the first two lines are not part of the resource limits. In the CLI, the first number is the maximum value, and the second number is the guaranteed minimum.
FGT1KA3607500810 (vdom-property) # edit root
FGT1KA3607500810 (root) # get
name : root
description : property limits for vdom root
session : 0 0
ipsec-phase1 : 0 0
ipsec-phase2 : 0 0
dialup-tunnel : 0 0
firewall-policy : 0 0
firewall-address : 0 0
firewall-addrgrp : 0 0
custom-service : 0 0
service-group : 0 0
onetime-schedule : 0 0
recurring-schedule : 0 0
user : 0 0
user-group : 0 0
sslvpn : 0 0
proxy : 0 0
Virtual Domain Licensing
Many FortiGate models support purchasing a license key to increase the maximum number. For specific information about the number of VDOM licenses that your FortiGate supports, see the product data sheet.
Configuring 500 or more VDOMs will result in reduced system performance. See FortiGate unit running very slowly.
|
|
Your FortiGate unit has limited resources that are divided among all configured VDOMs. These resources include system memory and CPU. Running security features on many VDOMs at once can limit resources available for basic processing. If you require many VDOMs, all with active security features, it is recommended to upgrade to a more powerful FortiGate unit. |
|
|
It is important to backup your configuration before upgrading the VDOM license on your FortiGate unit or units, especially with FortiGate units in HA mode. |
To obtain a VDOM license key
- Log in with a super_admin account.
- Go to System > Dashboard > Status.
- Record your FortiGate unit serial number as shown in System Information.
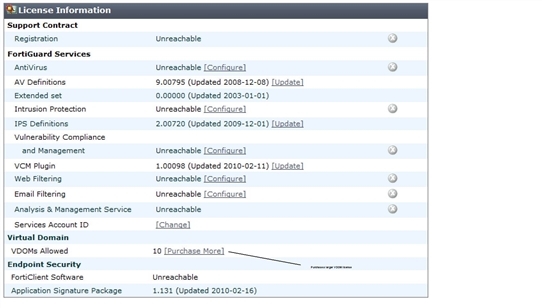
- Under License Information > Virtual Domain, select Purchase More.
|
|
If you do not see the Purchase More option on the System Dashboard, your FortiGate model does not support more than 10 VDOMs. |
VDOM License Information
- You will be taken to the Fortinet customer support website where you can log in and purchase a license key for 25, 50, 100, 250, 500, or more VDOMs.
- When you receive your license key, go to the Dashboard and select Upload License under License Information, Virtual Domains.
- In the Input License Key field, enter the 32-character license key you received from Fortinet customer support.
- Select Apply.
To verify the new VDOM license, in global configuration go to System > Dashboard. Under License Information, Virtual Domains the maximum number of VDOMs allowed is shown.
|
|
VDOMs created on a registered FortiGate unit are recognized as real devices by any connected FortiAnalyzer unit. The FortiAnalyzer unit includes VDOMs in its total number of registered devices. For example, if three FortiGate units are registered on the FortiAnalyzer unit and they contain a total of four VDOMs, the total number of registered FortiGate units on the FortiAnalyzer unit is seven. For more information, see the FortiAnalyzer Administration Guide. |
Logging in to VDOMs
Only super_admin administrator accounts can access all global settings on the FortiGate unit and all of the VDOMs as well. Other administrator accounts can access and configure only their single VDOM and they must connect to an interface that is part of that VDOM. For example, administratorB is the admin for vdomB. If he tries to log into vdomA, or an interface that is part of vdomA he will not be able to log on. For more information on administrators in VDOMs, see Administrators in Virtual Domains.
Management services communicate using the management VDOM, which is the root VDOM by default. For more information, see Changing the management virtual domain.
|
|
Management traffic requires an interface that has access to the Internet. If there is no interface assigned to the VDOM containing the management traffic, services including updates will not function. For more information, see Changing the management virtual domain. |
To access a VDOM with a super_admin account - web-based manager:
- Log in with a super_admin account.
- In the Virtual Domains menu on the left-hand side, select the VDOM to configure.
The menu will expand to show the various pages and settings for that VDOM. - When you have finished configuring the VDOM, you can
- open the Global menu to return to global configuration
- log out
To access a VDOM with a super_admin account - CLI:
With the super_admin, logging into the CLI involves also logging into the specific VDOM. If you need a reminder, use edit ? to see a list of existing VDOMs before you editing a VDOM.
|
|
If you misspell a VDOM you are trying to switch to, you will create a new VDOM by that name. Any changes you make will be part of the new VDOM, and not the intended VDOM. If you are having problems where your changes aren’t visible, back up to the top level and use edit ? to see a list of VDOMs to ensure this has not happened. If it has happened, see Deleting a VDOM. |
config vdom
edit ?
edit <chosen_vdom>
..
<enter vdom related commands>
..
end
exit
To access a VDOM with a non super_admin account - web-based manager:
- Connect to the FortiGate unit using an interface that belongs to the VDOM to be configured.
- Log in using an administrator account that has access to the VDOM.
The main web-based manager page opens. The interface is largely the same as if the device has VDOMs disabled. From here you can access VDOM-specific settings.
To access a VDOM with a non-super_admin account - CLI:
A non-super_admin account has access to only one VDOM and must log in through an interface that belongs to the same VDOM, but the process is the same as logging into a non-VDOM unit.
Login: regular_admin
Password: <password>
..
<enter vdom related commands>
..
exit
Configuring Virtual Domains
Only a super_admin administrator account such as the default “admin” account can create, disable, or delete VDOMs. That account can create additional administrators for each VDOM.
This section includes:
- Creating a Virtual Domain
- Disabling a Virtual Domain
- Deleting a VDOM
- Administrators in Virtual Domains
Creating a Virtual Domain
Once you have enabled Virtual Domains on your FortiGate unit, you can create additional Virtual Domains beyond the default root Virtual Domain.
By default new Virtual Domains are set to NAT/Route operation mode. If you want a Virtual Domain to be in Transparent operation mode, you must manually change it. See Virtual Domains in Transparent mode.
You can name new Virtual Domains as you like with the following restrictions:
- only letters, numbers, “-”, and “_” are allowed
- no more than 11 characters are allowed
- no spaces are allowed
- VDOMs cannot have the same names as interfaces, zones, switch interfaces, or other VDOMs.
|
|
When creating large numbers of VDOMs you should not enable advanced features such as proxies, web filtering, and antivirus due to limited FortiGate unit resources. Also when creating large numbers of VDOMs, you may experience reduced performance for the same reason. |
To create a VDOM - web-based manager:
- Log in with a super_admin account.
- Go to System > Dashboard > Status and ensure that Virtual Domains are enabled. If not, see Enabling and accessing Virtual Domains.
- Select System > VDOM > VDOM.
- Select Create New.
- Enter a unique name for your new VDOM.
- Enter a short and descriptive comment to identify this VDOM.
- Select OK.
Repeat Steps4 through 7 to add additional VDOMs.
To create a VDOM - CLI:
config vdom
edit <new_vdom_name>
end
|
|
If you want to edit an existing Virtual Domain in the CLI, and mistype the name a new Virtual Domain will be created with this new misspelled name. If you notice expected configuration changes are not visible, this may be the reason. You should periodically check your VDOM list to ensure there are none of these misspelled VDOMs present. |
Disabling a Virtual Domain
The status of a VDOM can be Enabled, or Disabled.
Active status VDOMs can be configured. Active is the default status when a VDOM is created. The management VDOM must be an Active VDOM. For more information on the management VDOM, see Changing the management virtual domain.
Disabled status VDOMs are considered “offline”. The configuration remains, but you cannot use the VDOM, and only the super_admin administrator can view it. You cannot delete a disabled VDOM without first enabling it, and removing references to it like usual—there is no Delete icon for disabled status VDOMs. You can assign interfaces to a disabled VDOM. See Deleting a VDOM.
The following procedures show how to disable a VDOM called “test-vdom”.
To disable a VDOM - web-based manager:
- Go to Global > VDOM > VDOM.
- Open the VDOM for editing.
- Ensure Enable is not selected and then select OK.
The VDOM’s Enable icon in the VDOM list is a grey X.
To disable a VDOM - CLI:
config vdom
edit test-vdom
config system settings
set status disable
end
end
To enable a VDOM - web-based manager:
- Go to Global > VDOM > VDOM.
- Open the VDOM for editing.
- Ensure Enable is selected and then select OK.
The VDOM’s Enable icon in the VDOM list is a green checkmark.
To enable a VDOM - CLI:
config vdom
edit test-vdom
config system settings
set status enable
end
end
Deleting a VDOM
Deleting a VDOM removes it from the FortiGate unit configuration.
Before you can delete a VDOM, all references to it must be removed. This includes any objects listed in Per-VDOM settings - web-based manager. If there are any references to the VDOM remaining, you will see an error message and not be able to delete the VDOM.
The VDOM must also be enabled. A disabled VDOM cannot be deleted. You cannot delete the root VDOM or the management VDOM.
|
|
Before deleting a VDOM, a good practice is to reset any interface referencing that VDOM to its default configuration, with “root” selected as the Virtual Domain. |
The following procedures show how to delete the test-vdom VDOM.
To delete a VDOM - web-based manager:
- Go to Global > VDOM > VDOM.
- Select the check box for the VDOM and then select the Delete icon.
If the Delete icon is not active, there are still references to the VDOM that must first be removed. The Delete icon is available when all the references to this VDOM are removed. - Confirm the deletion.
To delete a VDOM - CLI:
config vdom
delete test-vdom
end
Removing references to a VDOM
When you are going to delete a VDOM, all references to that VDOM must first be removed. It can be difficult to find all the references to the VDOM. This section provides a list of common objects that must be removed before a VDOM can be deleted, and a CLI command to help list the dependencies.
Interfaces are an important part of VDOMs. If you can move all the interfaces out of a VDOM, generally you will be able to delete that VDOM.
Common objects that refer to VDOMs
When you are getting ready to delete a VDOM check for, and remove the following objects that refer to that VDOM or its components:
- Routing - both static and dynamic routes
- Firewall addresses, policies, groups, or other settings
- Security Features/Profiles
- VPN configuration
- Users or user groups
- Logging
- DHCP servers
- Network interfaces, zones, custom DNS servers
- VDOM Administrators
Administrators in Virtual Domains
When Virtual Domains are enabled, permissions change for administrators. Administrators are now divided into per-VDOM administrators, and super_admin administrators. Only super_admin administrator accounts can create other administrator accounts and assign them to a VDOM.
This section includes:
- Administrator VDOM permissions
- Creating administrators for Virtual Domains
- Virtual Domain administrator dashboard display
Administrator VDOM permissions
Different types of administrator accounts have different permissions within VDOMs. For example, if you are using a super_admin profile account, you can perform all tasks. However, if you are using a regular admin account, the tasks available to you depend on whether you have read only or read/write permissions. The following table shows what tasks can be performed by which administrators.
Table 3: Administrator VDOM permissions
| Tasks | Regular administrator account | Super_admin profile administrator account | |
| Read only permission | Read/write permission | ||
| View global settings | yes | yes | yes |
| Configure global settings | no | no | yes |
| Create or delete VDOMs | no | no | yes |
| Configure multiple VDOMs | no | no | yes |
| Assign interfaces to a VDOM | no | no | yes |
| Revision Control Backup and Restore | no | no | yes |
| Create VLANs | no | yes - for 1 VDOM | yes - for all VDOMs |
| Assign an administrator to a VDOM | no | no | yes |
| Create additional admin accounts | no | yes - for 1 VDOM | yes - for all VDOMs |
| Create and edit protection profiles | no | yes - for 1 VDOM | yes - for all VDOMs |
The only difference in admin accounts when VDOMs are enabled is selecting which VDOM the admin account belongs to. Otherwise, by default the administration accounts are the same as when VDOMs are disabled and closely resemble the super_admin account in their privileges.
Creating administrators for Virtual Domains
Using the admin administrator account, you can create additional administrator accounts and assign them to VDOMs.
|
|
The newly-created administrator can access the FortiGate unit only through network interfaces that belong to their assigned VDOM or through the console interface. The network interface must be configured to allow management access, such as HTTPS and SSH. Without these in place, the new administrator will not be able to access the FortiGate unit and will have to contact the super_admin administrator for access. |
The following procedure creates a new Local administrator account called admin_sales with a password of fortinet in the sales VDOM using the admin_prof default profile.
To create an administrator for a VDOM - web-based manager:
- Log in with a super_admin account.
- Go to System > Admin > Administrators.
- Select Create New.
- Select Regular for Type, as you are creating a Local administrator account.
- Enter the necessary information about the administrator: email, password, etc.
- If this admin will be accessing the VDOM from a particular IP address or subnet, enable Restrict this Admin Login from Trusted Hosts Only and enter the IP in Trusted Host #1. See Using trusted hosts.
- Select
prof_adminfor the Admin Profile. - Select
salesfrom the list of Virtual Domains. - Select OK.
To create administrators for VDOMs - CLI:
config global
config system admin
edit <new_admin_name>
set vdom <vdom_for_this_account>
set password <pwd>
set accprofile <an_admin_profile>
...
end
Using trusted hosts
Setting trusted hosts for all of your administrators increases the security of your network by further restricting administrative access. In addition to knowing the password, an administrator must connect only through the subnet or subnets you specify. You can even restrict an administrator to a single IP address if you define only one trusted host IP address with a netmask of 255.255.255.255.
When you set trusted hosts for all administrators, the FortiGate unit does not respond to administrative access attempts from any other hosts. This provides the highest security. If you leave even one administrator unrestricted, the unit accepts administrative access attempts on any interface that has administrative access enabled, potentially exposing the unit to attempts to gain unauthorized access.
The trusted hosts you define apply both to the web-based manager and to the CLI when accessed through Telnet or SSH. CLI access through the console is not affected.
The trusted host addresses all default to 0.0.0.0/0.0.0.0 for IPv4, or ::/0 for IPv6. If you set one of the zero addresses to a non-zero address, the other zero addresses will be ignored. The only way to use a wildcard entry is to leave the trusted hosts at 0.0.0.0/0.0.0.0 or ::0. However, this configuration is less secure.
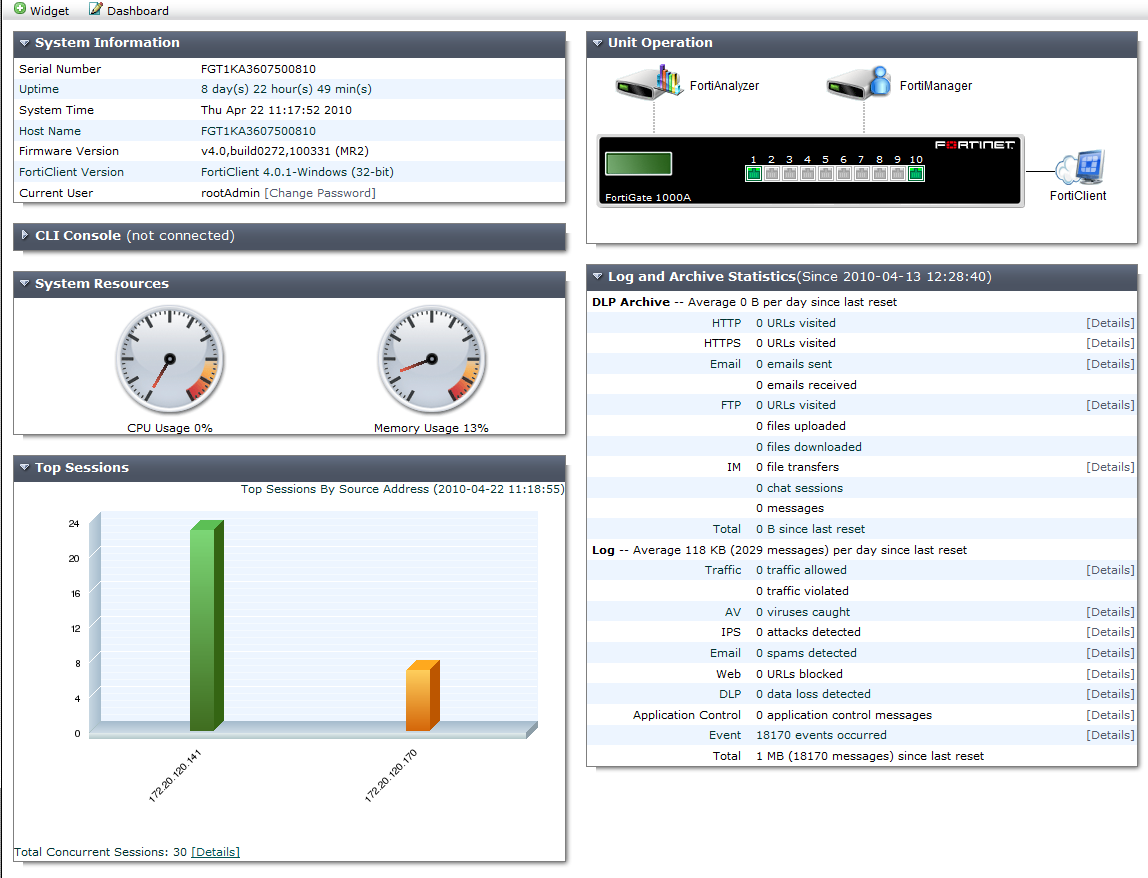
Virtual Domain administrator dashboard display
When administrators logs into their virtual domain, they see a different dashboard than the global administrator will see. The VDOM dashboard displays information only relevant to that VDOM — no global or other VDOM information is displayed.
Table 4: VDOM dashboard information
| Information | per-VDOM | Global |
|---|---|---|
| System Information | read-only | yes |
| License Information | no | yes |
| CLI console | yes | yes |
| Unit Operation | read-only | yes |
| Alert Message Console | no | yes |
| Top Sessions | limited to VDOM sessions | yes |
| Traffic | limited to VDOM interfaces | yes |
| Statistics | yes | yes |
VDOM administrator dashboard
Copyright © 2018 Fortinet, Inc. All Rights Reserved. | Terms of Service | Privacy Policy
