
Authentication servers
FortiGate units support the use of external authentication servers. An authentication server can provide password checking for selected FortiGate users or it can be added as a member of a FortiGate user group.
If you are going to use authentication servers, you must configure the servers before you configure FortiGate users or user groups that require them.
|
|
Mac OS and iOS devices, including iPhones and iPads, can perform user authentication with FortiOS units using RADIUS servers, but not with LDAP or TACACS+ servers. |
This section includes the following topics:
- FortiAuthenticator servers
- RADIUS servers
- LDAP servers
- TACACS+ servers
- POP3 servers
- SSO servers
- RSA ACE (SecurID) servers
FortiAuthenticator servers
FortiAuthenticator is an Authentication, Authorization, and Accounting (AAA) server, that includes a RADIUS server, an LDAP server, and can replace the FSSO Collector Agent on a Windows AD network. Multiple FortiGate units can use a single FortiAuthenticator for FSSO, remote authentication, and FortiToken management.
For more information, see the FortiAuthenticator Administration Guide.
RADIUS servers
Remote Authentication and Dial-in User Service (RADIUS) is a broadly supported client-server protocol that provides centralized authentication, authorization, and accounting functions. RADIUS clients are built into gateways that allow access to networks such as Virtual Private Network servers, Network Access Servers (NAS), as well as network switches and firewalls that use authentication. FortiGate units fall into the last category.
RADIUS servers use UDP packets to communicate with the RADIUS clients on the network to authenticate users before allowing them access to the network, to authorize access to resources by appropriate users, and to account or bill for those resources that are used. RADIUS servers are currently defined by RFC 2865 (RADIUS) and RFC 2866 (Accounting), and listen on either UDP ports 1812 (authentication) and 1813 (accounting) or ports 1645 (authentication) and 1646 (accounting) requests. RADIUS servers exist for all major operating systems.
You must configure the RADIUS server to accept the FortiGate unit as a client. FortiGate units use the authentication and accounting functions of the RADIUS server.
|
|
FortiOS does not accept all characters from auto generated keys from MS Windows 2008. These keys are very long and as a result RADIUS authentication will not work. Maximum key length for MS Windows 2008 is 128 bytes. In older versions of FSAE, it was 40 bytes. |
Microsoft RADIUS servers
Microsoft Windows Server 2000, 2003, and 2008 have RADIUS support built-in. Microsoft specific RADIUS features are defined in RFC 2548. The Microsoft RADIUS implementation can use Active Directory for user credentials.
For details on Microsoft RADIUS server configurations, refer to Microsoft documentation.
RADIUS user database
The RADIUS user database is commonly an SQL or LDAP database, but can also be any combination of:
- usernames and passwords defined in a configuration file
- user account names and passwords configured on the computer where the RADIUS server is installed.
If users are members of multiple RADIUS groups, then the user group authentication timeout value does not apply. See Membership in multiple groups.
RADIUS authentication with a FortiGate unit
To use RADIUS authentication with a FortiGate unit
- configure one or more RADIUS servers on the FortiGate unit
- assign users to a RADIUS server
When a configured user attempts to access the network, the FortiGate unit will forward the authentication request to the RADIUS server which will match the username and password remotely. Once authenticated the RADIUS server passes the authorization granted message to the FortiGate unit which grants the user permission to access the network.
The RADIUS server uses a “shared secret” key along with MD5 hashing to encrypt information passed between RADIUS servers and clients, including the FortiGate unit. Typically only user credentials are encrypted. Additional security can be configured through IPsec tunnels by placing the RADIUS server behind another VPN gateway.
RADIUS attribute value pairs
RADIUS packets include a set of attribute value pairs (AVP) to identify information about the user, their location and other information. The FortiGate unit sends the following RADIUS attributes.
FortiOS supported RADIUS attributes
| RADIUS Attribute | Name | Description | AVP type |
|---|---|---|---|
| 1 | Acct-Session-ID | Unique number assigned to each start and stop record to make it easy to match them, and to eliminate duplicate records. | 44 |
| 2 | Username | Name of the user being authenticated | 1 |
| 3 | NAS-Identifier | Identifier or IP address of the Network Access Server (NAS) that is requesting authentication. In this case, the NAS is the FortiGate unit. | 32 |
| 4 | Framed-IP-Address | Address to be configured for the user. | 8 |
| 5 | Fortinet-VSA | See Vendor-specific attributes | 26 |
| 6 | Acct-Input-Octets | Number of octets received from the port over the course of this service being provided. Used to charge the user for the amount of traffic they used. |
42 |
| 7 | Acct-Output-Octets | Number of octets sent to the port while delivering this service. Used to charge the user for the amount of traffic they used. |
43 |
The following table describes the supported authentication events and the RADIUS attributes that are sent in the RADIUS accounting message.
RADIUS attributes sent in RADIUS accounting message
| RADIUS Attributes | |||||||
|---|---|---|---|---|---|---|---|
| Authentication Method | 1 | 2 | 3 | 4 | 5 | 6 | 7 |
| Web | X | X | X | X | |||
| XAuth of IPsec (without DHCP) | X | X | X | X | |||
| XAuth of IPsec (with DHCP) | X | X | X | X | X | ||
| PPTP/L2TP (in PPP) | X | X | X | X | X | X | X |
| SSL-VPN | X | X | X | X | X | ||
Vendor-specific attributes
Vendor specific attributes (VSA) are the method RADIUS servers and client companies use to extend the basic functionality of RADIUS. Some major vendors, such as Microsoft, have published their VSAs, however many do not.
In order to support vendor-specific attributes (VSA), the RADIUS server requires a dictionary to define which VSAs to support. This dictionary is typically supplied by the client or server vendor.
The Fortinet RADIUS vendor ID is 12356.
The FortiGate unit RADIUS VSA dictionary is supplied by Fortinet and is available through the Fortinet Knowledge Base (https://kb.forticare.com) or through Technical Support. Fortinet’s dictionary for FortiOS 4.0 and up is configured this way:
##
Fortinet’s VSA’s
#
VENDOR fortinet 12356
BEGIN-VENDOR fortinet
ATTRIBUTE Fortinet-Group-Name 1 string
ATTRIBUTE Fortinet-Client-IP-Address 2 ipaddr
ATTRIBUTE Fortinet-Vdom-Name 3 string
ATTRIBUTE Fortinet-Client-IPv6-Address 4 octets
ATTRIBUTE Fortinet-Interface-Name 5 string
ATTRIBUTE Fortinet-Access-Profile 6 string
#
# Integer Translations
#
END-VENDOR Fortinet
Note that using the Fortinet-Vdom-Name, users can be tied to a specific VDOM on the FortiGate unit. See the documentation provided with your RADIUS server for configuration details.
Role Based Access Control
In Role Based Access Control (RBAC), network administrators and users have varying levels of access to network resources based on their role, and that role’s requirement for access specific resources. For example, a junior accountant does not require access to the sales presentations, or network user account information.
There are three main parts to RBAC: role assignment, role authorization, and transaction authorization. Role assignment is accomplished when someone in an organization is assigned a specific role by a manager or HR. Role authorization is accomplished when a network administrator creates that user’s RADIUS account and assigns them to the required groups for that role. Transaction authorization occurs when that user logs on and authenticates before performing a task.
RBAC is enforced when FortiOS network users are remotely authenticated via a RADIUS server. For users to authenticate, a security policy must be matched. That policy only matches a specific group of users. If VDOMs are enabled, the matched group will be limited to a specific VDOM. Using this method network administrators can separate users into groups that match resources, protocols, or VDOMs. It is even possible to limit users to specific FortiGate units if the RADIUS servers serve multiple FortiOS units.
For more information on security policies, see Authentication in security policies.
Configuring the FortiGate unit to use a RADIUS server
The information you need to configure the FortiGate unit to use a RADIUS server includes
- the RADIUS server’s domain name or IP address
- the RADIUS server’s shared secret key.
You can optionally specify the NAS IP or Called Station ID. When configuring the FortiGate to use a RADIUS server, the FortiGate is a Network Access Server (NAS). If the FortiGate interface has multiple IP addresses, or you want the RADIUS requests to come from a different address you can specify it here. Called Station ID applies to carrier networks. However, if the NAS IP is not included in the RADIUS configuration, the IP of the FortiGate unit interface that communicates with the RADIUS server is used instead.
A maximum of 10 remote RADIUS servers can be configured on the FortiGate unit. One or more servers must be configured on FortiGate before remote users can be configured. To configure remote users, see Local and remote users.
On the FortiGate unit, the default port for RADIUS traffic is 1812. Some RADIUS servers use port 1645. If this is the case with your server, you can either:
- Re-configure the RADIUS server to use port 1812. See your RADIUS server documentation for more information on this procedure.
or
- Change the FortiGate unit default RADIUS port to 1645 using the CLI:
config system global
set radius-port 1645
end
One wildcard admin account can be added to the FortiGate unit when using RADIUS authentication. This uses the wildcard character to allow multiple admin accounts on RADIUS to use a single account on the FortiGate unit. See Example — wildcard admin accounts - CLI .
To configure the FortiGate unit for RADIUS authentication - web-based manager:
- Go to User & Device > Authentication > RADIUS Servers and select Create New.
- Enter the following information and select OK.
| Name | A name to identify the RADIUS server on the FortiGate unit. |
| Primary Server Name/IP | Enter the domain name (such as fgt.exmaple.com) or the IP address of the RADIUS server. |
| Primary Server Secret | Enter the server secret key, such as radiusSecret. This can be a maximum of 16 characters long. This must match the secret on the RADIUS primary server. |
| Secondary Server Name/IP | Optionally enter the domain name (such as fgt.exmaple.com) or the IP address of the secondary RADIUS server. |
| Secondary Server Secret | Optionally, enter the secondary server secret key, such as radiusSecret2. This can be a maximum of 16 characters long. This must match the secret on the RADIUS secondary server. |
| Authentication Scheme | If you know the RADIUS server uses a specific authentication protocol, select it from the list. Otherwise select Use Default Authentication Scheme. The Default option will usually work. |
| NAS IP/ Called Station ID |
Enter the IP address to be used as an attribute in RADIUS access requests. NAS-IP-Address is RADIUS setting or IP address of FortiGate interface used to talk to RADIUS server, if not configured. Called Station ID is same value as NAS-IP Address but in text format. |
| Include in every User Group | When enabled this RADIUS server will automatically be included in all user groups. This is useful if all users will be authenticating with the remote RADIUS server. |
|
|
For MAC OS and iOS devices to authenticate, you must use MS-CHAP-v2 authentication. In the CLI, the command is set auth-type ms_chap_v2. |
- Select OK.
To configure the FortiGate unit for RADIUS authentication - CLI example:
config user radius
edit ourRADIUS
set auth-type auto
set server 10.11.102.100
set secret radiusSecret
end
For more information about RADIUS server options, refer to the FortiGate CLI Reference.
Troubleshooting RADIUS
To test the connection to the RADIUS server use the following command:
diagnose test authserver radius-direct <server_name or IP> <port number> <secret>
For the port number, enter -1 to use the default port. Otherwise enter the port number to check.
LDAP servers
Lightweight Directory Access Protocol (LDAP) is an Internet protocol used to maintain authentication data that may include departments, people, groups of people, passwords, email addresses, and printers. LDAP consists of a data-representation scheme, a set of defined operations, and a request/response network.
The scale of LDAP servers range from big public servers such as BigFoot and Infospace, to large organizational servers at universities and corporations, to small LDAP servers for workgroups that may be using OpenLDAP. This document focuses on the institutional and workgroup applications of LDAP.
This section includes:
- Components and topology
- LDAP directory organization
- Configuring the FortiGate unit to use an LDAP server
- Example — wildcard admin accounts - CLI
- Example of LDAP to allow Dial-in through member-attribute - CLI
- Troubleshooting LDAP
Components and topology
LDAP organization starts with directories. A directory is a set of objects with similar attributes organized in a logical and hierarchical way. Generally, an LDAP directory tree reflects geographic and organizational boundaries, with the Domain name system (DNS) names to structure the top level of the hierarchy. The common name identifier for most LDAP servers is cn, however some servers use other common name identifiers such as uid.
When LDAP is configured and a user is required to authenticate the general steps are:
- The FortiGate unit contacts the LDAP server for authentication.
- To authenticate with the FortiGate unit, the user enters a username and password.
- The FortiGate unit sends this username and password to the LDAP server.
- If the LDAP server can authenticate the user, the user is successfully authenticated with the FortiGate unit.
- If the LDAP server cannot authenticate the user, the connection is refused by the FortiGate unit.
Binding
Binding is the step where the LDAP server authenticates the user. If the user is successfully authenticated, binding allows the user access to the LDAP server based on that user’s permissions.
The FortiGate unit can be configured to use one of three types of binding:
- anonymous - bind using anonymous user search
- regular - bind using username/password and then search
- simple - bind using a simple password authentication without a search
You can use simple authentication if the user records all fall under one domain name (dn). If the users are under more than one dn, use the anonymous or regular type, which can search the entire LDAP database for the required username.
If your LDAP server requires authentication to perform searches, use the regular type and provide values for username and password.
Supported versions
The FortiGate unit supports LDAP protocol functionality defined in RFC 2251: Lightweight Directory Access Protocol v3, for looking up and validating user names and passwords. FortiGate LDAP supports all LDAP servers compliant with LDAP v3, including FortiAuthenticator. In addition, FortiGate LDAP supports LDAP over SSL/TLS, which can be configured only in the CLI.
FortiGate LDAP does not support proprietary functionality, such as notification of password expiration, which is available from some LDAP servers. FortiGate LDAP does not supply information to the user about why authentication failed.
|
|
LDAP user authentication is supported for PPTP, L2TP, IPsec VPN, and firewall authentication. However, with PPTP, L2TP, and IPsec VPN, PAP (Packet Authentication Protocol) is supported, while CHAP (Challenge Handshake Authentication Protocol) is not. |
LDAP directory organization
To configure your FortiGate unit to work with an LDAP server, you need to understand the organization of the information on the server.
The top of the hierarchy is the organization itself. Usually this is defined as Domain Component (DC), a DNS domain. If the name contains a dot, such as example.com, it is written as two parts separated by a comma: dc=example,dc=com.
In this example, Common Name (CN) identifiers reside at the Organization Unit (OU) level, just below DC. The Distinguished Name (DN) is ou=People,dc=example,dc=com.
LDAP object hierarchy
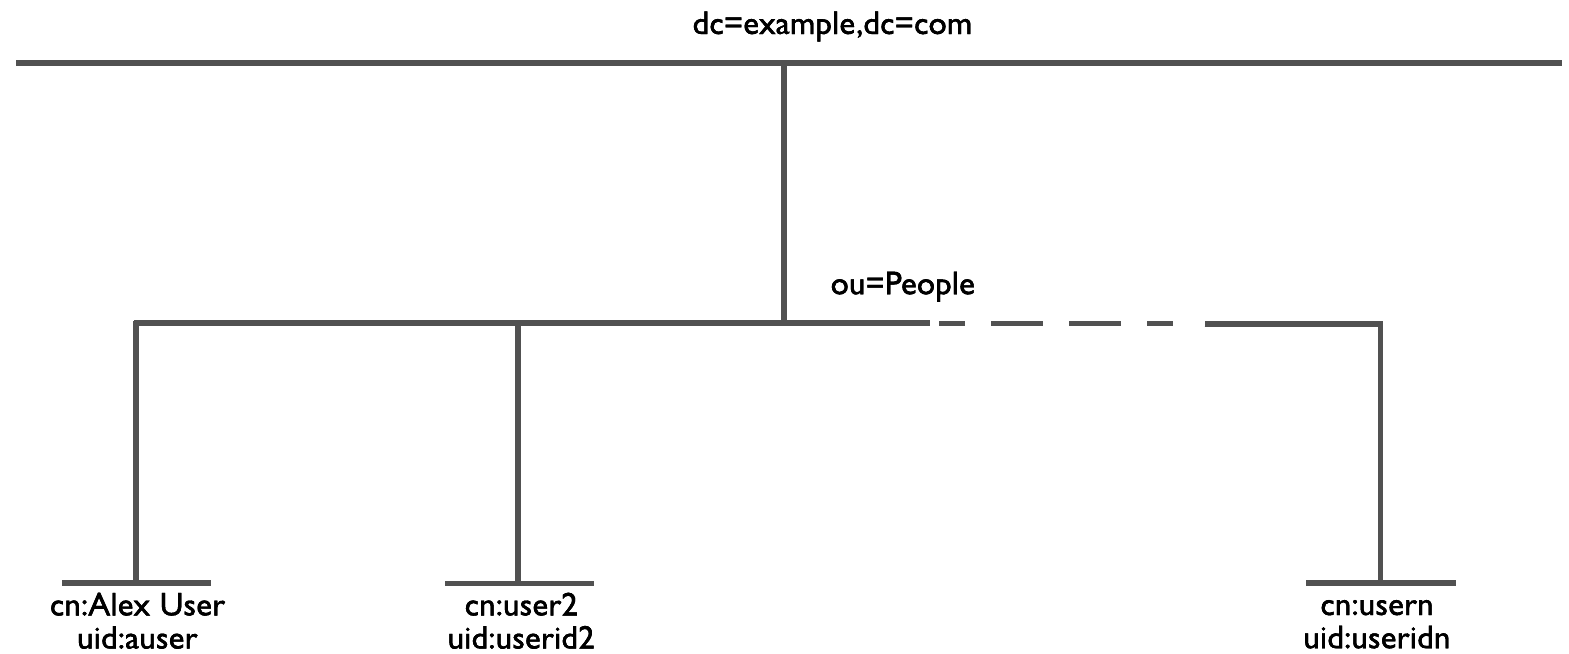
In addition to the DN, the FortiGate unit needs an identifier for the individual person. Although the FortiGate unit GUI calls this the Common Name (CN), the identifier you use is not necessarily CN. On some servers, CN is the full name of a person. It might be more convenient to use the same identifier used on the local computer network. In this example, User ID (UID) is used.
Locating your identifier in the hierarchy
You need to determine the levels of the hierarchy from the top to the level that contain the identifier you want to use. This defines the DN that the FortiGate unit uses to search the LDAP database. Frequently used distinguished name elements include:
- uid (user identification)
- pw (password)
- cn (common name)
- ou (organizational unit)
- o (organization)
- c (country)
One way to test this is with a text-based LDAP client program. For example, OpenLDAP includes a client, ldapsearch, that you can use for this purpose.
Enter the following at the command line:
ldapsearch -x '(objectclass=*)'
The output is lengthy, but the information you need is in the first few lines:
version: 2
#
# filter: (objectclass=*)
# requesting: ALL
dn: dc=example,dc=com
dc: example
objectClass: top
objectClass: domain
dn: ou=People,dc=example,dc=com
ou: People
objectClass: top
objectClass: organizationalUnit
...
dn: uid=tbrown,ou=People,dc=example,dc=com
uid: tbrown
cn: Tom Brown
In the output above, you can see tbrown (uid) and Tom Brown(cn). Also note the dn is ou=People, dc=example, dc=com.
Configuring the FortiGate unit to use an LDAP server
After you determine the common name and distinguished name identifiers and the domain name or IP address of the LDAP server, you can configure the server on the FortiGate unit. The maximum number of remote LDAP servers that can be configured is 10.
One or more servers must be configured on FortiGate before remote users can be configured. To configure remote users, see Local and remote users.
To configure the FortiGate unit for LDAP authentication - web-based manager:
- Go to User & Device > Authentication > LDAP Servers and select Create New.
- Enter a Name for the LDAP server.
- In Server Name/IP enter the server’s FQDN or IP address.
- If necessary, change the Server Port number. The default is port 389.
- Enter the Common Name Identifier (20 characters maximum).
cnis the default, and is used by most LDAP servers. - In the Distinguished Name field, enter the base distinguished name for the server using the correct X.500 or LDAP format.
The FortiGate unit passes this distinguished name unchanged to the server. The maximum number of characters is 512.
If you don’t know the distinguished name, leave the field blank and select the Query icon to the right of the field. See Using the Query icon. - In the Distinguished Name field, enter the base distinguished name for the server using the correct X.500 or LDAP format.
The FortiGate unit passes this distinguished name unchanged to the server. The maximum number of characters is 512.
If you don’t know the distinguished name, leave the field blank and select the Query icon to the right of the field. See Using the Query icon. - In Bind Type, select Regular.
- In User DN, enter the LDAP administrator’s distinguished name.
- In Password, enter the LDAP administrator’s password.
- Select OK.
|
|
To verify your Distinguished Name field is correct, you can select the Test button. If your DN field entry is valid, you will see the part of the LDAP database it defines. If your DN field entry is not valid, it will display an error message and return no information. |
For detailed information about configuration options for LDAP servers, see the Online Help on your FortiGate unit or the FortiGate CLI Reference.
To configure the FortiGate unit for LDAP authentication - CLI example:
config user ldap
edit ourLDAPsrv
set server 10.11.101.160
set cnid cn
set dn cn=users,dc=office,dc=example,dc=com
set type regular
set username cn=administrator,cn=users,dc=office,dc=example,dc=com
set password w5AiGVMLkgyPQ
set password-expiry-warning enable
set password-renewal enable
end
password-expiry-warning and password-renewal
In SSLVPN, when an LDAP user is connecting to the LDAP server it is possible for them to receive any pending password expiry or renewal warnings. When the password renewal or expiry warning exists, SSLVPN users will see a prompt allowing them to change their password.
password-expiry-warning allows FortiOS to detect from the LDAP server when a password is expiring or has expired using server controls or error codes.
password-renewal allows FortiOS to perform the online LDAP password renewal operations the LDAP server expects.
On an OpenLDAP server, when a user attempts to logon with an expired password they are allowed to logon but only to change their password.
When changing passwords on a Windows AD system, the connection must be SSL-protected.
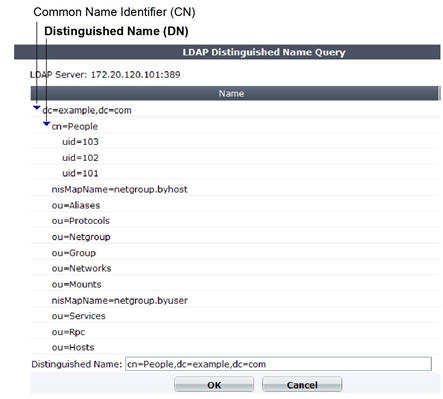
Using the Query icon
The LDAP Distinguished Name Query list displays the LDAP directory tree for the LDAP server connected to the FortiGate unit. This helps you to determine the appropriate entry for the DN field. To see the distinguished name associated with the Common Name identifier, select the Expand icon next to the CN identifier. Select the DN from the list. The DN you select is displayed in the Distinguished Name field. Select OK and the Distinguished Name you selected will be saved in the Distinguished Name field of the LDAP Server configuration.
To see the users within the LDAP Server user group for the selected Distinguished Name, expand the Distinguished Name in the LDAP Distinguished Name Query tree.
LDAP server Distinguished Name Query tree
Example — wildcard admin accounts - CLI
A wildcard admin account is an administrator account with the wildcard option enabled. This option allows multiple different remote administration accounts to match one local administration account, avoiding the need to set up individual admin accounts on the FortiGate unit. Instead multiple LDAP admin accounts will all be able to use one FortiGate admin account.
The initial benefit of wildcard admin accounts is fast configuration of the FortiGate unit’s administration account to work with your LDAP network. The many to one ratio saves on effort, and potential errors.
The ongoing benefit is that as long as the users on the LDAP system belong to that group, and the test admin user settings don’t change on the FortiGate unit, no other work is required. This point is important as it can help avoid system updates or changes that would otherwise require changes to the LDAP administrator account configuration. Even if a user is added to or removed from the LDAP group, no changes are required on the FortiGate unit.
Two potential issues with wildcard admin accounts are that multiple users may be logged on to the same account at the same time. This becomes an issue if they are changing the same information at the same time. The other potential issue is that security is reduced because multiple people have login access for the same account. If each user was assigned their own account, a hijacking of one account would not affect the other users.
Note that wildcard admin configuration also applies to RADIUS. When configuring for RADIUS, configure the RADIUS server, and RADIUS user group instead of LDAP. When using web-based management, wildcard admin is the only type of remote administrator account that does not require you to enter a password on account creation. That password is normally used when the remote authentication server is unavailable during authentication.
In this example, default values are used where possible. If a specific value is not mentioned, it is set to its default value.
Configuring the LDAP server
The important parts of this configuration are the username and group lines. The username is the domain administrator account. The group binding allows only the group with the name GRP to access.
|
|
The dn used here is as an example only. On your network use your own domain name. |
To configure LDAP server - CLI:
config user ldap
edit "ldap_server"
set server "192.168.201.3"
set cnid "sAMAccountName"
set dn "DC=example,DC=com,DC=au"
set type regular
set username "CN=Administrator,CN=Users,DC=example,DC=COM”
set password *
set group-member-check group-object
set group-object-filter (&(objectcategory=group)member="CN=GRP,OU=training,DC=example,DC=COM"))
next
end
To configure the user group and add the LDAP server - CLI:
config user group
edit "ldap_grp"
set member "ldap"
config match
edit 1
set server-name "ldap_server"
set group-name "CN=GRP,OU=training,DC=example,DC=COM"
next
end
next
end
Configuring the admin account
The wildcard part of this example is only available in the CLI for admin configuration. When enabled, this allows all LDAP group members to login to the FortiGate unit without the need to create a separate admin account for each user. In effect the members of that group will each be able to login as “test”.
To configure the admin account - CLI:
config system admin
edit "test"
set remote-auth enable
set accprofile "super_admin"
set wildcard enable
set remote-group "ldap_grp"
next
end
For troubleshooting, test that the admin account is operational, and see Troubleshooting LDAP.
Example of LDAP to allow Dial-in through member-attribute - CLI
In this example, users defined in MicroSoft Windows Active Directory (AD) are allowed to setup a VPN connection simply based on an attribute that is set to TRUE, instead of based on being part of a specific group.
In AD, the “Allow Dial-In” property is activated in the user properties, and this sets the msNPAllowDialin attribute to “TRUE”.
This same procedure can be used for other member attributes, as your system requires.
Configuring LDAP member-attribute settings
To accomplish this with a FortiGate unit, the member attribute must be set. Setting member attributes can only be accomplished through the CLI using the member-attr keyword - the option is not available through the web-based manager.
Before configuring the FortiGate unit, the AD server must be configured and have the msNPAllowDialin attribute set to “TRUE” for the users in question. If not, those users will not be able to properly authenticate.
The dn used here is as an example only. On your network use your own domain name.
To configure user LDAP member-attribute settings - CLI:
config user ldap
edit "ldap_server"
set server "192.168.201.3"
set cnid "sAMAccountName"
set dn "DC=fortinet,DC=com,DC=au"
set type regular
set username "fortigate@example.com"
set password ******
set member-attr "msNPAllowDialin"
next
end
Configuring LDAP group settings
A user group that will use LDAP must be configured. This example adds the member ldap to the group which is the LDAP server name that was configured earlier.
To configure LDAP group settings - CLI:
config user group
edit "ldap_grp"
set member "ldap"
config match
edit 1
set server-name "ldap"
set group-name "TRUE"
next
end
end
Once these settings are in place, users can authenticate.
Troubleshooting LDAP
The examples in this section use the values from the previous example.
LDAP user test
A quick way to see if the LDAP configuration is correct is to run a diagnose CLI command with LDAP user information. The following command tests with a user called netAdmin and a password of fortinet. If the configuration is correct the test will be successful.
FGT# diag test authserver ldap ldap_server netAdmin fortinet
'ldap_server' is not a valid ldap server name — an LDAP server by that name has not been configured on the FortiGate unit, check your spelling.
authenticate 'netAdmin' against 'ldap_server' failed! — the user netAdmin does not exist on ldap_server, check your spelling of both the user and sever and ensure the user has been configured on the FortiGate unit.
LDAP authentication debugging
For a more in-depth test, you can use a diag debug command. The sample output from a shows more information about the authentication process that may prove useful if there are any problems.
Ensure the “Allow Dial-in” attribute is still set to “TRUE” and run the following CLI command. fnbamd is the Fortinet non-blocking authentication daemon.
FGT# diag debug enable
FGT# diag debug reset
FGT# diag debug application fnbamd –1
FGT# diag debug enable
The output will look similar to:
get_member_of_groups-Get the memberOf groups.
get_member_of_groups- attr='msNPAllowDialin', found 1 values
get_member_of_groups-val[0]='TRUE'
fnbamd_ldap_get_result-Auth accepted
fnbamd_ldap_get_result-Going to DONE state res=0
fnbamd_auth_poll_ldap-Result for ldap svr 192.168.201.3 is SUCCESS
fnbamd_auth_poll_ldap-Passed group matching
If the “Allow Dial-in” attribute is not set but it is expected, the last line of the above output will instead be:
fnbamd_auth_poll_ldap-Failed group matching
TACACS+ servers
When users connect to their corporate network remotely, they do so through a remote access server. As remote access technology has evolved, the need for security when accessing networks has become increasingly important. This need can be filled using a Terminal Access Controller Access-Control System (TACACS+) server.
TACACS+ is a remote authentication protocol that provides access control for routers, network access servers, and other networked computing devices via one or more centralized servers. TACACS+ allows a client to accept a username and password and send a query to a TACACS+ authentication server. The server host determines whether to accept or deny the request and sends a response back that allows or denies the user access to the network.
TACACS+ offers fully encrypted packet bodies, and supports both IP and AppleTalk protocols. TACACS+ uses TCP port 49, which is seen as more reliable than RADIUS’s UDP protocol.
There are several different authentication protocols that TACACS+ can use during the authentication process:
Authentication protocols
| Protocol | Definition |
|---|---|
| ASCII | Machine-independent technique that uses representations of English characters. Requires user to type a username and password that are sent in clear text (unencrypted) and matched with an entry in the user database stored in ASCII format. |
| PAP | Password Authentication Protocol (PAP) Used to authenticate PPP connections. Transmits passwords and other user information in clear text. |
| CHAP | Challenge-Handshake Authentication Protocol (CHAP) Provides the same functionality as PAP, but is more secure as it does not send the password and other user information over the network to the security server. |
| MS-CHAP | MicroSoft Challenge-Handshake Authentication Protocol v1 (MSCHAP) Microsoft-specific version of CHAP. |
| default | The default protocol configuration, Auto, uses PAP, MS-CHAP, and CHAP, in that order. |
Configuring a TACACS+ server on the FortiGate unit
A maximum of 10 remote TACACS+ servers can be configured for authentication.
One or more servers must be configured on FortiGate before remote users can be configured. To configure remote users, see Local and remote users.
The TACACS+ page in the web-based manager is not available until a TACACS+ server has been configured in the CLI. For more information see the CLI Reference.
To configure the FortiGate unit for TACACS+ authentication - web-based manager:
- Go to User & Device > Authentication > TACACS+ Servers and select Create New.
- Enter the following information, and select OK.
| Name | Enter the name of the TACACS+ server. |
| Server Name/IP | Enter the server domain name or IP address of the TACACS+ server. |
| Server Key | Enter the key to access the TACACS+ server. |
| Authentication Type | Select the authentication type to use for the TACACS+ server. Auto tries PAP, MSCHAP, and CHAP (in that order). |
To configure the FortiGate unit for TACACS+ authentication - CLI:
config user tacacs+
edit tacacs1
set authen-type auto
set key abcdef
set port 49
set server 192.168.0.101
end
POP3 servers
FortiOS can authenticate users who have accounts on POP3 or POP3s email servers. POP3 authentication can be configured only in the CLI.
To configure the FortiGate unit for POP3 authentication:
config user pop3
edit pop3_server1
set server pop3.fortinet.com
set secure starttls
set port 110
end
To configure a POP3 user group:
config user group
edit pop3_grp
set member pop3_server1
end
A user group can list up to six POP3 servers as members.
SSO servers
Novell and Microsoft Windows networks provide user authentication based on directory services: eDirectory for Novell, Active Directory for Windows. Users can log on at any computer in the domain and have access to resources as defined in their user account. The Fortinet Single Sign On (FSSO) agent enables FortiGate units to authenticate these network users for security policy or VPN access without asking them again for their username and password.
When a user logs in to the Windows or Novell domain, the FSSO agent sends to the FortiGate unit the user’s IP address and the names of the user groups to which the user belongs. The FortiGate unit uses this information to maintain a copy of the domain controller user group database. Because the domain controller authenticates users, the FortiGate unit does not perform authentication. It recognizes group members by their IP address.
In the FortiOS FSSO configuration, you specify the server where the FSSO Collector agent is installed. The Collector agent retrieves the names of the Novell or Active Directory user groups from the domain controllers on the domains, and then the FortiGate unit gets them from the Collector agent. You cannot use these groups directly. You must define FSSO type user groups on your FortiGate unit and then add the Novell or Active Directory user groups to them. The FSSO user groups that you created are used in security policies and VPN configurations to provide access to different services and resources.
FortiAuthenticator servers can replace the Collector agent when FSSO is using polling mode. The benefits of this is that FortiAuthenticator is a stand-alone server that has the necessary FSSO software pre-installed. For more information, see the FortiAuthenticator Administration Guide.
Single Sign-on Agent configuration settings
The following are SSO configuration settings in User & Device > Authentication > Single Sign-On.
SSO Server List
Lists all the collector agents’ lists that you have configured. On this page, you can create, edit or delete FSSO agents. There are different types of FSSO agents, each with its own settings.
Note: You can create a redundant configuration on your unit if you install a collector agent on two or more domain controllers. If the current (or first) collector agent fails, the Fortinet unit switches to the next one in its list of up to five collector agents.
| Create New | Creates a new agent. When you select Create New, you are automatically redirected to the New page. |
| Edit | Modifies the settings for the selected SSO server. To remove multiple entries from the list, for each servers you want removed, select the check box and then select Delete. To remove all agents from the list, on the FSSO Agent page, select the check box at the top of the check box column and then select Delete. |
| Delete | Removes an agent from the list on the page. |
| Settings when Type is Poll Active Directory Server | |
|---|---|
| Server IP/Name | The IP address of the domain controller (DC). |
| User | The user ID used to access the domain controller. |
| Password | Enter the password for the account used to access the DC. |
| LDAP Server | Select the check box and select an LDAP server to access the Directory Service. |
| Enable Polling | Enable to allow the FortiGate unit to poll this DC. |
| Users/Groups | A list of user and user group names retrieved from the DC. |
| Settings when Type is Fortinet Single Sign On Agent | |
|---|---|
| Name | Enter a name for the SSO server. |
| Primary Agent IP/Name Secondary Agent IP/Name |
Enter the IP address or name of the Directory Service server where this SSO agent is installed. The maximum number of characters is 63. |
| Password | Enter the password for the collector agent. This is required only if you configured your Fortinet Single Sign On Agent collector agent to require authenticated access. |
| LDAP Server | Select the check box and select an LDAP server to access the Directory Service. |
| More FSSO agents | Select to add up to three additional SSO agents. |
| Users/Groups | A list of user and user group names retrieved from the server. |
| Settings when Type is RADIUS Single Sign On Agent | |
|---|---|
| Use RADIUS Shared Secret | Enable |
| Shared Secret | Enter the RADIUS server shared secret. |
| Send RADIUS Responses | Enable. |
RSA ACE (SecurID) servers
SecurID is a two-factor system that uses one-time password (OTP) authentication. It is produced by the company RSA. This system includes portable tokens carried by users, an RSA ACE/Server, and an Agent Host. In our configuration, the FortiGate unit is the Agent Host.
Components
When using SecurID, users carry a small device or “token” that generates and displays a pseudo-random password. According to RSA, each SecurID authenticator token has a unique 64-bit symmetric key that is combined with a powerful algorithm to generate a new code every 60 seconds. The token is time-synchronized with the SecurID RSA ACE/Server.
The RSA ACE/Server is the management component of the SecurID system. It stores and validates the information about the SecurID tokens allowed on your network. Alternately the server could be an RSA SecurID 130 Appliance.
The Agent Host is the server on your network, in this case it is the FortiGate unit, that intercepts user logon attempts. The Agent Host gathers the user ID and password entered from their SecurID token, and sends that information to the RSA ACE/Server to be validated. If valid, a reply comes back indicating it is a valid logon and the FortiGate unit allows the user access to the network resources specified in the associated security policy.
Configuring the SecurID system
To use SecurID with a FortiGate unit, you need:
- to configure the RSA server and the RADIUS server to work with each other (see RSA server documentation)
- to configure the RSA SecurID 130 Appliance
or - to configure the FortiGate unit as an Agent Host on the RSA ACE/Server
- to configure the FortiGate unit to use the RADIUS server
- to create a SecurID user group
- to configure a security policy with SecurID authentication
The following instructions are based on RSA ACE/Server version 5.1, or RSA SecurID 130 Appliance, and assume that you have successfully completed all the external RSA and RADIUS server configuration steps listed above.
For this example, the RSA server is on the internal network, with an IP address of 192.128.100.100. The FortiGate unit internal interface address is 192.168.100.3, RADIUS shared secret is fortinet123, RADIUS server is at IP address 192.168.100.102.
To configure the RSA SecurID 130 Appliance
- Go to the IMS Console for SecurID and logon.
- Go to RADIUS > RADIUS Clients, and select Add New.
- Enter the following information to configure your FortiGate as a SecurID Client, and select Save.
| RADIUS Client Basics | |
|---|---|
| Client Name | FortiGate |
| Associated RSA Agent | FortiGate |
| RADIUS Client Settings | |
|---|---|
| IP Address | 192.168.100.3 The IP address of the FortiGate unit internal interface. |
| Make / Model | Select Standard Radius |
| Shared Secret | fortinet123 The RADIUS shared secret. |
| Accounting | Leave unselected |
| Client Status | Leave unselected |
To configure the FortiGate unit as an Agent Host on the RSA ACE/Server
- On the RSA ACE/Server computer, go to Start > Programs > RSA ACE/Server, and then Database Administration - Host Mode.
- On the Agent Host menu, select Add Agent Host.
- Enter and save the following information.
| Name | FortiGate |
| Network Address | 192.168.100.3 The IP address of the FortiGate unit. |
| Secondary Nodes | Optionally enter other IP addresses that resolve to the FortiGate unit. |
If needed, refer to the RSA ACE/Server documentation for more information.
To configure the FortiGate unit to use the RADIUS server
- Go to User & Device > Authentication > RADIUS Servers and select Create New.
- Enter the following information, and select OK.
| Name | RSA |
| Primary Server IP/Name | 192.168.100.102 Optionally select Test to ensure the IP address is correct and the FortiGate can contact the RADIUS server. |
| Primary Server Secret | fortinet123 |
| Authentication Scheme | Select Use Default Authentication Scheme. |
To create a SecurID user group
- Go to User & Device > User > User Groups, and select Create New.
- Enter the following information.
| Name | RSA_group |
| Type | Firewall |
- In Remote Groups, select Add, then select the RSA server.
- Select OK.
To create a SecurID user:
- Go to User & Device > User > User Definition, and select Create New.
- Use the wizard to enter the following information, and then select Create.
| User Type | Remote RADIUS User |
| User Name | wloman |
| RADIUS Server | RSA |
| Contact Info | (optional) Enter Email or SMS information |
| User Group | RSA_group |
To test this configuration, on your FortiGate unit use the CLI command:
diagnose test authserver radius RSA auto wloman 111111111
The series of 1s is the one time password that your RSA SecurID token generates and you enter.
Using the SecurID user group for authentication
You can use the SecurID user group in several FortiOS features that authenticate by user group including
The following sections assume the SecurID user group is called securIDgrp and has already been configured. Unless otherwise states, default values are used.
Security policy
To use SecurID in a security policy, you must include the SecurID user group in a security policy. This procedure will create a security policy that allows HTTP, FTP, and POP3 traffic from the internal interface to wan1. If these interfaces are not available on your FortiGate unit, substitute other similar interfaces.
To configure a security policy with SecurID authentication
- Go to Policy & Objects > Policy > IPv4.
- Select Create New.
- Enter:
| Incoming Interface | internal |
| Source Address | all |
| Source User(s) | securIDgrp |
| Outgoing Interface | wan1 |
| Destination Address | all |
| Schedule | always |
| Services | HTTP, FTP, POP3 |
| Action | ACCEPT |
| NAT | On |
| Shared Shaper | On, if you want to either limit traffic or guarantee minimum bandwidth for traffic that uses the SecurID security policy. Use the default shaper guarantee-100kbps. |
| Log Allowed Traffic | On, if you want to generate usage reports on traffic authenticated with this policy. |
- Select OK.
The SecurID security policy is configured.
For more detail on configuring security policies, see the FortiOS Handbook FortiGate Fundamentals guide.
IPsec VPN XAuth
Extended Authentication (XAuth) increases security by requiring user authentication in addition to the preshared key.
When creating an IPsec VPN using the wizard (VPN > IPsec > Wizard), select the SecurID User Group on the Authentication page. Members of the SecurID group are required to enter their SecureID code to authenticate.
For more on XAuth, see Configuring XAuth authentication
PPTP VPN
PPTP VPN is configured in the CLI. In the PPTP configuration (config vpn pptp), set usrgrp to the SecurID user group.
SSL VPN
You need to map the SecurID user group to the portal that will serve SecurID users and include the SecurID user group in the Source User(s) field in the security policy.
To map the SecurID group to an SSL VPN portal:
- Go to VPN > SSL > Settings.
- In Authentication/Portal Mapping, select Create New.
- Enter
| Users/Groups | securIDgrp |
| Portal | Choose the portal. |
- Select OK.
Copyright © 2018 Fortinet, Inc. All Rights Reserved. | Terms of Service | Privacy Policy
