
Managing “bring your own device”
FortiOS can control network access for different types of personal mobile devices that your employees bring onto your premises. You can:
- identify and monitor the types of devices connecting to your networks, wireless or wired
- use MAC address based access control to allow or deny individual devices
- create security policies that specify device types
- enforce endpoint control on devices that can run FortiClient Endpoint Control software
Device monitoring
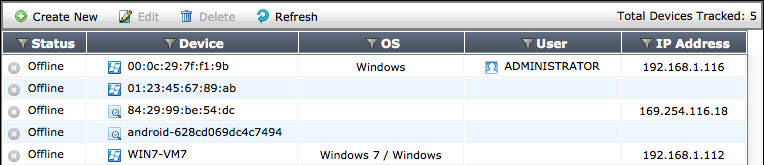
The FortiGate unit can monitor your networks and gather information about the devices operating on those networks. Collected information includes:
- MAC address
- IP address
- operating system
- hostname
- user name
- how long ago the device was detected and on which FortiGate interface
You can go to User & Device > Device > Device Definitions to view this information. Mouse-over the Device column for more details.
Device monitoring is enabled separately on each interface. Device detection is intended for devices directly connected to your LAN ports. If enabled on a WAN port, device detection may be unable to determine the operating system on some devices.
To configure device monitoring
- Go to System > Network > Interfaces.
- Edit the interface that you want to monitor devices on.
- In Device Management, select Detect and Identify Devices.
- Select OK.
- Repeat steps 2 through 4 for each interface that will monitor devices.
For ease in identifying devices, Fortinet recommends that you assign each device an Alias.
To assign an alias to a detected device or change device information
- Go to User & Device > Device > Device Definitions.
- Double-click the device entry or right-click it and select Edit.
- Enter an Alias such as the user’s name to identify the device.
This is step is compulsory. The alias replaces the MAC address in the device list. - Change other information as needed.
- Select OK.
To add a device manually
- Go to User & Device > Device > Device Definitions and select Create New.
- Enter the following information:
- Alias (required)
- MAC address
- Device Type
- Optionally, add the device to Custom Groups.
- Optionally, enter Comments.
- Select OK.
Device Groups
You can specify multiple device types in a security policy. As an alternative, you can add multiple device types to a custom device group and include the group in the policy. This enables you to create a different policy for devices that you know than for devices in general.
To create a custom device group and add devices to it
- Go to User & Device > Device > Device Groups.
The list of device groups is displayed. - Select Create New.
- Enter a Name for the new device group.
- Click in the Members field and click a device type to add. Repeat to add other devices.
- Select OK.
Controlling access with a MAC Address Access Control List
A MAC Address Access Control List (ACL) allows or blocks access on a network interface that includes a DHCP server. If the interface does not use DHCP, or if you want to limit network access to a larger group such as employee devices, it is better to create a device group and specify that group in your security policies.
A MAC Address ACL functions as either a list of blocked devices or a list of allowed devices. This is determined by the Unknown MAC Address entry.
By default, the ACL is a list of blocked devices. The Unknown MAC Address entry Action is Assign IP. You add an entry for each MAC address that you want to block and set its Action to Block.
If you want the ACL to allow only a limited set of devices, you set the Unknown MAC Address entry to Bloc. Then, add the MAC address of each allowed device. Set Action to Assign IP. Optionally, you can set Action to Reserve and enter the IP address that will always be assigned to the device.
To create a MAC Address ACL to allow only specific devices
- Go to the SSID or network interface configuration.
- In the DHCP Server section, expand Advanced.
DHCP Server must be enabled. - In MAC Reservation + Access Control, select Create New and enter an allowed device’s MAC Address.
- In the IP or Action column, select one of:
- Assign IP — device is assigned an IP address from the DHCP server address range.
- Reserve IP — device is assigned the IP address that you specify.
- Repeat Steps Managing “bring your own device” and Managing “bring your own device” for each additional MAC address entry.
- Set the Unknown MAC Address entry IP or Action to Block.
- Select OK.
To create a MAC Address ACL to block specific devices
- Go to the SSID or network interface configuration.
- In the DHCP Server section, expand Advanced.
DHCP Server must be enabled. - In MAC Reservation + Access Control, select Create New and enter a blocked device’s MAC Address.
- In the IP or Action column, select Block.
- Repeat Steps Managing “bring your own device” and Managing “bring your own device” for each additional MAC address entry.
- Set the Unknown MAC Address entry IP or Action to Assign IP.
- Select OK.
Security policies for devices
Security policies enable you to implement policies according to device type. For example:
- Gaming consoles cannot connect to the company network or the Internet.
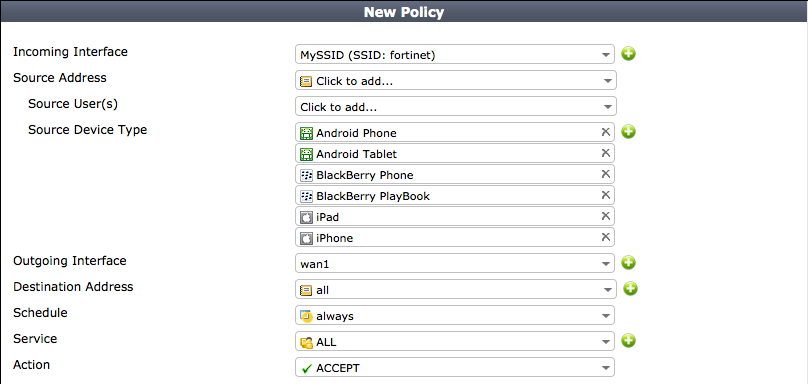
- Personal tablet and phone devices can connect to the Internet but not to company servers.
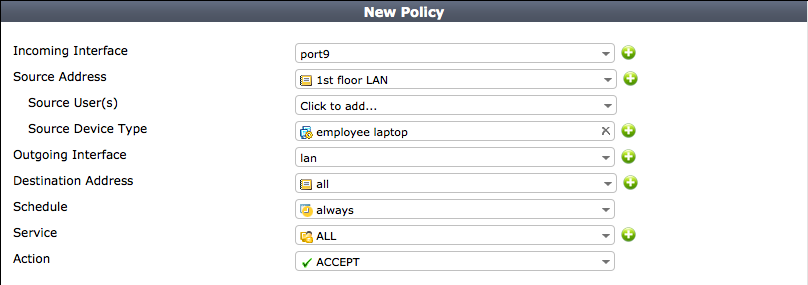
- Company-issued laptop computers can connect to the Internet and company servers. Web filtering and antivirus are applied.
- Employee laptop computers can connect to the Internet, but web filtering is applied. They can also connect to company networks, but only if FortiClient Endpoint Security is installed to protect against viruses.
The following images show these policies implemented for WiFi to the company network and to the Internet.
Device policies for company laptop access to the company network
Device policies for WiFi access to the Internet
The next section explains device policy creation in detail.
Creating device policies
Device-based security policies are similar to policies based on user identity:
- The policy enables traffic to flow from one network interface to another.
- NAT can be enabled.
- UTM protection can be applied.
To create a device policy
- Go to Policy & Objects > Policy > IPv4 and select Create New.
- Choose Incoming Interface, Source Address, and Outgoing Interface as you would for any security policy.
- In Source Device Type, select the device types that can use this policy.
You can select multiple devices or device groups. - Select Enable NAT if appropriate.
- Configure UTM Security Profiles as you would for any security policy.
- Select OK.
Adding endpoint protection
Optionally, you can require that users’ devices have FortiClient Endpoint Security software installed. FortiOS pushes a FortiClient profile out to the FortiClient software, configuring network protection such as antivirus, application control, and web category filtering. Devices without an up-to-date installation of FortiClient software are restricted to a captive portal from which the user can download a FortiClient installer. For information about creating FortiClient profiles, see "Endpoint Protection".
To add endpoint protection to a security policy
- Go to Policy & Objects > Policy > IPv4 and edit the policy.
- In Firewall / Network Options set Compliant with FortiClient Profile to ON.
The policy must have device types or gevice groups in the Source Device Type field.
Copyright © 2018 Fortinet, Inc. All Rights Reserved. | Terms of Service | Privacy Policy
