
Captive portals
A captive portal is a convenient way to authenticate web users on wired or WiFi networks.
This section describes:
Introduction to Captive Portals
You can authenticate your users on a web page that requests the user’s name and password. Until the user authenticates successfully, the authentication page is returned in response to any HTTP request. This is called a captive portal.
After successful authentication, the user accesses the requested URL and can access other web resources, as permitted by security policies. Optionally, the captive portal itself can allow web access to only the members of specified user group.
The captive portal can be hosted on the FortiGate unit or on an external authentication server. You can configure captive portal authentication on any network interface, including WiFi and VLAN interfaces.
When a captive portal is configured on a WiFi interface, the access point initially appears open. The wireless client can connect to the access point with no security credentials, but sees only the captive portal authentication page.
WiFi captive portal types:
- Authentication — until the user enters valid credentials, no communication beyond the AP is permitted.
- Disclaimer + Authentication — immediately after successful authentication, the portal presents the disclaimer page—an acceptable use policy or other legal statement—to which the user must agree before proceeding.
- Disclaimer Only — the portal presents the disclaimer page—an acceptable use policy or other legal statement—to which the user must agree before proceeding. The authentication page is not presented.
- Email Collection — the portal presents a page requesting the user’s email address, for the purpose of contacting the person in future. This is often used by businesses who provide free WiFi access to their customers. The authentication page is not presented.
Configuring a captive portal
Captive portals are configured on network interfaces. On a physical (wired) network interface, you edit the interface configuration in System > Network > Interfaces and set Security Mode to Captive Portal. A WiFi interface does not exist until the WiFi SSID is created. You can configure a WiFi captive portal at the time that you create the SSID. Afterwards, the captive portal settings will also be available by editing the WiFi network interface in System > Network > Interfaces.
To configure a wired Captive Portal - web-based manager:
- Go to System > Network > Interfaces and edit the interface to which the users connect.
- In Security Mode select Captive Portal.
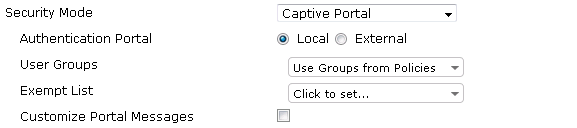
- Enter
| Authentication Portal | Local - portal hosted on the FortiGate unit. Remote - enter FQDN or IP address of external portal. |
| User Groups | Select permitted user groups or select Use Groups from Policies, which permits the groups specified in the security policy. Use Groups from Policies is not available in WiFi captive portals. |
| Exempt List | Select exempt lists whose members will not be subject to captive portal authentication. |
| Customize Portal Messages |
Enable, then select Edit. See Customizing captive portal pages. |
- Select OK.
To configure a WiFi Captive Portal - web-based manager:
- Go to WiFi Controller > WiFi Network > SSID and create your SSID.
If the SSID already exists, you can edit the SSID or you can edit the WiFi interface in System > Network > Interfaces. - In Security Mode, select Captive Portal.

- Enter
| Portal Type | The portal can provide authentication and/or disclaimer, or perform user email address collection. See Introduction to Captive Portals. |
| Authentication Portal | Local - portal hosted on the FortiGate unit. Remote - enter FQDN or IP address of external portal. |
| User Groups | Select permitted user groups. |
| Exempt List | Select exempt lists whose members will not be subject to captive portal authentication. |
| Customize Portal Messages | Click the link of the portal page that you want to modify. See Customizing captive portal pages. |
- Select OK.
Exemption from the captive portal
A captive portal requires all users on the interface to authenticate. But some devices are not able to authenticate. You can create an exemption list of these devices. For example, a printer might need to access the Internet for firmware upgrades. Using the CLI, you can create an exemption list to exempt all printers from authentication.
config user security-exempt-list
edit r_exempt
config rule
edit 1
set devices printer
end
end
Customizing captive portal pages
These pages are defined in replacement messages. Defaults are provided. In the web-based manager, you can modify the default messages in the SSID configuration by selecting Customize Portal Messages. Each SSID can have its own unique portal content.
The captive portal contains the following default web pages:
- Login page—requests user credentials
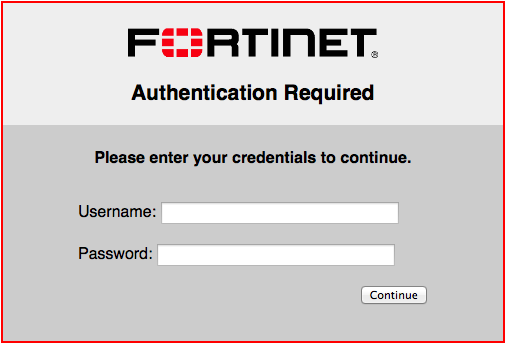
Typical modifications for this page would be to change the logo and modify some of the text.
You can change any text that is not part of the HTML code nor a special tag enclosed in double percent (%) characters.
There is an exception to this rule. The line “Please enter your credentials to continue” is provided by the %%QUESTION%% tag. You can replace this tag with text of your choice. Except for this item, you should not remove any tags because they may carry information that the FortiGate unit needs.
- Login failed page—reports that the entered credentials were incorrect and enables the user to try again.

The Login failed page is similar to the Login page. It even contains the same login form. You can change any text that is not part of the HTML code nor a special tag enclosed in double percent (%) characters.
There is an exception to this rule. The line “Firewall authentication failed. Please try again.” is provided by the %%FAILED_MESSAGE%% tag. You can replace this tag with text of your choice. Except for this item, you should not remove any tags because they may carry information that the FortiGate unit needs.
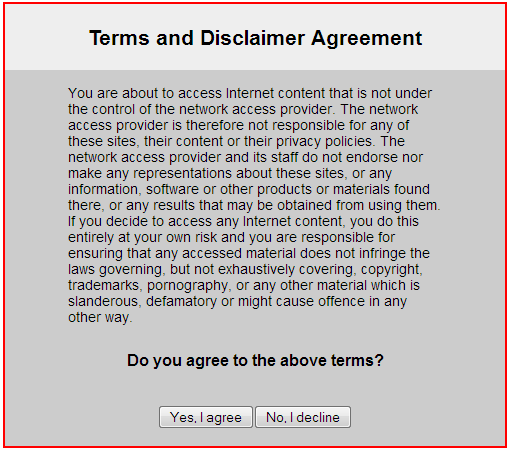
- Disclaimer page—is a statement of the legal responsibilities of the user and the host organization to which the user must agree before proceeding.(WiFi or SSL VPN only)
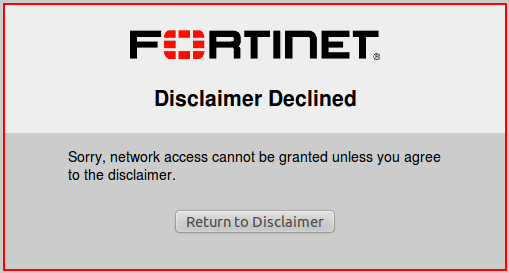
- Declined disclaimer page—is displayed if the user does not agree to the statement on the Disclaimer page. Access is denied until the user agrees to the disclaimer.
Changing images in portal messages
You can replace the default Fortinet logo with your organization’s logo. First, import the logo file into the FortiGate unit and then modify the Login page code to reference your file.
To import a logo file:
- Go to System > Config > Replacement Messages and select Manage Images.
- Select Create New.
- Enter a Name for the logo and select the appropriate Content Type.
The file must not exceed 24 Kilo bytes. - Select Browse, find your logo file and then select Open.
- Select OK.
To specify the new logo in the replacement message:
- Go to System > Network > Interfaces and edit the interface.
The Security Mode must be Captive Portal. - Select the portal message to edit.
- In SSL VPN or WiFi interfaces, in Customize Portal Messages click the link to the portal messages that you want to edit.
- In other interfaces, make sure that Customize Portal Messages is selected, select the adjacent Edit icon, then select the message that you want to edit.
- In the HTML message text, find the %%IMAGE tag.
By default it specifies the Fortinet logo:%%IMAGE:logo_fw_auth%% - Change the image name to the one you provided for your logo.
The tag should now read, for example,%%IMAGE:mylogo%% - Select Save.
- Select OK.
Modifying text in portal messages
Generally, you can change any text that is not part of the HTML code nor a special tag enclosed in double percent (%) characters. You should not remove any tags because they may carry information that the FortiGate unit needs. See the preceding section for any exceptions to this rule for particular pages.
To modify portal page text
- Go to System > Network > Interfaces and edit the interface.
The SSID Security Mode must be Captive Portal. - Select the portal message to edit.
- In SSL VPN or WiFi interfaces, in Customize Portal Messages click the link to the portal messages that you want to edit.
- In other interfaces, make sure that Customize Portal Messages is selected, select the adjacent Edit icon, then select the message that you want to edit.
- Edit the HTML message text, then select Save.
- Select OK.
Configuring disclaimer page for ethernet interface captive portals
While you can customize a disclaimer page for captive portals that connect via WiFi, the same can be done for wired connections. However, this can only be configured on the CLI Console, and only without configuring user groups.
When configuring a captive portal through the CLI, you may set security-groups to a specific user group. The result of this configuration will show an authentication form to users who wish to log in to the captive portal—not a disclaimer page. If you do not set any security-groups in your configuration, an "Allow all" status will be in effect, and the disclaimer page will be displayed for users.
The example CLI configuration below shows setting up a captive portal interface without setting security-groups, resulting in a disclaimer page for users:
config system interface
edit "port1"
set vdom "root"
set ip 172.16.101.1 255.255.255.0
set allowaccess ping https ssh snmp http
set type physical
set explicit-web-proxy enable
set alias "LAN"
set security-mode captive-portal
set snmp-index 1
next
end
Copyright © 2018 Fortinet, Inc. All Rights Reserved. | Terms of Service | Privacy Policy
