
Examples and Troubleshooting
This chapter provides an example of a FortiGate unit providing authenticated access to the Internet for both Windows network users and local users.
The following topics are included in this section:
- Firewall authentication example
- LDAP Dial-in using member-attribute example
- RADIUS SSO example
- Troubleshooting
Firewall authentication example
Example configuration
Overview
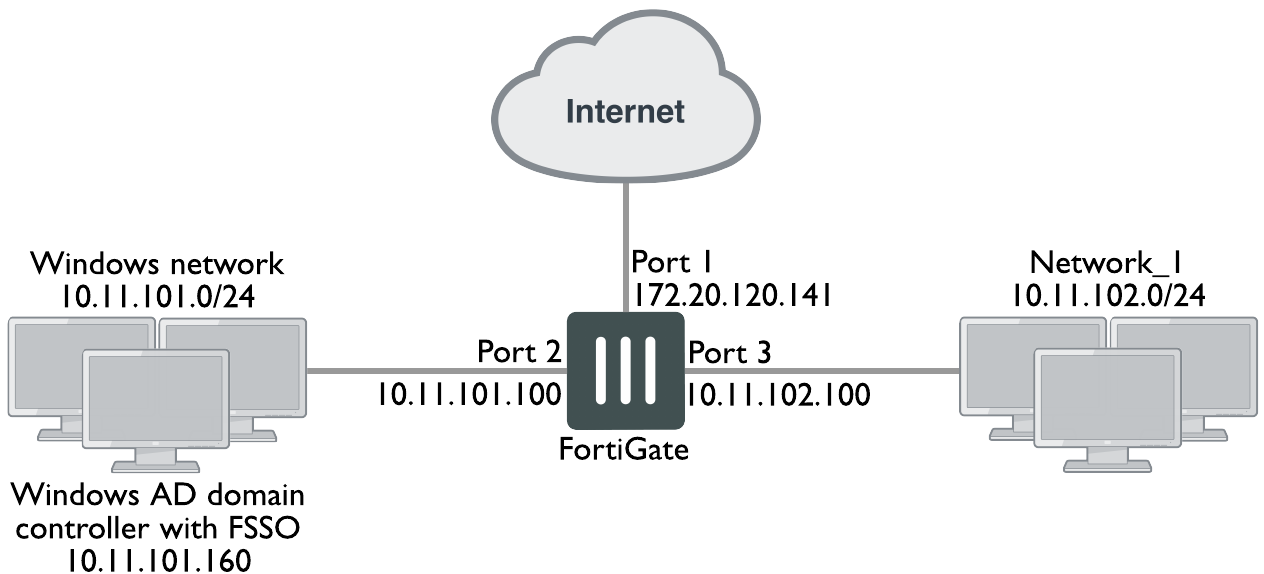
In this example, there is a Windows network connected to Port 2 on the FortiGate unit and another LAN, Network_1, connected to Port 3.
All Windows network users authenticate when they logon to their network. Members of the Engineering and Sales groups can access the Internet without entering their authentication credentials again. The example assumes that the Fortinet Single Sign On (FSSO) has already been installed and configured on the domain controller.
LAN users who belong to the Internet_users group can access the Internet after entering their username and password to authenticate. This example shows only two users, User1 is authenticated by a password stored on the FortiGate unit, User2 is authenticated on an external authentication server. Both of these users are referred to as local users because the user account is created on the FortiGate unit.
Creating a locally-authenticated user account
User1 is authenticated by a password stored on the FortiGate unit. It is very simple to create this type of account.
To create a local user - web-based manager:
- Go to User & Device > User > User Definition and select Create New.
- Follow the User Creation Wizard, entering the following information and then select Create:
| User Type | Local User |
| User Name | User1 |
| Password | hardtoguess |
| Email Address SMS |
(optional) |
| Enable | Select. |
To create a local user - CLI:
config user local
edit user1
set type password
set passwd hardtoguess
end
Creating a RADIUS-authenticated user account
To authenticate users using an external authentication server, you must first configure the FortiGate unit to access the server.
To configure the remote authentication server - web-based manager:
- Go to User & Device > Authentication > RADIUS Servers and select Create New.
- Enter the following information and select OK:
| Name | OurRADIUSsrv |
| Primary Server Name/IP | 10.11.101.15 |
| Primary Server Secret | OurSecret |
| Authentication Scheme | Select Use Default Authentication Scheme. |
To configure the remote authentication server - CLI:
config user radius
edit OurRADIUSsrv
set server 10.11.102.15
set secret OurSecret
set auth-type auto
end
Creation of the user account is similar to the locally-authenticated account, except that you specify the RADIUS authentication server instead of the user’s password.
To configure a remote user - web-based manager:
- Go to User & Device > User > User Definition and select Create New.
- Follow the User Creation Wizard, entering the following information and then select Create:
| User Type | Remote RADIUS User |
| User Name | User2 |
| RADIUS server | OurRADIUSsrv |
| Email Address SMS |
(optional) |
| Enable | Select |
To configure a remote user - CLI:
config user local
edit User2
set name User2
set type radius
set radius-server OurRADIUSsrv
end
Creating user groups
There are two user groups: an FSSO user group for FSSO users and a firewall user group for other users. It is not possible to combine these two types of users in the same user group.
Creating the FSSO user group
For this example, assume that FSSO has already been set up on the Windows network and that it uses Advanced mode, meaning that it uses LDAP to access user group information. You need to
- configure LDAP access to the Windows AD global catalog
- specify the collector agent that sends user logon information to the FortiGate unit
- select Windows user groups to monitor
- select and add the Engineering and Sales groups to an FSSO user group
To configure LDAP for FSSO - web-based manager:
- Go to User & Device > Authentication > LDAP Servers and select Create New.
- Enter the following information:
| Name | ADserver |
| Server Name / IP | 10.11.101.160 |
| Distinguished Name | dc=office,dc=example,dc=com |
| Bind Type | Regular |
| User DN | cn=FSSO_Admin,cn=users,dc=office,dc=example,dc=com |
| Password | set_a_secure_password |
- Leave other fields at their default values.
- Select OK.
To configure LDAP for FSSO - CLI"
config user ldap
edit "ADserver"
set server "10.11.101.160"
set dn "cn=users,dc=office,dc=example,dc=com"
set type regular
set username "cn=administrator,cn=users,dc=office,dc=example,dc=com"
set password set_a_secure_password
next
end
To specify the collector agent for FSSO - web-based manager
- Go to User & Device > Authentication > Single Sign-On and select Create New.
- Enter the following information:
| Type | Fortinet Single Sign-On Agent |
| Name | WinGroups |
| Primary Agent IP/Name | 10.11.101.160 |
| Password | fortinet_canada |
| LDAP Server | ADserver |
- Select Apply & Refresh.
In a few minutes, the FortiGate unit downloads the list of user groups from the server.
To specify the collector agent for FSSO - CLI:
config user fsso
edit "WinGroups"
set ldap-server "ADserver"
set password ENC G7GQV7NEqilCM9jKmVmJJFVvhQ2+wtNEe9T0iYA5Sa+EqT2J8zhOrbkJFDr0RmY3c4LaoXdsoBczA1dONmcGfthTxxwGsigzGpbJdC71spFlQYtj
set server "10.11.101.160"
end
To create the FSSO_Internet-users user group - web-based manager:
- Go to User & Device > User > User Groups and select Create New.
- Enter the following information and then select OK:
| Name | FSSO_Internet_users |
| Type | Fortinet Single Sign-On (FSSO) |
| Members | Engineering, Sales |
To create the FSSO_Internet-users user group - CLI:
config user group
edit FSSO_Internet_users
set group-type fsso-service
set member CN=Engineering,cn=users,dc=office,dc=example,dc=com CN=Sales,cn=users,dc=office,dc=example,dc=com
end
Creating the Firewall user group
The non-FSSO users need a user group too. In this example, only two users are shown, but additional members can be added easily.
To create the firewall user group - web-based manager:
- Go to User & Device > User > User Groups and select Create New.
- Enter the following information and then select OK:
| Name | Internet_users |
| Type | Firewall |
| Members | User1, User2 |
To create the firewall user group - CLI:
config user group
edit Internet_users
set group-type firewall
set member User1 User2
end
Defining policy addresses
- Go to Policy & Objects > Objects > Addresses.
- Create the following addresses:
| Address Name | Internal_net |
| Type | Subnet |
| Subnet / IP Range | 10.11.102.0/24 |
| Interface | Port 3 |
| Address Name | Windows_net |
| Type | Subnet |
| Subnet / IP Range | 10.11.101.0/24 |
| Interface | Port 2 |
Creating security policies
Two security policies are needed: one for firewall group who connect through port3 and one for FSSO group who connect through port2.
To create a security policy for FSSO authentication - web-based manager:
- Go to Policy & Objects > Policy > IPv4 and select Create New.
- Enter the following information:
| Incoming Interface | Port2 |
| Source Address | Windows_net |
| Source User(s) | FSSO_Internet_users |
| Outgoing Interface | Port1 |
| Destination Address | all |
| Schedule | always |
| Service | ALL |
| NAT | ON |
| Security Profiles | Optionally, enable security profiles. |
- Select OK.
To create a security policy for FSSO authentication - CLI:
config firewall policy
edit 0
set srcintf port2
set dstintf port1
set srcaddr Windows_net
set dstaddr all
set action accept
set groups FSSO_Internet_users
set schedule always
set service ANY
set nat enable
end
To create a security policy for local user authentication - web-based manager
- Go to Policy & Objects > Policy > IPv4 and select Create New.
- Enter the following information:
| Incoming Interface | Port3 |
| Source Address | Internal_net |
| Source User(s) | Internet_users |
| Outgoing Interface | Port1 |
| Destination Address | all |
| Schedule | always |
| Service | ALL |
| NAT | ON |
| Security Profiles | Optionally, enable security profiles. |
- Select OK.
To create a security policy for local user authentication - CLI
config firewall policy
edit 0
set srcintf port3
set dstintf port1
set srcaddr internal_net
set dstaddr all
set action accept
set schedule always
set groups Internet_users
set service ANY
set nat enable
end
LDAP Dial-in using member-attribute example
In this example, users defined in MicroSoft Windows Active Directory (AD) are allowed to set up a VPN connection simply based on an attribute that is set to TRUE, instead of based on their user group. In AD the "Allow Dialin" property is activated in the user properties, and this sets the msNPAllowDialin attribute to "TRUE".
This same procedure can be used for other member attributes, as your system requires.
To accomplish this with a FortiGate unit, member-attribute must be set. This can only be accomplished through the CLI - the option is not available through the web-based manager.
Before configuring the FortiGate unit, ensure the AD server has the msNPAllowDialin attribute set to "TRUE" for the users in question. If not, those users will not be able to authenticate.
To configure user LDAP member-attribute settings - CLI:
config user ldap
edit "ldap_server"
set server "192.168.201.3"
set cnid "sAMAccountName"
set dn "DC=fortilabanz,DC=com,DC=au"
set type regular
set username "fortigate@sample.com"
set password ******
set member-attr "msNPAllowDialin"
next
end
To configure LDAP group settings - CLI:
config user group
edit "ldap_grp"
set member "ldap"
config match
edit 1
set server-name "ldap"
set group-name "TRUE"
next
end
next
end
Once these settings are in place, users that are a member of the ldap user group will be able to authenticate.
To ensure your settings are correct, here is the sample output from a diag debug command that shows the authentication process.
When the "Allow Dial-in" attribute is set to "TRUE" the following will likely be in the output:
get_member_of_groups-Get the memberOf groups.
get_member_of_groups- attr='msNPAllowDialin', found 1 values
get_member_of_groups-val[0]='TRUE'
fnbamd_ldap_get_result-Auth accepted
fnbamd_ldap_get_result-Going to DONE state res=0
fnbamd_auth_poll_ldap-Result for ldap svr 192.168.201.3 is SUCCESS
fnbamd_auth_poll_ldap-Passed group matching
If the attribute is not set but it is expected, the following will likely be in the output:
get_member_of_groups-Get the memberOf groups.
get_member_of_groups- attr='msNPAllowDialin', found 1 values
get_member_of_groups-val[0]='FALSE'
fnbamd_ldap_get_result-Auth accepted
fnbamd_ldap_get_result-Going to DONE state res=0
fnbamd_auth_poll_ldap-Result for ldap svr 192.168.201.3 is SUCCESS
fnbamd_auth_poll_ldap-Failed group matching
The only difference between these two outputs is the last line which is either passed or failed based on if the member-attribute is set to the expected value or not.
RADIUS SSO example
A common RADIUS SSO topology involves a medium sized company network of users connecting to the Internet through the FortiGate unit, and authenticating with a RADIUS server. RADIUS SSO authentication was selected because it is fast and relatively easy to configure.
This section includes:
- Assumptions
- Topology
- Configuring RADIUS
- Configuring FortiGate regular and RADIUS SSO security policies
- Testing
Assumptions
- VDOMs are not enabled
- The admin super_admin administrator account will be used for all FortiGate unit configuration.
- Any other devices on the network do not affect the topology of this example, and therefore are not included.
- Anywhere settings are not described, they are assumed to be default values.
- A RADIUS server is installed on a server or FortiAuthenticator unit and uses default attributes.
- BGP is used for any dynamic routing.
- Authentication event logging under Log&Report has been configured.
Topology
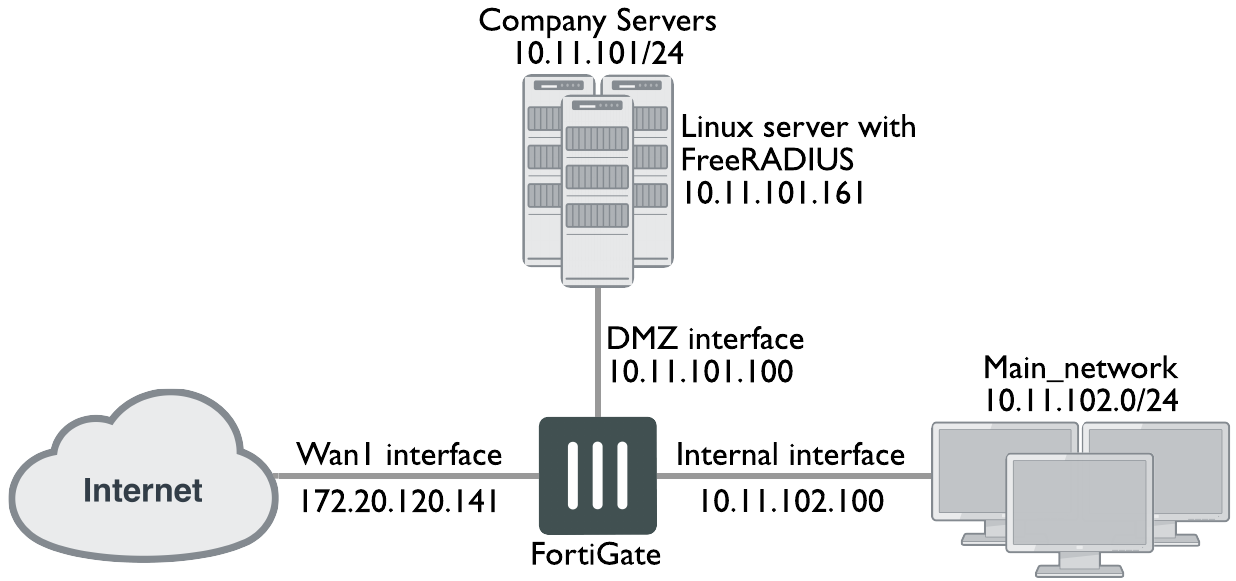
Example.com has an office with 20 users on the internal network. These users need access to the Internet to do their jobs. The office network is protected by a FortiGate-60C unit with access to the Internet through the wan1 interface, the user network on the internal interface, and all the servers are on the DMZ interface. This includes an Ubuntu Linux server running FreeRADIUS. For this example only two users will be configured — Pat Lee with an account name plee, or plee@example.com, and Kelly Green with an account name kgreen, or kgreen@example.com.
RADIUS SSO topology
Configuring RADIUS
Configuring RADIUS includes configuring the RADIUS server such as FreeRADIUS, a radius client on user’s computers, and configuring users in the system. For this example the two users will be Pat Lee, and Kelly Green. They belong to a group called exampledotcom_employees. When it is all configured, the RADIUS daemon needs to started.
The users have a RADIUS client installed on their PCs that allows them to authenticate through the RADIUS server.
FreeRADIUS can be found on the freeradius.org website. For any problems installing FreeRADIUS, see the FreeRADIUS documentation.
Configuring FortiGate interfaces
Before configuring the RADIUS SSO security policy, configure FortiGate interfaces. This includes defining a DHCP server for the internal network as this type of network typically uses DHCP. The wan1 and dmz interfaces are assigned static IP addresses and do not need a DHCP server.
FortiGate interfaces used in this example
| Interface | Subnet | Act as DHCP Server | Devices |
|---|---|---|---|
| wan1 | 172.20.120.141 | No | Internet Service Provider |
| dmz | 10.11.101.100 | No | Servers, including RADIUS server |
| internal | 10.11.102.100 | Yes: x.x.x.110-.250 | Internal user network |
To configure FortiGate interfaces - web-based manager:
- Go to System > Network > Interfaces.
- Select wan1 to edit.
- Enter the following information and select OK.
| Alias | Internet |
| Addressing Mode | Manual |
| IP/Network Mask | 172.20.120.141/255.255.255.0 |
| Administrative Access | HTTPS, SSH |
| Enable DHCP Server | Not selected |
| Comments | Internet |
| Administrative Status | Up |
- Select dmz to edit.
- Enter the following information and select OK.
| Alias | Servers |
| Addressing Mode | Manual |
| IP/Network Mask | 10.11.101.100/255.255.255.0 |
| Administrative Access | HTTPS, SSH, PING, SNMP |
| Enable DHCP Server | Not selected |
| Listen for RADIUS Accounting Messages | Select |
| Comments | Servers |
| Administrative Status | Up |
- Select internal to edit.
- Enter the following information and select OK.
| Alias | Internal network |
| Addressing Mode | Manual |
| IP/Network Mask | 10.11.102.100/255.255.255.0 |
| Administrative Access | HTTPS, SSH, PING |
| Enable DHCP Server | Select |
| Address Range | 10.11.102.110 - 10.11.102.250 |
| Netmask | 255.255.255.0 |
| Default Gateway | Same as Interface IP |
| DNS Server | Same as System DNS |
| Comments | Internal network |
| Administrative Status | Up |
Configuring a RADIUS SSO Agent on the FortiGate unit
To create a RADIUS SSO agent:
- Go to User & Device > Authentication > Single Sign-On and select Create New.
- In Type, select RADIUS Single-Sign-On Agent.
- Select Use RADIUS Shared Secret and enter the RADIUS server shared secret.
- Select Send RADIUS Responses.
- Select OK.
The Single Sign-On agent is named RSSO_Agent.
Creating a RADIUS SSO user group
To define a local user group for RADIUS SSO:
- Go to User & Device > User > User Groups and select Create New.
- Enter a Name for the user group.
- In Type, select RADIUS Single Sign-On (RSSO).
- In RADIUS Attribute Value, enter the name of the RADIUS user group this local user group represents.
- Select OK.
Configuring FortiGate regular and RADIUS SSO security policies
With the RADIUS server and FortiGate interfaces configured, security policies can be configured. This includes both RADIUS SSO and regular policies, as well as addresses and address groups. All policies require NAT to be enabled.
Security policies required for RADIUS SSO
| Seq. No. | From -> To | Type | Schedule | Description |
|---|---|---|---|---|
| 1 | internal -> wan1 | RADIUS SSO | business hours | Authenticate outgoing user traffic. |
| 2 | internal -> wan1 | regular | always | Allow essential network services and VoIP. |
| 3 | dmz -> wan1 | regular | always | Allow servers to access Internet. |
| 4 | internal -> dmz | regular | always | Allow users to access servers. |
| 5 | any -> any | deny | always | Implicit policy denying all traffic that hasn’t been matched. |
|
|
The RADIUS SSO policy must be placed at the top of the policy list so it is matched first. The only exception to this is if you have a policy to deny access to a list of banned users. In this case, that policy must go at the top so the RADIUS SSO does not mistakenly match a banned user or IP address. |
This section includes:
- Schedules, address groups, and services groups
- Configuring regular security policies
- Configuring RADIUS SSO security policy
Schedules, address groups, and services groups
This section lists the lists that need to be configured before security policies are created. Creating these lists is straight forward, so the essential information has been provided here but not step by step instructions. For more information on firewall related details, see
Schedules
Only one schedule needs to be configured — business_hours. This is a fairly standard Monday to Friday 8am to 5pm schedule, or whatever days and hours covers standard work hours at the company.
Address groups
The following address groups need to be configured before the security policies.
| Address Group Name | Interface | Address range included |
|---|---|---|
| internal_network | internal | 10.11.102.110 to 10.11.102.250 |
| company_servers | dmz | 10.11.101.110 to 10.11.101.250 |
Service groups
The following service groups need to be configured before the security policies. Note that the services listed are suggestions and may include more or less as required.
| Service Group Name | Interface | Description of services to be included |
|---|---|---|
| essential_network_services | internal | Any network protocols required for normal network operation such as DNS, NTP, BGP. |
| essential_server_services | dmz | All the protocols required by the company servers such as BGP, HTTP, HTTPS, FTP, IMAP, POP3, SMTP, IKE, SQL, MYSQL, NTP, TRACEROUTE, SOCKs, and SNMP. |
| user_services | internal | Any protocols required by users HTTP, HTTP, FTP, |
The following security policy configurations are basic and only include logging, and default AV and IPS.
Configuring regular security policies
Regular security policies allow or deny access for non-RADIUS SSO traffic. This is essential as there are network services—such as DNS, NTP, and FortiGuard—that require access to the Internet.
To configure regular security policies - web-based manager:
- Go to Policy & Objects > Policy > IP4, and select Create New.
- Enter the following information, and select OK.
| Incoming Interface | Internal |
| Source Address | internal_network |
| Outgoing Interface | wan1 |
| Destination Address | all |
| Schedule | always |
| Service | essential_network_services |
| Action | ACCEPT |
| NAT | ON |
| Security Profiles | ON: AntiVirus, IPS |
| Log Allowed Traffic | ON |
| Comments | Essential network services |
- Select Create New, enter the following information, and select OK.
| Incoming Interface | dmz |
| Source Address | company_servers |
| Outgoing Interface | wan1 |
| Destination Address | all |
| Schedule | always |
| Service | essential_server_services |
| Action | ACCEPT |
| NAT | ON |
| Security Profiles | ON: AntiVirus, IPS |
| Log Allowed Traffic | enable |
| Comments | Company servers accessing the Internet |
- Select Create New, enter the following information, and select OK.
| Incoming Interface | Internal |
| Source Address | internal_network |
| Outgoing Interface | dmz |
| Destination Address | company_servers |
| Schedule | always |
| Service | all |
| Action | ACCEPT |
| NAT | ON |
| Security Profiles | ON: AntiVirus, IPS |
| Log Allowed Traffic | enable |
| Comments | Access company servers |
Configuring RADIUS SSO security policy
The RADIUS SSO policy allows access for members of specific RADIUS groups.
To configure RADIUS SSO security policy:
- Go to Policy & Objects > Policy > IP4.
- Select Create New.
- Enter the following information:
| Incoming Interface | Internal |
| Source Address | internal_network |
| Source User(s) | Select the user groups you created for RSSO. |
| Outgoing Interface | wan1 |
| Destination Address | all |
| Schedule | business_hours |
| Service | ALL |
| Action | ACCEPT |
| NAT | ON |
| Security Profiles | ON: AntiVirus, WebFilter, IPS, and Email Filter. In each case, select the default profile. |
- Select OK.
- To ensure an RSSO-related policy is matched first, the policy should be placed higher in the security policy list than more general policies for the same interfaces.
- Select OK.
Testing
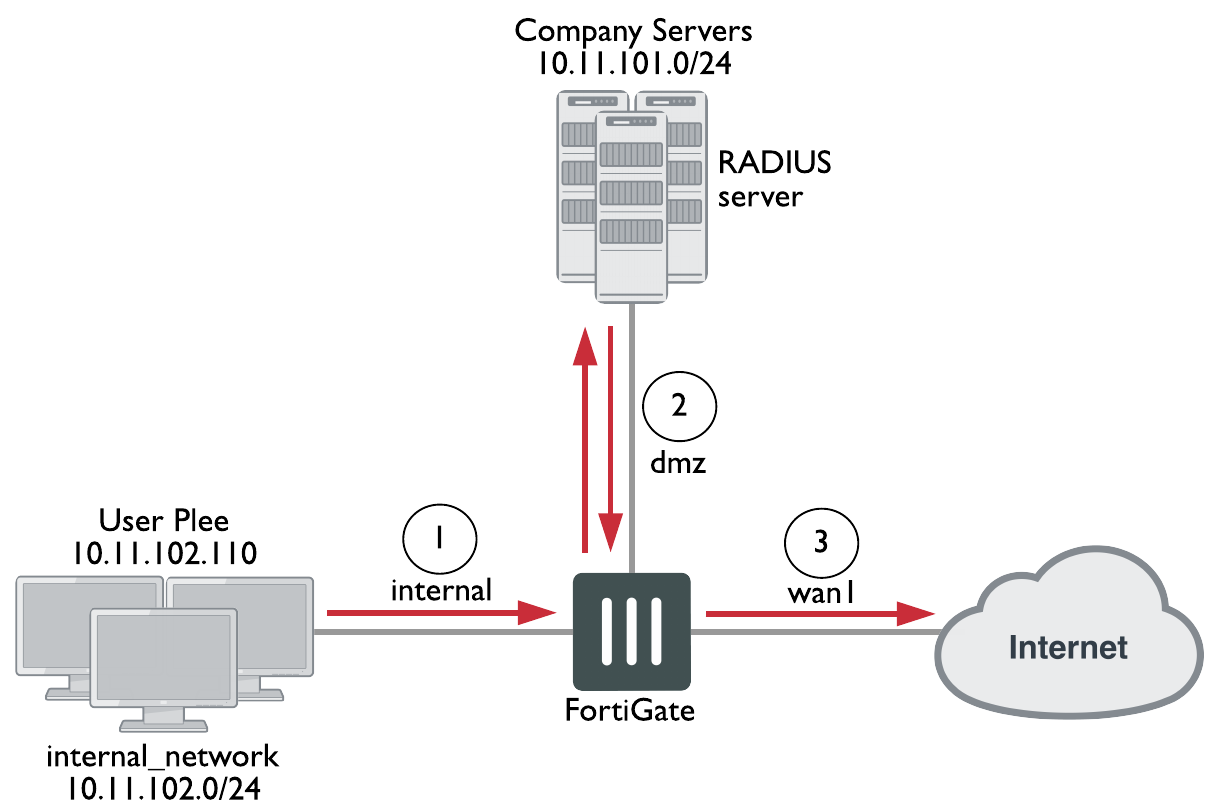
Once configured, a user only needs to log on to their PC using their RADIUS account. After that when they attempt to access an Internet website, the FortiGate unit will use their session information to get their RADIUS information. Once the user is verified, they are allowed access to the website.
To test the configuration perform the following steps:
- Have user 'plee' logon to their PC, and try to access an Internet website.
- The FortiGate unit will contact the RADUS server for user plee’s information.
Once confirmed, plee will have access to the website.
Each step generates log entries that enable you to verify that each step was successful. - If a step is unsuccessful, confirm that your configuration is correct.
RADIUS SSO test
Troubleshooting
In the web-based manager, a good tool for troubleshooting is the packet counter column on the security policy page (Policy > Policy). This column displays the number of packets that have passed through this security policy. Its value when you are troubleshooting is that when you are testing your configuration (end to end connectivity, user authentication, policy use) watching the packet count for an increase confirms any other methods you may be using for troubleshooting. It provides the key of which policy is allowing the traffic, useful information if you expect a user to require authentication and it never happens. For more information about authentication security policies, see "Authentication in security policies".
This section addresses how to get more information from the CLI about users and user authentication attempts to help troubleshoot failed authentication attempts.
diag firewall iprope list
Shows the IP that the computer connected from. This is useful to confirm authorization and VPN settings.
diag firewall iprope clear
Clear all authorized users from the current list. Useful to force users to re-authenticate after system or group changes. However, this command may easily result in many users having to re-authenticate, so use carefully.
diag rsso query ip
diag rsso query rsso-key
Queries the RSSO database.
For more information on troubleshooting specific features, go to that section of this document. Most sections have troubleshooting information at the end of the section. In addition to that information, see the FortiOS Handbook Troubleshooting guide for general troubleshooting information.
Copyright © 2018 Fortinet, Inc. All Rights Reserved. | Terms of Service | Privacy Policy
