
Web caching and SSL offloading
FortiGate web caching is a form of object caching that accelerates web applications and web servers by reducing bandwidth usage, server load, and perceived latency. Web caching supports caching of HTTP 1.0 and HTTP 1.1 web sites. See RFC 2616 for information about web caching for HTTP 1.1.
|
|
Web caching supports caching of Flash content over HTTP but does not cache audio and video streams including Flash videos and streaming content that use native streaming protocols such as RTMP. The first time a file is received by web caching it is cached in the format it is received in, whether it be compressed or uncompressed. When the same file is requested by a client but in a different compression format, the cached file is converted to the new compressed format before being sent to the client. |
There are three significant advantages to using web caching to improve HTTP and WAN performance:
- reduced bandwidth consumption because fewer requests and responses go over the WAN or Internet.
- reduced web server load because there are fewer requests for web servers to handle.
- reduced latency because responses for cached requests are available from a local FortiGate unit instead of from across the WAN or Internet.
You can use web caching to cache any web traffic that passes through the FortiGate unit, including web pages from web servers on a LAN, WAN or on the Internet. You apply web caching by enabling the web caching option in any security policy. When enabled in a security policy, web caching is applied to all HTTP sessions accepted by the security policy. If the security policy is an explicit web proxy security policy, the FortiGate unit caches explicit web proxy sessions.
Turning on web caching for HTTP and HTTPS traffic
Web caching can be applied to any HTTP or HTTPS traffic by enabling web caching in a security policy that accepts the traffic. This includes IPv4, IPv6, WAN optimization and explicit web proxy traffic. Web caching caches all HTTP traffic accepted by a policy on TCP port 80.
You can add web caching to a policy to:
- Cache Internet HTTP traffic for users on an internal network to reduce Internet bandwidth use. Do this by selecting the web cache option for security policies that allow users on the internal network to browse web sites on the Internet.
- Reduce the load on a public facing web server by caching objects on the FortiGate unit. This is a reverse proxy with web caching configuration. Do this by selecting the web cache option for a security policy that allows users on the Internet to connect to the web server.
- Cache outgoing explicit web proxy traffic when the explicit proxy is used to proxy users in an internal network who are connecting to the web servers on the Internet. Do this by selecting the web cache option for explicit web proxy security policies that allow users on the internal network to browse web sites on the Internet.
- Combine web caching with WAN optimization. You can enable web caching in any WAN optimization security policy. This includes manual, active, and passive WAN optimization policies and WAN optimization tunnel policies. You can enable web caching on both the client-side and the server-side FortiGate units or on just one or the other. For optimum performance you can enable web caching on both the client-side and server-side FortiGate units. In this way only uncached content is transmitted through the WAN optimization tunnel. All cached content is access locally by clients from the client side FortiGate unit.
|
|
One important use for web caching is to cache software updates (for example, Windows Updates or iOS updates. When updates occur a large number of users may all be trying to download these updates at the same time. Caching these updates will be a major performance improvement and also have a potentially large impact on reducing Internet bandwidth use. You may want to adjust the maximum cache object size to make sure these updates are cached. SeeMax cache object size. |
Turning on web caching for HTTPS traffic
Web caching can also cache the content of HTTPS traffic on TCP port 443. With HTTPS web caching, the FortiGate unit receives the HTTPS traffic on behalf of the client, opens up the encrypted traffic and extracts content to be cached. Then FortiGate unit re-encrypts the traffic and sends it on to its intended recipient. It is very similar to a man-in-the-middle attack.
You enable HTTPS web caching from the CLI in a security policy or an explicit proxy policy that accepts the traffic to be cached using webcache-https. For a firewall policy:
config firewall policy
edit 0
.
.
.
set webcache enable
set webcache-https any
.
.
.
end
For an explicit web proxy policy:
config firewall policy
edit 0
set proxy web
.
.
.
set webcache enable
set webcache-https any
.
.
.
end
|
|
Web caching for HTTPS traffic is not supported if WAN optimization is enabled. |
The any setting causes the FortiGate unit to re-encrypt the traffic with the FortiGate unit’s certificate rather than the original certificate. This configuration can cause errors for HTTPS clients because the name on the certificate does not match the name on the web site.
You can stop these errors from happening by configuring HTTPS web caching to use the web server’s certificate by setting webcache-https to ssl-server. This option is available for both firewall policies and explicit web proxy policies.
config firewall policy
edit 0
.
.
.
set webcache enable
set webcache-https ssl-server
.
.
.
end
The ssl-server option causes the FortiGate unit to re-encrypt the traffic with a certificate that you imported into the FortiGate unit. You can add certificates using the following command:
config firewall ssl-server
edit corporate-server
set ip <Web-Server-IP>
set port 443
set ssl-mode { full | half}
set ssl-cert <Web-Server-Cert>
end
Where:
Web-Server-IP is the web server’s IP address.
Web-Server-Cert is a web server certificate imported into the FortiGate unit.
The SSL server configuration also determines whether the SSL server is operating in half or full mode and the port used for the HTTPS traffic.
You can add multiple SSL server certificates in this way. When web caching processing an SSL stream if it can find a certificate that matches the web server IP address and port of one of the added SSL servers; that certificate is used to encrypt the SSL traffic before sending it to the client. As a result the client does not generate SSL certificate errors.
Web caching uses the FortiGate unit’s FortiASIC to accelerate SSL decryption/encryption performance.
Full mode SSL server configuration
The ssl-mode option determines whether the SSL server operates in half or full mode. In full mode the FortiGate unit performs both decryption and encryption of the HTTPS traffic. The full mode sequence is shown below.
Full mode SSL server configuration

In full mode the FortiGate unit is acting as a man in the middle, decrypting and encrypting the traffic. So both the client and the web server see encrypted packets.
Usually the port of the encrypted HTTPS traffic is always 443. However, in the SSL server configuration you can set the port used for HTTPS traffic. This port is not altered by the SSL Server. So for example, if the SSL Server receives HTTPS traffic on port 443, the re-encrypted traffic forwarded to the FortiGate unit to the server or client will still use port 443.
Half mode SSL server configuration
In half mode, the FortiGate unit only performs one encryption or decryption action. If HTTP packets are received, the half mode SSL server encrypts them and converts them to HTTPS packets. If HTTPS packets are received, the SSL server decrypts them and converts them to HTTP packets.
Half mode SSL server configuration

In half mode, the FortiGate unit is acting like an SSL accelerator, offloading HTTPS decryption from the web server to the FortiGate unit. Since FortiGate units can accelerate SSL processing, the end result could be improved web site performance.
Usually the port of the encrypted traffic is always 443. However, in the SSL server configuration you can set the port used for HTTPS traffic. No matter what port is used for the HTTPS traffic, the decrypted HTTP traffic uses port 80.
Changing the ports on which to look for HTTP and HTTPS traffic to cache
By default FortiOS assumes HTTP traffic uses TCP port 80 and HTTPS traffic uses port 443. So web caching caches all HTTP traffic accepted by a policy on TCP port 80 and all HTTPS traffic on TCP port 443. If you want to cache HTTP or HTTPS traffic on other ports, you can enable security profiles for the security policy and configure a proxy options profile to that looks for HTTP and HTTPS traffic on other TCP ports. To configure a proxy options profile go to Policy & Options > Policy > Proxy Options.
Setting the HTTP port to Any in a proxy options profile is not compatible with web caching. If you set the HTTP port to any, web caching only caches HTTP traffic on port 80.
Web caching and HA
You can configure web caching on a FortiGate HA cluster. The recommended best practice HA configuration for web caching is active-passive mode. When the cluster is operating, all web caching sessions are processed by the primary unit only. Even if the cluster is operating in active-active mode, HA does not load-balance web caching sessions.
In a cluster, only the primary unit stores the web cache database. The databases is not synchronized to the subordinate units. So, after a failover, the new primary unit must build its web cache.
Web caching and memory usage
To accelerate and optimize disk access and to provide better throughput and less latency, web caching uses provisioned memory to reduce disk I/O and increase disk I/O efficiency. In addition, web caching requires a small amount of additional memory per session for comprehensive flow control logic and efficient traffic forwarding.
When web caching is enabled you will see a reduction in available memory. The reduction increases when more web caching sessions are being processed. If you are thinking of enabling web caching on an operating FortiGate unit, make sure its memory usage is not maxed out during high traffic periods.
In addition to using the system dashboard to see the current memory usage you can use the get test wad 2 command to see how much memory is currently being used by web caching. See get test {wad | wccpd} <test_level> for more information.
Changing web cache settings
In most cases, the default settings for the WAN optimization web cache are acceptable. However, you may want to change them to improve performance or optimize the cache for your configuration. To change these settings, go to WAN Opt. & Cache > Cache > Settings.
From the FortiGate CLI, you can use the config wanopt webcache command to change these WAN optimization web cache settings.
|
|
For more information about many of these web cache settings, see RFC 2616. |
Always revalidate
Select to always revalidate requested cached objects with content on the server before serving them to the client.
Max cache object size
Set the maximum size of objects (files) that are cached. The default size is 512000 KB and the range is 1 to 4294967 KB. This setting determines the maximum object size to store in the web cache. Objects that are larger than this size are still delivered to the client but are not stored in the FortiGate web cache.
For most web traffic the default maximum cache object size is recommended. However, since web caching can also cache larger objects such as Windows updates, Mac OS updates, iOS updates or other updates delivered using HTTP you might want to increase the object size to make sure these updates are cached. Caching these updates can save a lot of Internet bandwidth and improve performance when major updates are released by these vendors.
Negative response duration
Set how long in minutes that the FortiGate unit caches error responses from web servers. If error responses are cached, then subsequent requests to the web cache from users will receive the error responses regardless of the actual object status.
The default is 0, meaning error responses are not cached. The content server might send a client error code (4xx HTTP response) or a server error code (5xx HTTP response) as a response to some requests. If the web cache is configured to cache these negative responses, it returns that response in subsequent requests for that page or image for the specified number of minutes.
Fresh factor
Set the fresh factor as a percentage. The default is 100, and the range is 1 to 100%. For cached objects that do not have an expiry time, the web cache periodically checks the server to see if the objects have expired. The higher the Fresh Factor the less often the checks occur.
For example, if you set the Max TTL value and Default TTL to 7200 minutes (5 days) and set the Fresh Factor to 20, the web cache check the cached objects 5 times before they expire, but if you set the Fresh Factor to 100, the web cache will check once.
Max TTL
The maximum amount of time (Time to Live) an object can stay in the web cache without the cache checking to see if it has expired on the server. The default is 7200 minutes (120 hours or 5 days) and the range is 1 to 5256000 minutes (5256000 minutes in a year).
Min TTL
The minimum amount of time an object can stay in the web cache before the web cache checks to see if it has expired on the server. The default is 5 minutes and the range is 1 to 5256000 minutes (5256000 minutes in a year).
Default TTL
The default expiry time for objects that do not have an expiry time set by the web server. The default expiry time is 1440 minutes (24 hours) and the range is 1 to 5256000 minutes (5256000 minutes in a year).
Proxy FQDN
The fully qualified domain name (FQDN) for the proxy server. This is the domain name to enter into browsers to access the proxy server. This field is for information only can be changed from the explicit web proxy configuration.
Max HTTP request length
The maximum length of an HTTP request that can be cached. Larger requests will be rejected. This field is for information only can be changed from the explicit web proxy configuration.
Max HTTP message length
The maximum length of an HTTP message that can be cached. Larger messages will be rejected. This field is for information only can be changed from the explicit web proxy configuration.
Ignore
Select the following options to ignore some web caching features.
| If-modified-since | By default, if the time specified by the if-modified-since (IMS) header in the client's conditional request is greater than the last modified time of the object in the cache, it is a strong indication that the copy in the cache is stale. If so, HTTP does a conditional GET to the Overlay Caching Scheme (OCS), based on the last modified time of the cached object. Enable ignoring if-modified-since to override this behavior. |
| HTTP 1.1 conditionals | HTTP 1.1 provides additional controls to the client over the behavior of caches toward stale objects. Depending on various cache-control headers, the FortiGate unit can be forced to consult the OCS before serving the object from the cache. For more information about the behavior of cache-control header values, see RFC 2616.Enable ignoring HTTP 1.1 Conditionals to override this behavior. |
| Pragma-no-cache | Typically, if a client sends an HTTP GET request with a pragma no-cache (PNC) or cache-control no-cache header, a cache must consult the OCS before serving the content. This means that the FortiGate unit always re-fetches the entire object from the OCS, even if the cached copy of the object is fresh.Because of this behavior, PNC requests can degrade performance and increase server-side bandwidth utilization. However, if you enable ignoring Pragma-no-cache, then the PNC header from the client request is ignored. The FortiGate unit treats the request as if the PNC header is not present. |
| IE Reload | Some versions of Internet Explorer issue Accept / header instead of Pragma no-cache header when you select Refresh. When an Accept header has only the / value, the FortiGate unit treats it as a PNC header if it is a type-N object. Enable ignoring IE reload to cause the FortiGate unit to ignore the PNC interpretation of the Accept / header. |
Cache Expired Objects
Applies only to type-1 objects. When this option is selected, expired type-1 objects are cached (if all other conditions make the object cacheable).
Revalidated Pragma-no-cache
The pragma-no-cache (PNC) header in a client's request can affect how efficiently the FortiGate unit uses bandwidth. If you do not want to completely ignore PNC in client requests (which you can do by selecting to ignore Pragma-no-cache, above), you can nonetheless lower the impact on bandwidth usage by selecting Revalidate Pragma-no-cache.
When you select Revalidate Pragma-no-cache, a client's non-conditional PNC-GET request results in a conditional GET request sent to the OCS if the object is already in the cache. This gives the OCS a chance to return the 304 Not Modified response, which consumes less server-side bandwidth, because the OCS has not been forced to otherwise return full content.
By default, Revalidate Pragma-no-cache is disabled and is not affected by changes in the top-level profile.
Most download managers make byte-range requests with a PNC header. To serve such requests from the cache, you should also configure byte-range support when you configure the Revalidate pragma-no-cache option.
Forwarding URLs to forwarding servers and exempting web sites from web caching
You can go to System > Network > Explicit Proxy and use the URL match list to forward URL patterns to forwarding servers and create a list of URLs that are exempt from web caching.
Forwarding URLs and URL patterns to forwarding servers
As part of configuring the explicit web proxy you can configure proxy chaining by adding web proxy forwarding servers. See "Proxy chaining (web proxy forwarding servers) ".
You can then use the URL match list to always forward explicit web proxy traffic destined for configured URLs or URL patterns to one of these forwarding servers. For example, you might want to forward all traffic for a specific country to a proxy server located in that country.
To forward traffic destined for a URL to a forwarding server that you have already added, go to System > Network > Explicit Proxy and select Create New. Add a name for the URL match entry and enter the URL or URL pattern. You can use wildcards such as * and ? and you can use a numeric IP address. Select Forward to Server and select a web proxy forwarding server from the list.
You can also exempt the URL or URL pattern from web caching.
Use the following command to forward all .ca traffic to a proxy server and all .com traffic to another proxy server.
config web-proxy url-match
edit "com"
set forward-server "server-commercial"
set url-pattern "com"
next
edit "ca"
set forward-server "server-canada"
set url-pattern "ca"
next
edit "www.google.ca"
set cache-exemption enable
set url-pattern "www.google.ca"
next
end
Exempting web sites from web caching
You may want to exempt some URLs from web caching for a number of reasons. For example, if your users access websites that are not compatible with FortiGate web caching you can add the URLs of these web sites to the web caching exempt list. You can add URLs and numeric IP addresses to the web cache exempt list.
You can also add URLs to the web cache exempt list by going to System > Network > Explicit Proxy and selecting Create New. Add a URL pattern to be exempt and select Exempt from Cache.
You can also add URLs and addresses to be exempt from the CLI. Enter the following command to add www.example.com to the web cache exempt list.
config web-proxy url-match
set cache-exemption enable
set url-pattern www.example.com
end
Exempting specific files from caching
You can exempt files from being cached, so long as you specify its full URL. Enter the following command to add the URL, with the file extension (in this example, .exe), to the web cache exempt list:
config web-proxy url-match
edit "exe"
set url-pattern "iavs9x.u.avast.com/custom/iavs9x/20160613t1237z/avast_free_antivirus_setup_online.exe"
set cache-exemption enable
next
end
|
|
You cannot use wildcards to exempt file extensions in general from caching. |
Monitoring Web caching performance
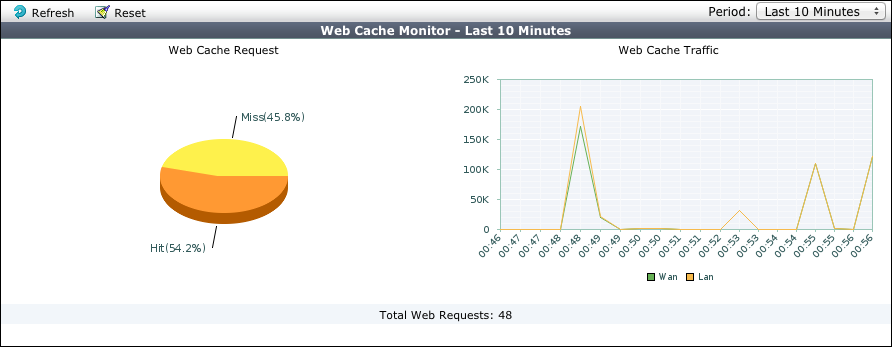
The web cache monitor shows the percentage of web cache requests that retrieved content from the cache (hits) and the percentage that did not receive content from the cache (misses). A higher the number of hits usually indicates that the web cache is being more effective at reducing WAN traffic.
The web cache monitor also shows a graph of web traffic on the WAN and LAN. A lower WAN line on the graph indicates the web cache is reducing traffic on the WAN. The web cache monitor also displays the total number of web requests processed by the web cache.
To view the web cache monitor, go to WAN Opt. & Cache > Monitor > Cache Monitor.
Web cache monitor
Example Web caching of HTTP and HTTPS Internet content for users on an internal network
This example describes how to configure web caching of HTTP and HTTPS for users on a private network connecting to the Internet.
Network topology and assumptions
This example includes a client network with subnet address 10.31.101.0 connecting to web servers on the Internet. All of the users on the private network access the Internet though a single general security policy on the FortiGate unit that accepts all sessions connecting to the Internet. Web caching for HTTP and HTTPS traffic is added to this security policy.
Since users on the private network have unrestricted access to the Internet and can be accessing many web servers the webcache-https is set to any and users may see error messages on their web browsers when accessing HTTPS content.
Initially, security profiles are not selected so the example caches all HTTP traffic on TCP port 80 and HTTPS traffic on port 443. The example also describes how to configure the security policy to cache HTTP traffic on port 80 and 8080 by adding a proxy options profile that looks for HTTP traffic on TCP ports 80 and 8080. The example also describes how to configure the security policy to cache HTTPS traffic on port 443 and 8443 using the same proxy options profile.
Example web caching topology

General configuration steps
This section breaks down the configuration for this example into smaller procedures. For best results, follow the procedures in the order given:
- Add HTTP web caching to the security policy that all users on the private network use to connect to the Internet.
- Add HTTPS web caching.
- Add a protocol options profile to look for HTTP traffic on ports 80 and 8080 and HTTPS traffic on ports 443 and 8443 and add this protocol options profile to the security policy.
If you perform any additional actions between procedures, your configuration may have different results.
Configuration Steps - web-based manager
Use the following steps to configure the example configuration from the FortiGate web-based manager.
To add HTTP web caching to a security policy
- Go to Policy & Objects > Policy > IPv4 and add a security policy that allows all users on the internal network to access the Internet.
| Incoming Interface | Internal |
| Source Address | all |
| Outgoing Interface | wan1 |
| Destination Address | all |
| Schedule | always |
| Service | ALL |
| Action | ACCEPT |
- Select Enable NAT and select Use Destination Interface Address.
- Turn on Web cache.
- Select OK.
To add HTTPS web caching
- From the CLI enter the following command to add HTTPS web caching to the policy.
Assume the index number of the policy is 5.
config firewall policy
edit 5
set webcache-https any
end
To cache HTTP traffic on port 80 and 8080
- Go to Policy & Objects > Policy > Proxy Options and edit the default proxy options profile.
You could also add a new profile. - Under Protocol Port Mapping enable HTTP and under Inspection Ports enter 80,8080.
- Go to Policy & Objects > Policy > IPv4, edit the security policy and
To cache HTTPS traffic on ports 443 and 8443
- Go to Policy & Objects > Policy > SSL/SSH Inspection and edit the certificate-inspection SSL/SSH inspection profile.
You could also use the deep-inspection profile or add a new profile. - Under SSL Inspection Options select Multiple Clients Connecting to Multiple Servers.
- Make sure Inspect All Ports is not selected.
- Make sure HTTPS is turned on and enter 443,8443.
- From the CLI, enter the following command to add the default proxy options profile and the certificate-inspection SSL SSH profile to the firewall policy.
config firewall policy
edit 5
set utm-status enable
set profile-protocol-options default
set ssl-ssh-profile certificate-inspection
end
|
|
You need to use the CLI to add the protocol options profile unless you also add a security profile that uses proxy-based inspection. |
Configuration Steps - CLI
Use the following steps to configure the example configuration from the FortiGate CLI.
To add HTTP and HTTPS web caching to a security policy
- Enter the following command to add a security policy that allows all users on the internal network to access the Internet and that includes web caching of HTTP and HTTPS traffic.
config firewall policy
edit 0
set srcintf internal
set srcaddr all
set dstintf wan1
set distinf all
set schedule always
set service ANY
set action accept
set nat enable
set webcache enable
set webcache-https any
end
To cache HTTP traffic on port 80 and 8080 and HTTPS traffic on ports 443 and 8443
- Enter the following command to edit the default proxy options profile to configure it to look for HTTP traffic on ports 80 and 8080:
config firewall profile-protocol-options
edit default
config http
set status enable
set ports 80 8080
end
- Enter the following command to edit the certification-inspection SSL SSH options profile to configure it to look for HTTPS traffic on ports 443 and 8443:
config firewall ssl-ssh-profile
edit certificate-inspection
config https
set status certificate-inspection
set ports 443 8443
end
- Enter the following command to add the default proxy options profile and the certificate-inspection SSL SSH profile to the firewall policy.
config firewall policy
edit 5
set utm-status enable
set profile-protocol-options default
set ssl-ssh-profile certificate-inspection
end
Example reverse proxy web caching and SSL offloading for an Internet web server using a static one-to-one virtual IP
This section describes configuring SSL offloading for a reverse proxy web caching configuration using a static one-to-one firewall virtual IP (VIP). While the static one-to-one configuration described in this example is valid, its also common to change the destination port of the unencrypted HTTPS traffic to a commonly used HTTP port such as 8080 using a port forwarding virtual IP.
Network topology and assumptions
In this configuration, clients on the Internet use HTTP and HTTPS to browse to a web server that is behind a FortiGate unit. A policy added to the FortiGate unit forwards the HTTP traffic to the web server. The policy also offloads HTTPS decryption and encryption from the web server so the web server only sees HTTP traffic.
The FortiGate unit also caches HTTP and HTTPS pages from the web server so when users access cached pages the web server does not see the traffic. Replies to HTTPS sessions are encrypted by the FortiGate unit before returning to the clients.
In this configuration, the FortiGate unit is operating as a web cache in reverse proxy mode. Reverse proxy caches can be placed directly in front of a web server. Web caching on the FortiGate unit reduces the number of requests that the web server must handle, therefore leaving it free to process new requests that it has not serviced before.
Using a reverse proxy configuration:
- avoids the capital expense of additional web servers by increasing the capacity of existing servers
- serves more requests for static content from web servers
- serves more requests for dynamic content from web servers
- reduces operating expenses including the cost of bandwidth required to serve content
- accelerates the response time of web servers and of page download times to end users.
When planning a reverse proxy implementation, the web server's content should be written so that it is “cache aware” to take full advantage of the reverse proxy cache.
In reverse proxy mode, the FortiGate unit functions more like a web server for clients on the Internet. Replicated content is delivered from the proxy cache to the external client without exposing the web server or the private network residing safely behind the firewall.
In this example, the site URL translates to IP address 192.168.10.1, which is the port2 IP address of the FortiGate unit. The port2 interface is connected to the Internet.
This example assumes that all HTTP traffic uses port 80 and all HTTPS traffic uses port 443.
The FortiGate unit includes the web server CA and an SSL server configuration for IP address 172.10.20.30 and port to 443. The name of the file containing the CA is Rev_Proxy_Cert_1.crt.
The destination address of incoming HTTP and HTTPS sessions is translated to the IP address of the web server using a static one-to-one virtual IP that performs destination address translation (DNAT) for the HTTP packets. The DNAT translates the destination address of the packets from 192.168.10.1 to 172.10.20.30 but does not change the destination port number.
When the SSL server on the FortiGate unit decrypts the HTTPS packets their destination port is changed to port 80.
Reverse proxy web caching and SSL offloading for an Internet web server using static one-to-one virtual IPs

General configuration steps
This section breaks down the configuration for this example into smaller procedures. For best results, follow the procedures in the order given:
- Configure the FortiGate unit as a reverse proxy web cache server.
- Configure the FortiGate unit for SSL offloading of HTTPS traffic.
- Add an SSL server to offload SSL encryption and decryption for the web server.
Also note that if you perform any additional actions between procedures, your configuration may have different results.
Configuration steps - web-based manager
To configure the FortiGate unit as a reverse proxy web cache server
- Go to Policy & Objects > Objects > Virtual IPs and select Create New to add a static NAT virtual IP that translates destination IP addresses from 192.168.10.1 to 172.10.20.30 (and does not translate destination ports):
| VIP Type | IPv4 VIP |
| Name | Reverse_proxy_VIP |
| Interface | port2 |
| Type | Static NAT |
| Source Address Filter | Do not select. |
| External IP Address/Range | 192.168.10.1 |
| Mapped IP Address/Range | 172.10.20.30 |
| Port Forwarding | Do not select. |
- Select OK.
- Go to Policy & Objects > Objects > IPv4 and select Create New to add a port2 to port1 security policy that accepts HTTP and HTTPS traffic from the Internet.
Do not select security profiles. Set the destination address to the virtual IP. You do not have to enable NAT.
| Incoming Interface | port2 |
| Source Address | all |
| Outgoing Interface | port1 |
| Destination Address | Reverse_proxy_VIP |
| Schedule | always |
| Service | HTTP HTTPS |
| Action | ACCEPT |
- Turn on Web Cache.
- Select OK.
- From the CLI enter the following command to add HTTPS web caching to the security policy
Assume the index number of the policy is 5.
config firewall policy
edit 5
set webcache-https ssl-server
end
To configure the FortiGate unit to offload SSL encryption and cache HTTPS content
- Go to System > Certificates > Local Certificates and select Import to import the web server’s CA.
For Type, select Local Certificate. Select the Browse button to locate the file (example file name: Rev_Proxy_Cert_1.crt).
The certificate key size must be 1024 or 2048 bits. 4096-bit keys are not supported. - Select OK to import the certificate.
- From the CLI, enter the following command to add the SSL server and to add the server’s certificate to the SSL server.
The SSL serveripmust match the destination address of the SSL traffic after being translated by the virtual IP (172.10.20.30) and the SSL serverportmust match the destination port of the SSL traffic (443). The SSL server operates in half mode since it performs a single-step conversion (HTTPS to HTTP or HTTP to HTTPS).
config firewall ssl-server
edit rev_proxy_server
set ip 172.10.20.30
set port 443
set ssl-mode half
set ssl-cert Rev_Proxy_Cert_1
end
Configuration steps - CLI
To configure the FortiGate unit as a reverse proxy web cache server
- Enter the following command to add a static NAT virtual IP that translates destination IP addresses from 192.168.10.1 to 172.10.20.30 (and does not translate destination ports):
config firewall vip
edit Reverse_proxy_VIP
set extintf port2
set type static-nat
set extip 192.168.10.1
set mappedip 172.10.20.30
end
- Enter the following command to add a port2 to port1 security policy that accepts HTTP and HTTPS traffic from the Internet. Enable web caching and HTTPS web caching.
Do not select security profiles. Set the destination address to the virtual IP. You do not have to enable NAT.
config firewall policy
edit 0
set srcintf port2
set srcaddr all
set dstintf port1
set dstaddr Reverse_proxy_VIP
set schedule always
set service HTTP HTTPS
set action accept
set webcache enable
set webcache-https ssl-server
end
To add an SSL server to offload SSL encryption and decryption for the web server
- Place a copy of the web server’s CA (file name Rev_Proxy_Cert_1.crt) in the root folder of a TFTP server.
- Enter the following command to import the web server’s CA from a TFTP server. The IP address of the TFTP server is 10.31.101.30:
execute vpn certificate local import tftp Rev_Proxy_Cert_1.crt 10.31.101.30
The certificate key size must be 1024 or 2048 bits. 4096-bit keys are not supported.
- From the CLI, enter the following command to add the SSL server.
The SSL serveripmust match the destination address of the SSL traffic after being translated by the virtual IP (172.10.20.30) and the SSL serverportmust match the destination port of the SSL traffic (443). The SSL server operates in half mode since it performs a single-step conversion (HTTPS to HTTP or HTTP to HTTPS).
config firewall ssl-server
edit rev_proxy_server
set ip 172.10.20.30
set port 443
set ssl-mode half
set ssl-cert Rev_Proxy_Cert_1
end
- Configure other
ssl-serversettings that you may require for your configuration.
Copyright © 2018 Fortinet, Inc. All Rights Reserved. | Terms of Service | Privacy Policy
