
Redistributing and blocking routes in BGP
During normal BGP operation, peer routers redistribute routes from each other. However, in some specific situations it may be best to not advertise routes from one peer, such as if the peer is redundant with another peer (they share the same routes exactly), if it might be unreliable in some way, or some other reason. The FortiGate can also take routes it learns from other protocols and advertise them in BGP, for example OSPF or RIP. If your Company hosts its own web or email servers, external locations will require routes to your networks to reach those services.
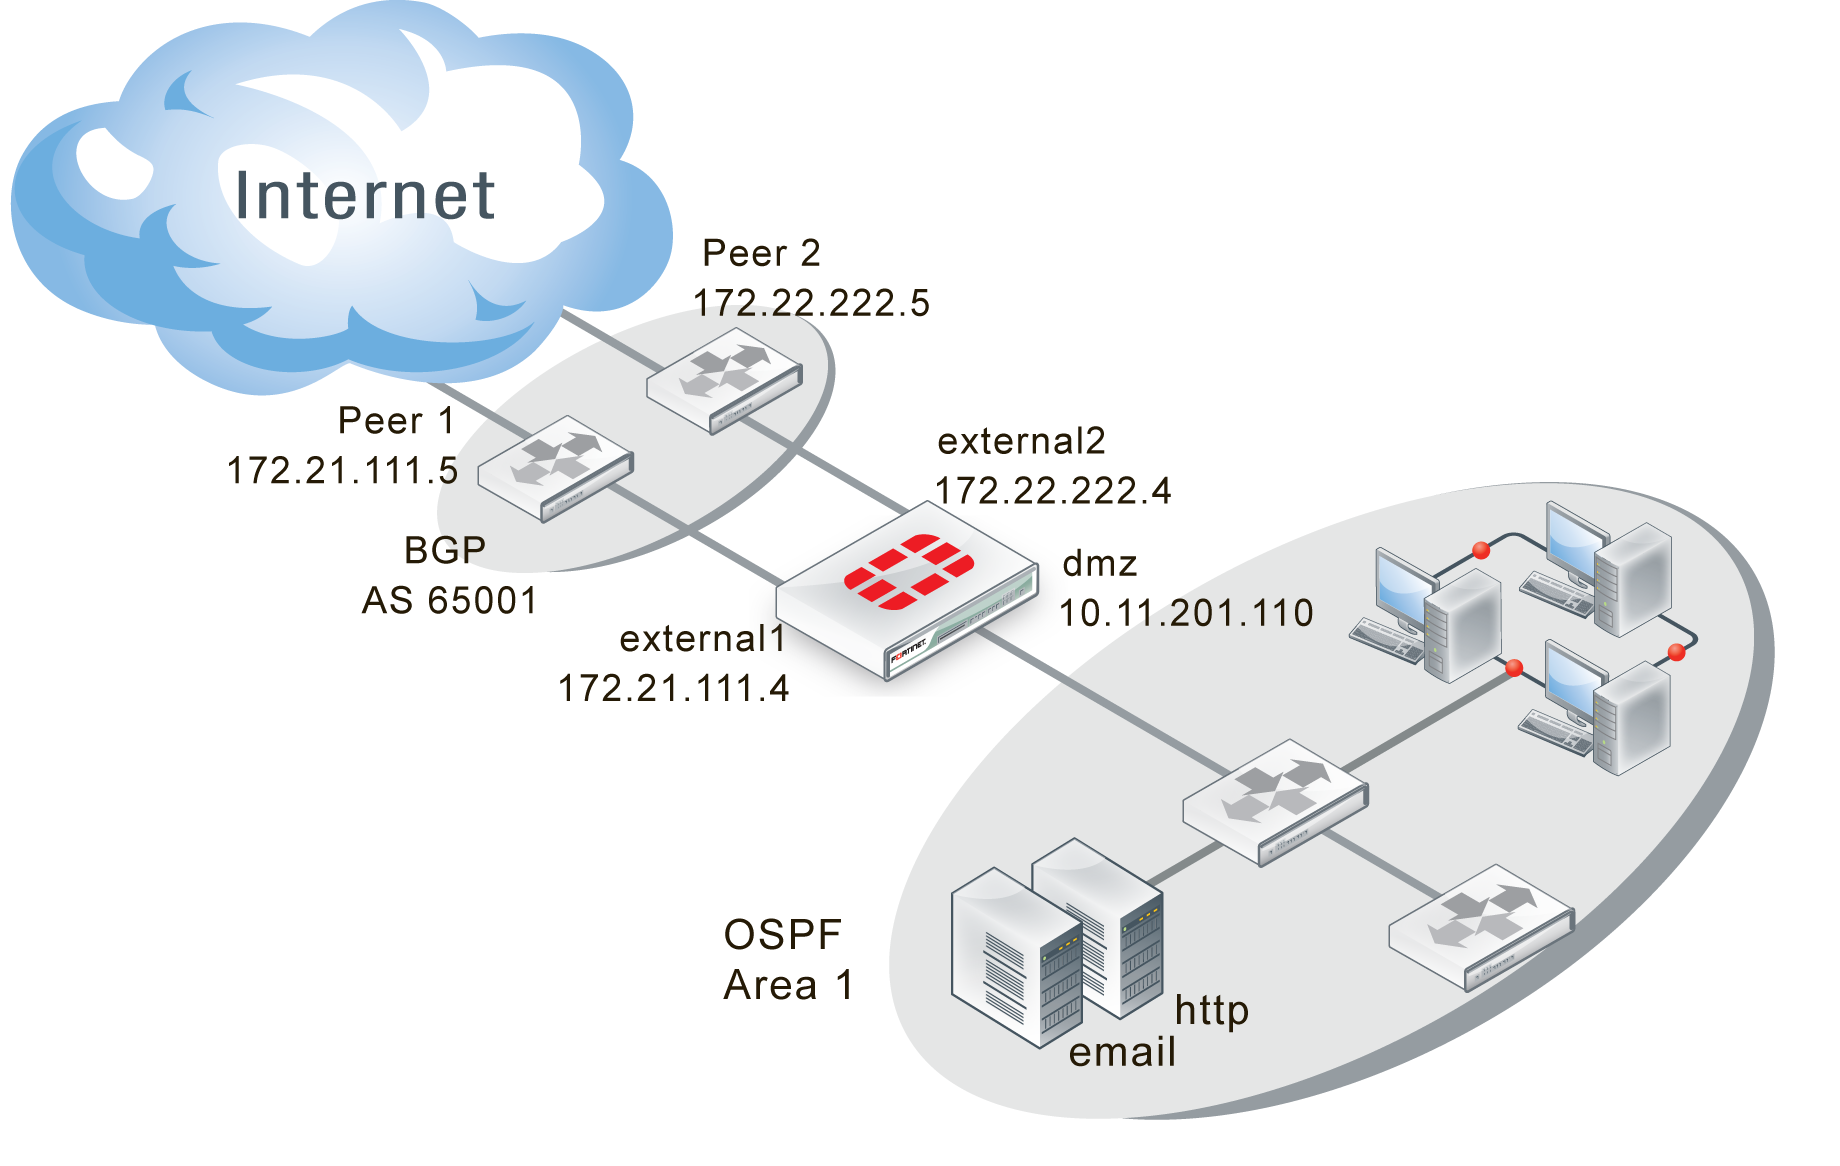
In this example the Company has an internal network in an OSPF area, and is connected to a BGP AS and two BGP peers. Company goes through these two peers to reach the Internet. However, Peer 1 routes will not be advertised to Peer 2. The Company internal user and server networks are running OSPF, and will redistribute those routes to BGP so external locations can reach the web and email servers.
This section includes the following topics:
Network layout and assumptions
The network layout for the BGP redistributing routes example involves the company network being connected to two BGP peers as shown below. In this configuration the FortiGate unit is the BGP border router between the Company AS, and the peer routers.
The components of the layout include:
- There is only one BGP AS in this example — AS 65001, shared by the FortiGate unit and both peers.
- The Company’s FortiGate unit connects to the Internet through two BGP peers.
- The Company internal networks on the dmz interface of the FortiGate unit with an IP of 10.11.201.0/24.
- The FortiGate units’ interfaces are connected as follows:
- port1 (dmz) has IP 10.11.201.110 and is the internal user and server network
- port2 (external1) has IP 172.21.111.4 and is connected to Peer 1’s network
- port3 (external2) has IP 172.22.222.4 and is connected to Peer 2’s network
- Peer 1 has IP 172.21.111.5, and Peer 2 has IP 172.22.222.5.
- OSPF Area 1 is configured on the dmz interface of the FortiGate unit, and is the routing protocol used by the internal users and servers.
BGP network topology
Assumptions
The the BGP redistributing routes configuration procedure follows these assumptions:
- The FortiGate unit has been configured following the Install Guide
- Interfaces port1, port2, and port 3 exist on the FortiGate unit
- We don’t know the router manufacturers of Peer 1 and Peer 2
- We don’t know what other devices are on the BGP AS or OSPF Area
- All basic configuration can be completed in both GUI and CLI
- Access lists and route maps will only be configured in CLI
- VDOMs are not enabled on the FortiGate unit
Configuring the FortiGate unit
- Configuring the FortiGate unit — networks and firewalls
- Configuring the FortiGate unit - BGP
- Configuring the FortiGate unit - OSPF
- Configuring other networking devices
- Configuring ECMP support for BGP
Configuring the FortiGate unit — networks and firewalls
The FortiGate unit has three interfaces connected to networks — two external and one dmz.
Security policies must be in place to allow traffic to flow between these networks.
Firewall services will change depending on which routing protocol is being used on that network — either BGP or OSPF. Beyond that, all services that are allowed will be allowed in both directions due to the internal servers. The services allowed are web-server services (DNS, HTTP, HTTPS, SSH, NTP, FTP*, SYSLOG, and MYSQL), email services (POP3, IMAP, and SMTP), and general troubleshooting services (PING, TRACEROUTE). Those last two can be removed once the network is up and working properly to increase security. Other services can be added later as needed.
To configure the interfaces - GUI
- Go to System > Network > Interfaces.
- Edit port1 (dmz) interface.
- Set the following information, and select OK.
| Alias | dmz |
| IP/Network Mask | 10.11.201.110/255.255.255.0 |
| Administrative Access | HTTPS SSH PING |
| Description | OSPF internal networks |
| Administrative Status | Up |
- Edit port2 (external1) interface.
- Set the following information, and select OK.
| Alias | external1 |
| IP/Network Mask | 172.21.111.4/255.255.255.0 |
| Administrative Access | HTTPS SSH |
| Description | BGP external Peer 1 |
| Administrative Status | Up |
- Edit port3 (external2) interface.
- Set the following information, and select OK.
| Alias | external2 |
| IP/Network Mask | 172.22.222.4/255.255.255.0 |
| Administrative Access | HTTPS SSH |
| Description | BGP external2 Peer2 |
| Administrative Status | Up |
To configure the FortiGate interfaces (CLI)
config system interface
edit port1
set alias dmz
set ip 10.11.201.110 255.255.255.0
set allowaccess https ssh ping
set description "OSPF internal networks"
set status up
next
edit port2
set alias external1
set ip 172.21.111.5 255.255.255.0
set allowaccess https ssh
set description "external1 Peer 1"
set status up
next
edit port3
set alias external2
set ip 172.22.222.5 255.255.255.0
set allowaccess https ssh
set description "external2 Peer 2"
set status up
next
end
To configure the firewall addresses - GUI
- Go to Policy & Objects > Objects > Addresses.
- Select Create New, and set the following information.
| Category | Address |
| Name | BGP_services |
| Type | Subnet / IP Range |
| Subnet / IP Range | 10.11.201.0 255.255.255.0 |
| Interface | port1 |
- Select OK.
To configure the firewall addresses - CLI
config firewall address
edit "BGP_services"
set associated-interface "port1"
set subnet 10.11.201.0 255.255.255.0
next
end
To configure firewall service groups - GUI
- Go to Policy & Objects > Objects > Services. Under the Create New dropdown menu, select Service Group.
- Name the group BGP_Services.
- Add the following services to the Members list: BGP, DNS, FTP, FTP_GET, FTP_PUT, HTTP, HTTPS, IMAP, MYSQL, NTP, PING, POP3, SMTP, SSH, SYSLOG, and TRACEROUTE.
- Select OK.
- Create another new Service Group.
- Name the group OSPF_Services.
- Add the following services to the Members list: DNS, FTP, FTP_GET, FTP_PUT, HTTP, HTTPS, IMAP, MYSQL, NTP, OSPF, PING, POP3, SMTP, SSH, SYSLOG, and TRACEROUTE.
- Select OK.
To configure firewall service groups - CLI
config firewall service group
edit "BGP_services"
set member “BGP”, "DHCP" "DNS" "FTP" "FTP_GET" "FTP_PUT" "HTTP" "HTTPS" "IMAP" "MYSQL" "NTP" "PING" "POP3" "SMTP" "SSH" "TRACEROUTE" "SYSLOG"
next
edit "OSPF_services"
set member "DHCP" "DNS" "FTP" "FTP_GET" "FTP_PUT" "HTTP" "HTTPS" "IMAP" "MYSQL" "NTP" "PING" "POP3" "SMTP" "SSH" "TRACEROUTE" "SYSLOG" "OSPF"
next
end
Configuring the FortiGate unit - BGP
The only change from the standard BGP configuration for this example is configuring the blocking Peer 1’s routes from being advertised to Peer 2. From the network topology you can guess that both of these peers likely share many routes in common and it makes no sense to advertise unneeded routes.
Blocking Peer 1’s routes to Peer 2 is done with distribute-list-out keyword. They allow you to select which routes you will advertise to a neighbor using an access list. In this case we will block all incoming routes from Peer 1 when we send updates to Peer 2. Otherwise Peer 1 and Peer 2 are regular neighbors.
The FortiGate unit will redistribute routes learned from OSPF into BGP.
This is advanced configuration and the commands are only available in the CLI.
To create access list to block Peer 1 - CLI
config access-list
edit “block_peer1”
config rule
edit 1
set prefix 172.21.111.0 255.255.255.0
set action deny
set exact-match enable
end
end
end
To configure BGP on the FortiGate unit - CLI
config router bgp
set as 65001
set router-id 10.11.201.110
config redistribute ospf
set status enable
end
config neighbor
edit 172.22.222.5
set remote-as 65001
set distribute-list-out “block_peer1”
next
edit 172.21.111.5
set remote-as 65001
end
end
Configuring the FortiGate unit - OSPF
This configuration involves only one OSPF Area, so all traffic will be intra-area. If there were two or more areas with traffic going between them it would be inter-area traffic. These two types are comparable to BGP’s traffic within one AS (iBGP) or between multiple ASes (eBPG). Redistributing routes from OSPF to BGP is considered external because either the start or end point is a different routing protocol.
The OSPF configuration is basic apart from redistributing BGP routes learned.
To configure OSPF on the FortiGate unit - web-based manager
- Go to Router > Dynamic > OSPF.
- For Router ID enter
10.11.201.110and then select Apply. - Under Advanced Options > Redistribute, select BGP and set the BGP Metric to 1.
- For Areas, select Create New, enter the following information and then select OK.
| Area (IP) | 0.0.0.0
|
| Type | Regular |
| Authentication | None |
- For Networks, select Create New.
- Enter 10.11.201.0/255.255.255.0 for IP/Netmask, and select OK.
- For Interfaces, select Create New.
- Enter
OSPF_dmz_networkfor Name. - Select
port1(dmz)for Interface, and then select OK.
To configure OSPF on the FortiGate unit - CLI
config router ospf
set router-id 10.11.201.110
config area
edit 0.0.0.0
set type regular
set authentication none
end
config network
edit 1
set area 0.0.0.0
set prefix 10.11.201.0 255.255.255.0
end
config interface
edit “OSPF_dmz_network”
set interface port1(dmz)
set status enable
end
config redistribute bgp
set status enable
set metric 1
end
end
Configuring other networking devices
As with all BGP configurations, the peer routers will need to be updated with the FortiGate unit’s BGP information including IP address, AS number, and what capabilities are being used such as IPv6, graceful restart, BFD, and so on.
Configuring ECMP support for BGP
"ECMP" stands for "Equal Cost Multiple Path". ECMP is a mechanism that allows multiple routes to the same destination with different next-hops and load-balances routed traffic over those multiple next-hops.
- ECMP only works for routes that are sourced by the same routing protocol (that is: Static Routes, OSPF, or BGP).
- ECMP is enabled by default with 10 paths.
- ECMP with static routes is effective if the routes are configured with the same distance and same priority.
To configure ECMP support - CLI
config router bgp
set ebgp-multipath disable[|enable]
set ibgp-multipath disable[|enable]
...
end
Testing network configuration
Testing this configuration involves the standard connectivity checks, but also ensuring that routes are being passed between protocols as expected.
Check the routing table on the FortiGate unit to ensure that routes from both OSPF and BGP are present.
Check the routing table on devices on the OSPF network for routes redistributed from BGP. Also check those devices for connectivity to the Internet.
Check the routing table on Peer 2 to ensure no routes from Peer 1 are present, but routes from the internal OSPF network are present.
For help with troubleshooting, see Redistributing and blocking routes in BGP.
Copyright © 2018 Fortinet, Inc. All Rights Reserved. | Terms of Service | Privacy Policy
