4. Configure these settings: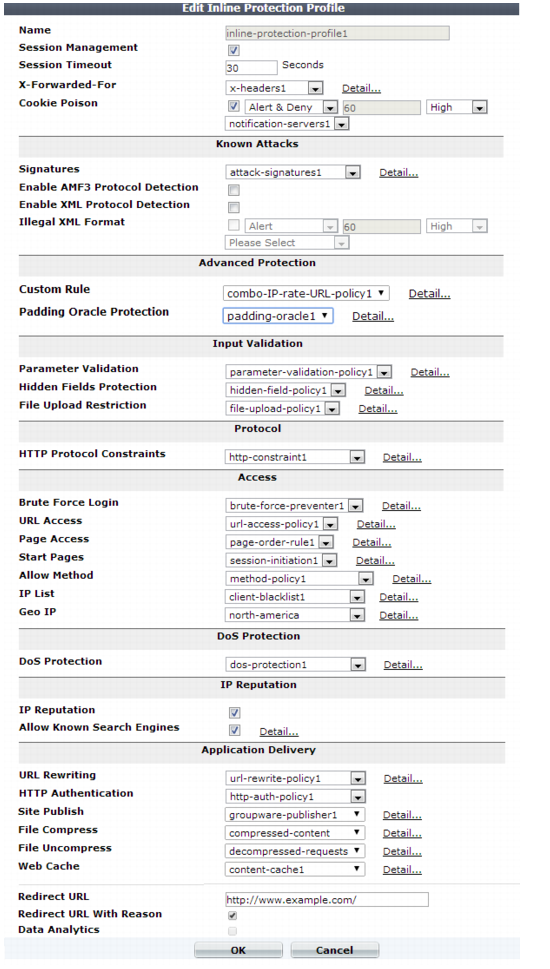
Inline protection profiles include features that require an inline network topology. They can be configured at any time, but cannot be applied by a policy if the FortiWeb appliance is operating in a mode that does not support them. For details, see Table 47. |
To save time, you may be able to use auto-learning to generate protection profiles and their components by observing your web servers’ traffic. For details, see “Auto-learning”. |
Setting name | Description |
Session Management | Enable to add a cookie to the reply in order for FortiWeb to be able to track the state of web applications across multiple requests (i.e., to implement HTTP sessions). Also configure Session Timeout. This feature adds the FortiWeb’s own session support, and does not duplicate or require that your web applications have its own sessions. For details, see “HTTP sessions & security”. Note: Enabling this option is required if: • you select features requiring session cookies, such as DoS Protection, Start Pages, Page Access, or Hidden Fields Protection • in any policy, you will select an auto-learning profile with this profile • you want to include this profile’s traffic in the traffic log Note: This feature requires that the client support cookies. RPC clients and browsers where the person has disabled cookies do not support FortiWeb HTTP sessions, and therefore also do not support FortiWeb features that are dependent upon them. |
Session Timeout | Type the HTTP session timeout in seconds. After this time elapses during which there were no more subsequent requests, after which the FortiWeb appliance will regard the next request as the start of a new HTTP session. This option appears only if Session Management is enabled. The default is 1200 (20 minutes). The valid range is from 20 to 3,600 seconds. |
X-Forwarded-For | Select the X-Forwarded-For: and X-Real-IP: HTTP header settings to use, if any. For details, see “Defining your proxies, clients, & X-headers”. Note: Configuring this option is required if the true IP address of the client is hidden from FortiWeb because a load balancer or other web proxy is deployed in front. In that case, you must configure an X-header rule so that FortiWeb will block only requests related to the original client. Otherwise, it may block all requests whenever any attack occurs, since all requests will appear to originate from the proxy’s IP. |
Cookie Poisoning | Enable to detect cookie poisoning, then select the action that FortiWeb takes if it detects cookie tampering: • Alert — Accept the request and generate an alert email, log message, or both. • Alert & Deny — Block the request and generate an alert, log message, or both. • Period Block — Block requests for a specified number of seconds as set in the accompanying field to the right. The range is 1 to 3600. See also “Monitoring currently blocked IPs”. Note: If FortiWeb is deployed behind a NAT load balancer, when using this option, you must also define an X-header that indicates the original client’s IP (see “Defining your proxies, clients, & X-headers”). Failure to do so may cause FortiWeb to block all connections when it detects a violation of this type. • Remove Cookie — Accept the request, but remove the poisoned cookie from the datagram before it reaches the web server, and generate an alert message, log message, or both. In addition, select which severity level and trigger policy FortiWeb uses when it logs cookie tampering. This feature requires you to enable Session Management in the appropriate server policy. For more information on logging and alerts, see “Configuring logging”. When FortiWeb receives the first HTTP/HTTPS request from a client, it uses a cookie to track the session. For the cookie poisoning feature, the session-tracking cookie includes a hash value that FortiWeb uses to detect tampering with the cookie from the back-end server response. If FortiWeb determines the cookie from the client has changed, it takes the specified action. Note: This feature requires that the client support cookies. |
Signatures | Select the name of the signature set, if any, that will be applied to matching requests. Also configure Enable AMF3 Protocol Detection. Attack log messages for this feature vary by which type of attack was detected. For a list, see “Blocking known attacks & data leaks”. |
Enable AMF3 Protocol Detection | Enable to scan requests that use action message format 3.0 (AMF3) for: • cross-site scripting (XSS) attacks • SQL injection attacks • common exploits and other attack signatures that you have enabled in Signatures. AMF3 is a binary format that can be used by Adobe Flash/Flex clients to send input to server-side software. Caution: To scan for attacks or enforce input rules on AMF3, you must enable this option. Failure to enable the option will cause the FortiWeb appliance to be unable to scan AMF3 requests for attacks. |
Enable XML Protocol Detection | Enable to scan for matches with attack and data leak signatures in Web 2.0 (XML AJAX), SOAP, and other XML submitted by clients in the bodies of HTTP POST requests. |
Illegal XML Format | Enable to validate that XML elements and attributes in the request’s body conform to the W3C XML 1.1 standard, the XML 2.0 standard, or both. Malformed XML, such as without the final > or with multiple >> in the closing tag, is often an attempt to exploit an unhandled error condition in a web application’s XHTML or XML parser. Attack log messages contain Illegal XML Format when this feature detects malformed XML. Caution: If your back-end web servers require extensive protection for a vulnerable XML parser, you should add 3rd-party XML protection to your security architecture. Unlike XML protection profiles in previous versions of FortiWeb, Illegal XML Format does not scan for conformity with the document object model (DOM)/DTD/W3C Schema, recursive payloads, Schema poisoning, or other advanced XML attacks. It also cannot encrypt or sign XML elements. Failure to provide adequate XML protection could allow attackers to penetrate your network. |
Custom Rule | Select the name of a combination source IP, rate limit, HTTP header, and URL access policy, if any, that will be applied to matching requests. See “Combination access control & rate limiting”. Attack log messages contain Custom Access Violation when this feature detects a violation. |
Padding Oracle Protection | Select the name of padding oracle protection rule, if any, that will be applied to matching requests. See “Defeating cipher padding attacks on individually encrypted inputs”. Attack log messages contain Padding Oracle Attack when this feature detects a violation. |
Parameter Validation | Select the name of the parameter validation rule, if any, that will be applied to matching requests. See “Validating parameters (“input rules”)”.) Attack log messages contain Parameter Validation Violation when this feature detects a parameter rule violation. |
Hidden Fields Protection | Select the name of the hidden fields protection rule, if any, to use to protect hidden fields on your web site. See “Preventing tampering with hidden inputs”. Attack log messages contain Hidden Field Manipulation when this feature detects tampering. This option appears only when Session Management is enabled. |
File Upload Restriction | Select an existing file upload restriction policy, if any, that will be applied to matching HTTP requests. See “Limiting file uploads”. Attack log messages contain Illegal File Size when this feature detects an excessively large upload. |
HTTP Protocol Constraints | Select the name of an HTTP parameter constraint, if any, that will be applied to matching requests. See “HTTP/HTTPS protocol constraints”. Attack log messages for this feature vary by which type of constraint was violated. |
Brute Force Login | Select the name of a brute force login attack profile, if any, that will be applied to matching requests. See “Preventing brute force logins”. Attack log messages contain Brute Force Login Violation when this feature detects a brute force login attack. |
URL Access | Select the name of the URL access policy, if any, that will be applied to matching HTTP requests. See “Restricting access to specific URLs”. Attack log messages contain URL Access Violation when this feature detects a URL matched by this policy. |
Page Access | Select the page access rule, if any, that defines the URLs that must be accessed in a specific order. See “Enforcing page order that follows application logic”. Attack log messages contain Page Access Violation when this feature detects an illegal request order. This option appears only when Session Management is enabled. |
Start Pages | Select the start pages rule, if any, that represent legitimate entry points into your web pages and web services. See “Specifying URLs allowed to initiate sessions”. Attack log messages contain Start Page Violation when this feature detects a session attempting to initiate illegally. This option appears only when Session Management is enabled. |
Allow Method | Select an existing allow method policy, if any, that will be applied to matching HTTP requests. See “Specifying allowed HTTP methods”. Attack log messages contain HTTP Method Violation when this feature detects a non-allowed HTTP request method. |
IP List | Select the name of a client white list or black list, if any, that will be applied to matching requests. See “Blacklisting & whitelisting clients using a source IP or source IP range”. |
Geo IP | Select the name of a geographically-based client black list, if any, that will be applied to matching requests. See “Blacklisting & whitelisting countries & regions”. |
DoS Protection | Select the name of an existing DoS prevention policy. For details, see “Grouping DoS protection rules”. |
IP Reputation | Enable to apply IP reputation intelligence. See “Blacklisting source IPs with poor reputation”. |
Allow Known Search Engines | Enable to exempt popular search engines’ spiders from DoS sensors, brute force login sensors, HTTP protocol constraints, and combination rate & access control (called “advanced protection” and “custom policies” in the web UI). This option improves access for search engines. Rapid access rates, unusual HTTP usage, and other characteristics that may be suspicious for web browsers are often normal with search engines. If you block them, your web sites’ rankings and visibility may be affected. By default, this option allows all popular predefined search engines. Known search engine indexer source IPs are updated via FortiGuard Security Service. To specify which search engines are exempt, click the Details link. A new frame appears on the right side of the protection profile. Enable or disable each search engine, then click Apply. See also “Blacklisting content scrapers, search engines, web crawlers, & other robots”. Note: X-header-derived client source IPs (see “Defining your proxies, clients, & X-headers”) do not support this feature in this release. If FortiWeb is deployed behind a load balancer or other web proxy that applies source NAT, this feature will not work. |
URL Rewriting | Select the name of a URL rewriting rule set, if any, that will be applied to matching requests. For details, see “Rewriting & redirecting”. |
HTTP Authentication | Select the name of an authorization policy, if any, that will be applied to matching requests. For details, see “Offloading HTTP authentication & authorization”. If the client fails to authenticate, it will receive an HTTP 403 Access Forbidden error message. |
Site Publish | Select the name of a site publishing policy, if any, that will be applied to matching requests. For details, see “Single sign-on (SSO) (site publishing)”. |
File Compress | Select the name of an compression policy, if any, that will be applied to matching requests. For details, see “Configuring compression offloading”. |
File Uncompress | Select the name of a decompression policy, if any, that will be applied to matching requests. For details, see “Configuring temporary decompression for scanning & rewriting”. |
Web Cache | Select the name of a content caching policy, if any, that will be used for matching requests. See “Caching”. |
Redirect URL | Type a URL including the FQDN/IP and path, if any, to which a client will be redirected if: • its request violates any of the rules in this profile, and For example, you could enter: www.example.com/products/ If you do not enter a URL, depending on the type of violation and the configuration, the FortiWeb appliance will log the violation, may attempt to remove the offending parts, and could either reset the connection or return an HTTP 403 Access Forbidden or 404 File Not Found error message. |
Redirect URL With Reason | Enable to include the reason for redirection as a parameter in the URL, such as reason=Parameter%20Validation%20Violation, when traffic has been redirected using Redirect URL. The FortiWeb appliance also adds fortiwaf=1 to the URL to detect and cancel a redirect loop (if the redirect action would otherwise recursively triggers an attack event). By default, this option is disabled. Caution: If the FortiWeb appliance is protecting a redirect URL, enable this option to prevent infinite redirect loops. |
Data Analytics | Enable to gather hit, attack, and traffic volume statistics for each server policy that includes this profile. See “Configuring policies to gather data” and “Viewing web site statistics”. Note: This option cannot be enabled until you have uploaded a geography-to-IP mapping database. See “Updating data analytics definitions”. |