Figure 57: Policy dialog (reverse proxy mode)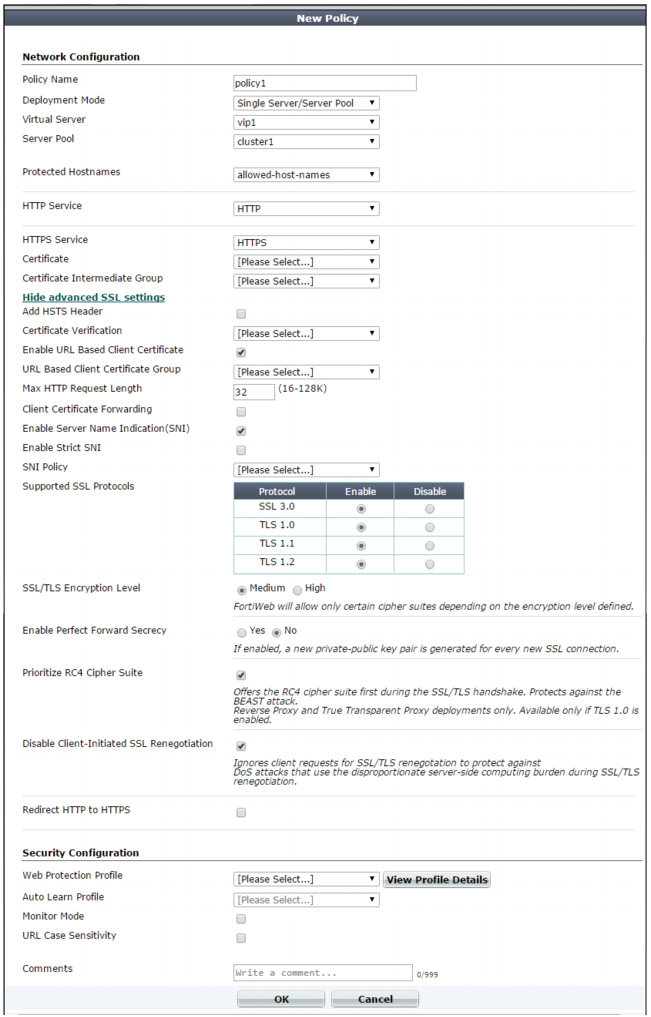
If a policy has any virtual servers or a server pool members with IPv6 addresses, it does not apply features that do not yet support IPv6, even if they are selected. |
To achieve more complex policy behaviors and routing, you can chain multiple policies together. See “Defining your web servers”. |
The maximum number of server policies you can create depends on the model of your FortiWeb appliance. For details, see “Appendix B: Maximum configuration values”. |
Do not configure policies you will not use. FortiWeb allocates memory with each server policy, regardless of whether it is actually in active use. Configuring extra policies unnecessarily consumes memory and decreases performance. |
Alternatively, you can create missing components on-the-fly while configuring the policy, without leaving the page. To do this, select Create New from each policy component’s drop-down menu. However, when creating many components, you can save time by leaving the policy page, going to the other menu areas, and creating similar profiles by cloning, then modifying each clone. Generally speaking, because policies tie other components together and apply them to client’s connections with your web servers, they should be configured last. See “Workflow”. |
To save time, you may be able to use auto-learning to generate protection profiles and their components by observing your web servers’ traffic. For details, see “Auto-learning”. |
Setting name | Description |
Policy Name | Type a name that can be referenced by other parts of the configuration. Do not use spaces or special characters. The maximum length is 63 characters. |
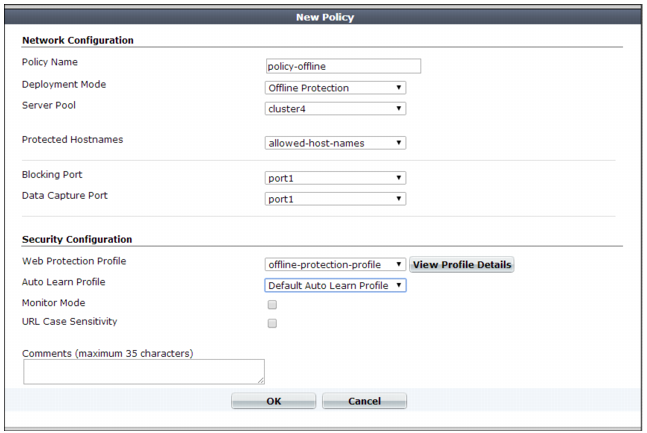
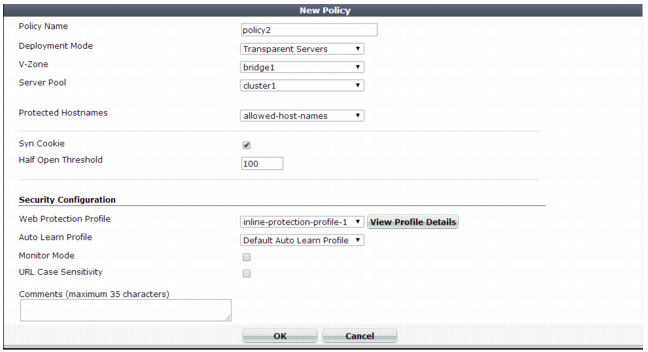
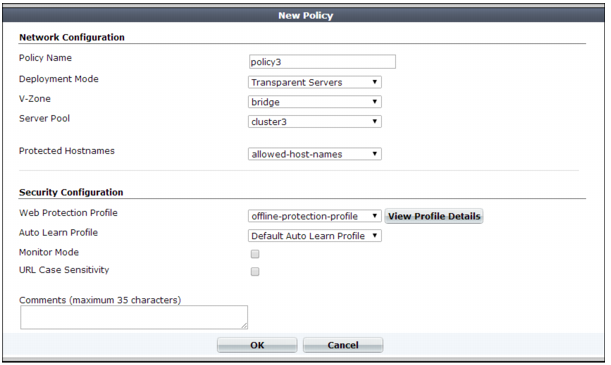
Deployment Mode | Select the method of distribution that the FortiWeb appliance uses when it accepts connections for this policy. The deployment modes that are available depend on the types of network topologies that the current operation mode supports. • Single Server/Server Balance — Forwards connections to a server pool. Depending on the pool configuration, FortiWeb either forwards connections to a single physical server or domain server or distributes the connection among the pool members. Also configure Server Pool. This option is available only if the FortiWeb appliance is operating in reverse proxy mode. • HTTP Content Routing — Use HTTP content routing to route HTTP requests to a specific server pool. This option is available only if the FortiWeb appliance is operating in reverse proxy mode. • Offline Protection — Allow connections to pass through the FortiWeb appliance, and apply an offline protection profile. Also configure Server Pool. This is the only option available if operation mode is offline protection. • Transparent Servers — Allow connections to pass through the FortiWeb appliance, and apply a protection profile. Also configure Server Pool. This is the only option available when the operation mode is either true transparent proxy or transparent inspection. |
Virtual Server or Data Capture Port or V-zone | Select the name of a virtual server, data capture (listening) network interface, or v-zone (bridge). The name and purpose of these settings varies by operation mode: • Reverse proxy — Virtual Server identifies the IP address and network interface of incoming traffic that FortiWeb routes and to which the policy applies a profile. • Offline protection — Data Capture Port identifies the network interface of incoming traffic that the policy attempts to apply a profile to. The IP address is ignored. • True transparent proxy or transparent inspection — V-zone identifies the network interface of the incoming traffic that the policy applies a profile to. |
HTTP Content Routing | To specify HTTP content routing policies this policy uses and associated options, click Add, then complete the following settings for each entry: • HTTP Content Routing Policy Name — The name of the policy. • Web Protection Profile — Select the profile to apply to the connections that this policy accepts. For more information, see “Configuring a protection profile for inline topologies”. Note: FortiWeb does not block clients with source IP addresses designated as a trusted IP. For details, see “Blacklisting & whitelisting clients using a source IP or source IP range”. • Default — Specifies whether the specified protection profile is applied to any traffic that does not match conditions specified in the HTTP content routing policies. You can specify up to 255 HTTP content routing policies in each server policy. This option appears only if Deployment Mode is HTTP Content Routing. |
Match Once | Enable to forward subsequent requests from an identified client connection to the same server pool as the initial connection from the client. This option allows FortiWeb to improve its performance by skipping the process of matching HTTP header content to content routing policies for connections it has already evaluated and routed. This option appears only if Deployment Mode is HTTP Content Routing. |
Server Pool | Select the server pool whose members receive the connections. A server pool can contain a single physical server or domain server. For details, see “Creating a server pool”. This option appears only if Deployment Mode is Single Server/Server Balance, Offline Protection, or Transparent Servers. Caution: Multiple virtual servers/policies can forward traffic to the same server pool. If you do this, consider the total maximum load of connections that all virtual servers forward to your server pool. This configuration can multiply traffic forwarded to your server pool, which can overload them and cause dropped connections. |
Protected Hostnames | Select a protected host names group to allow or reject connections based upon whether the Host: field in the HTTP header is empty or does or does not match the protected host names group. For details, see “Defining your protected/allowed HTTP “Host:” header names”. If you do not select a protected host names group, FortiWeb accepts or blocks requests based on other criteria in the policy or protection profile, but regardless of the Host: field in the HTTP header. Attack log messages contain HTTP Host Violation when this feature does not detect an allowed host name. Caution: Unlike HTTP 1.1, HTTP 1.0 does not require the Host: field. The FortiWeb appliance does not block HTTP 1.0 requests because they do not have this field, regardless of whether or not you have selected a protected host names group. |
Blocking Port | Select which network interface FortiWeb uses to send TCP RST (connection reset) packets when it attempts to block the request or connection after it detects traffic that violates a policy. For details on blocking behavior, see “Topology for offline protection mode”. This option is available only when FortiWeb is operating in offline protection mode. |
Syn Cookie | Enable to prevent TCP SYN floods. Also configure Half Open Threshold. Note: This option is available only when FortiWeb is operating in true transparent proxy mode. (Other modes use DoS protection profiles instead. See “Preventing a TCP SYN flood”.) |
Half Open Threshold | Type the TCP SYN cookie threshold in packets per second. Also configure Syn Cookie. Note: This option is available only when FortiWeb is operating in true transparent proxy mode. (Other modes use DoS protection profiles instead. See “Preventing a TCP SYN flood”.) |
HTTP Service | Select the custom or predefined service that defines the TCP port number where the virtual server receives HTTP traffic. This option is available only if FortiWeb is operating in reverse proxy mode. |
HTTPS Service | Select the custom or predefined service that defines the TCP port number where the virtual server receives HTTPS traffic. Also configure Certificate. Enable if requests from clients to the FortiWeb appliance or back-end servers use SSL or TLS. See also “Supported cipher suites & protocol versions”. When enabled, the FortiWeb appliance handles SSL negotiations and encryption and decryption, instead of the web servers, also known as SSL offloading (see “Offloading vs. inspection”). Connections between the client and the FortiWeb appliance are encrypted. (The server pool configuration specifies whether connections between the FortiWeb appliance and each web server are encrypted.) This option is available only when FortiWeb is operating in reverse proxy mode. (For other operation modes, use the server pool configuration to enable SSL inspection instead.) Caution: If you do not enable an HTTPS option and provide a certificate for HTTPS connections, FortiWeb cannot decrypt connections and scan content in the HTTP body. Tip: FortiWeb appliances contain specialized hardware to accelerate SSL processing. Offloading SSL/TLS processing can improve the performance of secure HTTP (HTTPS) connections. |
Certificate | Do one of the following: • Select the server certificate that FortiWeb uses to encrypt or decrypt SSL-secured connections. • Select Create New to open a window that allows you to upload a the certificate to use. For more information, see “Uploading a server certificate” and “Offloading vs. inspection”. If Enable Server Name Indication (SNI) is selected, FortiWeb uses a Server Name Indication (SNI) configuration instead of or in addition to this server certificate. For more information, see Enable Server Name Indication (SNI). Available only if you specify a value for HTTPS Service. |
Certificate Intermediate Group | Select the name of a group of intermediate certificate authority (CA) certificates, if any, that FortiWeb presents to clients. An intermediate CA can complete the signing chain and validate the server certificate’s CA signature. Configure this option when clients receive certificate warnings that an intermediary CA has signed the server certificate specified by Certificate, not a root CA or other CA currently trusted by the client directly. Alternatively, you can include the entire signing chain in the server certificate itself before you upload it to FortiWeb. See “Uploading a server certificate” and “Supplementing a server certificate with its signing chain”. Available only if you specify a value for HTTPS Service. |
Show/Hide advanced SSL settings | Click to show or hide the settings that allow you to specify a Server Name Indication (SNI) configuration, increase security by disabling specific versions of TLS and SSL for this policy, and other advanced SSL settings. For example, if FortiWeb can use a single certificate to decrypt and encrypt traffic for all the web sites that reside on the servers in a pool, you may not have to set any advanced SSL settings. For more information, see the descriptions of the individual settings. |
Add HSTS Header | Enable to combat MITM attacks on HTTP by injecting the RFC 6797 strict transport security header into the reply. For example: Strict-Transport-Security: max-age=31536000; includeSubDomains This header forces clients to use HTTPS for subsequent visits to this domain. If the certificate is invalid, the client’s web browser receives a fatal connection error and does not display a dialog that allows the user to override the certificate mismatch error and continue. Available only if you specify a value for HTTPS Service. |
Max. Age | Specify the time to live in seconds for the HSTS header. Available only if Add HSTS Header is selected. |
Certificate Verification | Select the name of a certificate verifier, if any, that FortiWeb uses to validate an HTTP client’s personal certificate. However, if you select Enable Server Name Indication (SNI) and the domain in the client request matches an entry in the specified SNI policy, FortiWeb uses the SNI configuration to determine which certificate verifier to use. If you do not select a verifier, clients are not required to present a personal certificate. See also “How to apply PKI client authentication (personal certificates)”. Personal certificates, sometimes also called user certificates, establish the identity of the person connecting to the web site (PKI authentication). You can require clients to present a certificate instead of, or in addition to, HTTP authentication (see “Offloading HTTP authentication & authorization”). Available only if you specify a value for HTTPS Service. For true transparent proxy mode, configure this setting in the server pool configuration instead. See Certificate Verification in “Creating a server pool”. Note: The client must support SSL 3.0, TLS 1.0, TLS 1.1, or TLS 1.2. |
Enable URL Based Client Certificate | Specifies whether FortiWeb uses a URL-based client certificate group to determine whether a client is required to present a personal certificate. Available only if you specify a value for HTTPS Service. |
URL Based Client Certificate Group | Specifies the URL-based client certificate group that determines whether a client is required to present a personal certificate. If the URL the client requests does not match an entry in the group, the client is not required to present a personal certificate. For information on creating a group, see “Use URLs to determine whether a client is required to present a certificate”. |
Max HTTP Request Length | Specifies the maximum allowed length for an HTTP request with a URL that matches an entry in the URL-based client certificate group. FortiWeb blocks any matching requests that exceed the specified size. This setting prevents a request from exceeding the maximum buffer size. |
Client Certificate Forwarding | Enable to configure FortiWeb to include the X.509 personal certificate presented by the client during the SSL/TLS handshake, if any, in an X‑Client‑Cert: HTTP header when it forwards the traffic to the protected web server. FortiWeb still validates the client certificate itself, but this forwarding action can be useful if the web server requires the client certificate for the purpose of server-side identity-based functionality. |
Enable Server Name Indication (SNI) | Select to use a Server Name Indication (SNI) configuration instead of or in addition to the server certificate specified by Certificate. The SNI configuration enables FortiWeb to determine which certificate to present on behalf of the members of a pool based on the domain in the client request. See “Allowing FortiWeb to support multiple server certificates”. If you specify both an SNI configuration and Certificate, FortiWeb uses the certificate specified by Certificate when the requested domain does not match a value in the SNI configuration. If you select Enable Strict SNI, FortiWeb always ignores the value of Certificate. Available only if you specify a value for HTTPS Service. |
Enable Strict SNI | Select to configure FortiWeb to ignore the value of Certificate when it determines which certificate to present on behalf of server pool members, even if the domain in a client request does not match a value in the SNI configuration. |
SNI Policy | Select the Server Name Indication (SNI) configuration that determines which certificate FortiWeb presents on behalf of the members of a server pool. |
SSL Protocols | Specify which versions of the SSL or TLS cryptographic protocols clients can use to connect securely to the FortiWeb appliance or back-end servers. For more information, see “Supported cipher suites & protocol versions”. Available only if you specify a HTTPS Service value. |
SSL/TLS encryption level | Specify whether the set of cipher suites that FortiWeb allows creates a medium-security or high-security configuration. For more information, see “Supported cipher suites & protocol versions”. Available only if you specify a HTTPS Service value. |
Enable Perfect Forward Secrecy | Enable to configure FortiWeb to generate a new public-private key pair when it establishes a secure session with a Diffie–Hellman key exchange. Perfect forward secrecy (PFS) improves security by ensuring that the key pair for a current session is unrelated to the key for any future sessions. Available only if you specify a HTTPS Service value. |
Prioritize RC4 Cipher Suite | Enable to configure FortiWeb to use the RC4 cipher when it first attempts to create a secure connection with a client. This option protects against a BEAST (Browser Exploit Against SSL/TLS) attack, a TLS 1.0 vulnerability. Available only if you specify a HTTPS Service value. |
Disable Client-Initiated SSL Renegotiation | Select to configure FortiWeb to ignore requests from clients to renegotiate TLS or SSL. Protects against denial-of-service (DoS) attacks that use TLS/SSL renegotiation to overburden the server. Available only if you specify a HTTPS Service value. |
Redirect HTTP to HTTPS | Select to automatically redirect all HTTP requests to the HTTPS service with the same URL and parameters. Also configure HTTPS Service and ensure service uses port 443 (the default). FortiWeb does not apply the protection profile for this policy (specified by Web Protection Profile) to the redirected traffic. Available only when the operation mode is reverse proxy. This option can replace redirection functionality that you create using URL rewriting rules. For more information, see “Example: HTTP-to-HTTPS redirect”. |
Web Protection Profile | Select the profile to apply to the connections that this policy accepts, or select Create New to add a new profile in a pop-up window, without leaving the current page. For details on specific protection profiles, see one of the following topics: Note: The current operation mode determines which profiles are available. For details, see Table 47. Note: FortiWeb does not block clients with source IP addresses designated as a trusted IP. For details, see “Blacklisting & whitelisting clients using a source IP or source IP range”. If Deployment Mode is HTTP Content Routing, this option is available when you create the list of content routing policies. |
View Profile Details | Click to display the settings of the current profile without leaving the current page. To return to the policy settings, click Back to Policy Settings. |
WAF Auto Learn Profile | Select the auto-learning profile, if any, to use in order to discover attacks, URLs, and parameters in your web servers’ HTTP sessions, or select Create New to add a new auto-learning profile in a pop-up window without leaving the current page. For details, see “Configuring an auto-learning profile”. |
Monitor Mode | Enable to override any actions included in the profiles, and instead accept the request and generate an alert email and/or log message for all policy violations. To collect complete session information and build accurate protection profiles, auto-learning requires that you either configure all actions to be Alert or enable this option. Caution: When this option is enabled, FortiWeb ignores the Action setting (deny, redirect, etc.) in protection profile components, which permits attack attempts to complete. Note: Logging and/or alert email occur only if you enable and configure them. See “Logging” and “Alert email”. |
URL Case Sensitivity | Enable to differentiate uniform resource locators (URLs) according to upper case and lower case letters for features that act upon the URLs in the headers of HTTP requests, such as start page rules, IP list rules, and page access rules. For example, when this option is enabled, an HTTP request involving http://www.Example.com/ would not match profile features that specify http://www.example.com (difference is lower case “e”). |
Comments | Type a description or other comment. The description may be up to 35 characters long. |
Whitelisted items are not included in policy enforcement. See “Configuring the global object white list”. |
If you have another FortiWeb appliance, you can use its web vulnerability scanner to verify that your policy is blocking attacks as you expect. For details, see “Vulnerability scans”. |