Supplementing a server certificate with its signing chain
If a server certificate is signed by an intermediate (non-root) certificate authority rather than a root CA, before the client will trust the server’s certificate, you must demonstrate a link with trusted root CAs, thereby proving that the server’s certificate is genuine. Otherwise, the server certificate may cause the end-user’s web browser to display certificate warnings.
If you did not append the signing chain inside the server certificate itself, you must configure the FortiWeb appliance to provide the certificates of intermediate CAs when it presents the server certificate.
To upload an intermediate CA’s certificate
1. Go to
System > Certificates > Intermediate CA.

You can click View Certificate Detail to view the selected certificate’s subject, range of dates within which the certificate is valid, version number, serial number, and extensions (purposes).
To access this part of the web UI, your administrator's account access profile must have
Read and
Write permission to items in the
Admin Users category. For details, see
“Permissions”.
2. To upload a certificate, click Import.
A dialog appears.
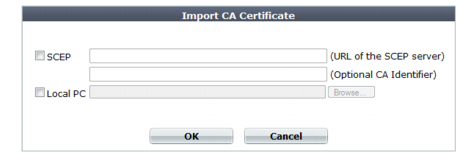
3. Do one of the following to locate a certificate:
• Select SCEP and enter the URL of the applicable Simple Certificate Enrollment Protocol server. (SCEP allows routers and other intermediate network devices to obtain certificates.)
To specify a specific certificate authority, enter an identifier in the field below the URL.
• Select Local PC, then browse to locate a certificate file.
4. Click OK.
5. Go to System > Certificates > Intermediate CA Group.
To access this part of the web UI, your administrator's account access profile must have
Read and
Write permission to items in the
Admin Users category. For details, see
“Permissions”.
6. Click Create New.
A dialog appears.
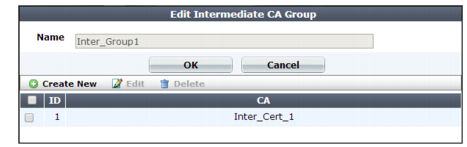
7. In Name, type a name that can be referenced by other parts of the configuration. Do not use spaces or special characters. The maximum length is 35 characters.
8. Click OK.
9. Click Create New.
A dialog appears.

10. In ID, type the index number of the host entry within the group, or keep the field’s default value of auto to let the FortiWeb appliance automatically assign the next available index number.
11. In CA, select the name of an intermediary CA’s certificate that you previously uploaded and want to add to the group.
12. Click OK.
13. Repeat the previous steps for each intermediary CA certificate that you want to add to the group.
The FortiWeb appliance will present both the server’s certificate and those of the intermediate CAs when establishing a secure connection with the client.
See also