Blacklisting & whitelisting countries & regions
While many web sites are truly global in nature, others are specific to a region. Government web applications that provide services only to its residents are one example.
In such cases, when requests appear to originate from other parts of the world, it may not be worth the security risk to accept them.
• DDoS botnets and mercenary hackers might be the predominant traffic source.
• Anonymizing VPN services or Tor may have been used to mask the true source IP of an attacker that is actually within your own country.
Blacklisting clients individually in this case would be time-consuming and difficult to maintain due to PPPoE or other dynamic allocations of public IP addresses, and IP blocks that are re-used by innocent clients.
FortiWeb allows you to block traffic from many IP addresses that are currently known to belong to networks in other regions. It uses a
MaxMind GeoLite database of mappings between geographical regions and all public IP addresses that are known to originate from them. You can also specify exceptions to the blacklist, which allows you to, for example, block a country or region but allow a geographic location within that country or region.
| Because geographical IP policies are evaluated before many other techniques, defining these IP addresses can be used to improve performance. For details, see “Sequence of scans”. |
To configure blocking by geography
If FortiWeb is behind an external load balancer that applies SNAT, for example, you may need to configure it to append its and the client’s IP address to X‑Forwarded‑For: in the HTTP header so that FortiWeb can apply this feature. Otherwise, all traffic may appear to come from the same client, with a private network IP: the external load balancer.
2. If you want to use a trigger to create a log message and/or alert email when a geographically blacklisted client attempts to connect to your web servers, configure the trigger first. See
“Configuring triggers”.
3. If you need to exempt some clients’ public IP addresses, configure Geo IP reputation exemptions first:
a. Go to Web Protection> Access > Geo IP Exceptions.
To access this part of the web UI, your administrator’s account access profile must have
Read and
Write permission to items in the
Web Protection Configuration category. For details, see
“Permissions”.
b. Specify a name for the exception item, and then click OK.
c. Click Create New to add IPv4 addresses (for example, 192.168.0.1) or IP ranges (for example, 192.168.0.1-192.168.0.255) to the exception item, as required.
4. Go to Web Protection> Access > Geo IP.
5. Click Create New.
A dialog appears.
6. Configure these settings:

Setting name | Description |
Name | Type a name that can be referenced by other parts of the configuration. Do not use spaces or special characters. The maximum length is 35 characters. |
Severity | When rule violations are recorded in the attack log, each log message contains a Severity Level (severity_level) field. Select which severity level the FortiWeb appliance will use when a blacklisted IP address attempts to connect to your web servers: • Low • Medium • High |
Trigger Action | Select which trigger, if any, that the FortiWeb appliance uses when it logs and/or sends an alert email about a blacklisted IP address’s attempt to connect to your web servers. See “Configuring triggers”. |
Exception | Select the exceptions configuration you created in step 3, if required. |
7. Click OK.
8. Click Create New.
9. From the Country list on the left, select one or more geographical regions that you want to block, then click the right arrow to move them to the Selected Country list on the right.
In addition to countries, the
Country list also includes distinct territories within a country, such as Puerto Rico and United States Minor Outlying Islands, and regions that are not associated with any country, such as Antarctica.
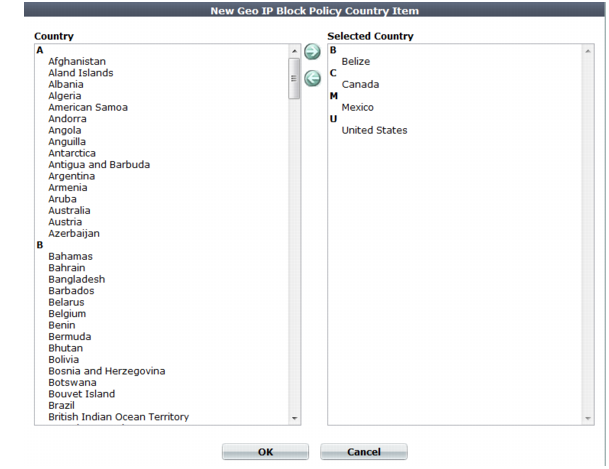
10. Click OK.
The web UI returns to the initial dialog. The countries that you are blocking will appear as individual entries.
11. Click OK.
See also