Connecting to FortiGuard services
Most exploits and virus exposures occur within the first 2 months of a known vulnerability. Most botnets consist of thousands of zombie computers whose IP addresses are continuously changing. To keep your defenses effective against the evolving threat landscape, Fortinet recommends FortiGuard services. New vulnerabilities and botnets are discovered and new signatures are built by Fortinet researchers every day.
Without these updates, your FortiWeb cannot detect the newest threats.
After you have subscribed to FortiGuard services, configure your FortiWeb appliance to connect to the Internet so that it can reach the world-wide Fortinet Distribution Network (FDN) in order to:
• verify its FortiGuard service licenses
• download up-to-date signatures, IP lists, and engine packages
FortiWeb appliances often can connect using default settings. However, due to differences in routing and firewalling, you should confirm this by verifying connectivity.
To determine your FortiGuard license status
The appliance will attempt to validate its license when it boots. If the appliance could not connect because proxy settings were not configured, or due to any other connectivity issue that you have since resolved, you can reboot the appliance to re-attempt license validation.
2. Go to System > Status > Status.
To access this part of the web UI, your administrator's account access profile must have
Read permission to items in the
System Configuration category. For details, see
“Permissions”.
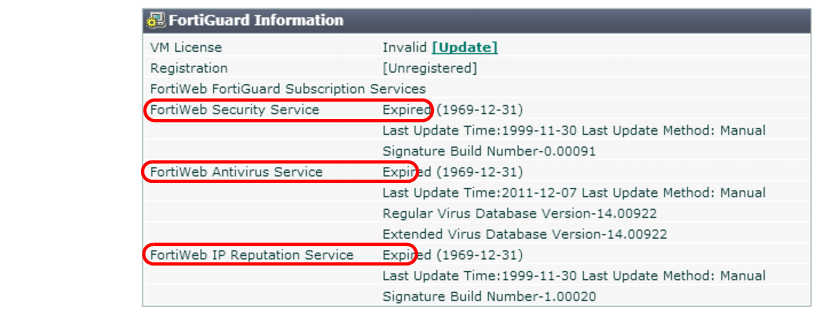
3. In the FortiGuard Information widget, look at the FortiWeb Security Service row, FortiWeb Antivirus Service row, and FortiWeb IP Reputation Service row.
• Expired — At the last attempt, the license was either expired or FortiWeb was unable to determine license status due to network connection errors with the FDN.
| Your FortiWeb appliance cannot detect the latest vulnerabilities and compliance violations unless it is licensed and has network connectivity to download current definitions from the FortiGuard service. |
If the connection did not succeed:
• On FortiWeb, verify the:
• time zone & time
• DNS settings
• network interface up/down status & IP
• static routes
• On your computer, use nslookup to verify that FortiGuard domain names are resolving (license authentication queries are sent to update.fortiguard.net).
C:\Users\cschwartz>nslookup update.fortiguard.net
Server: google-public-dns-a.google.com
Address: 8.8.8.8
Non-authoritative answer:
Name: fds1.fortinet.com
Addresses: 209.66.81.150
209.66.81.151
208.91.112.66
Aliases: update.fortiguard.net
• On FortiWeb, use execute ping and execute traceroute to verify that connectivity from FortiWeb to the Internet and FortiGuard is possible. Check the configuration of any NAT or firewall devices that exist between the FortiWeb appliance and the FDN or FDS server override.
FortiWeb # exec traceroute update.fortiguard.net
traceroute to update.fortiguard.net (209.66.81.150), 32 hops max, 84 byte packets
1 192.0.2.2 0 ms 0 ms 0 ms
2 209.87.254.221 <static-209-87-254-221.storm.ca> 4 ms 2 ms 3 ms
3 209.87.239.161 <core-2-g0-3.storm.ca> 2 ms 3 ms 3 ms
4 67.69.228.161 3 ms 4 ms 3 ms
5 64.230.164.17 <core2-ottawa23_POS13-1-0.net.bell.ca> 3 ms 5 ms 3 ms
6 64.230.99.250 <tcore4-ottawa23_0-4-2-0.net.bell.ca> 16 ms 17 ms 15 ms
7 64.230.79.222 <tcore3-montreal01_pos0-14-0-0.net.bell.ca> 14 ms 14 ms 15 ms
8 64.230.187.238 <newcore2-newyork83_so6-0-0_0> 63 ms 15 ms 14 ms
9 64.230.187.42 <bxX5-newyork83_POS9-0-0.net.bell.ca> 21 ms 64.230.187.93 <BX5-NEWYORK83_POS12-0-0_core.net.bell.ca> 17 ms 16 ms
10 67.69.246.78 <Abovenet_NY.net.bell.ca> 28 ms 28 ms 28 ms
11 64.125.21.86 <xe-1-3-0.cr2.lga5.us.above.net> 29 ms 29 ms 30 ms
12 64.125.27.33 <xe-0-2-0.cr2.ord2.us.above.net> 31 ms 31 ms 33 ms
13 64.125.25.6 <xe-4-1-0.cr2.sjc2.us.above.net> 82 ms 82 ms 100 ms
14 64.125.26.202 <xe-1-1-0.er2.sjc2.us.above.net> 80 ms 79 ms 82 ms
15 209.66.64.93 <209.66.64.93.t01015-01.above.net> 80 ms 80 ms 79 ms
16 209.66.81.150 <209.66.81.150.available.above.net> 83 ms 82 ms 81 ms
To verify FortiGuard update connectivity
1. If your FortiWeb appliance must connect to the Internet (and therefore FDN) through an explicit (non-transparent) web proxy, configure the proxy connection (see
“Accessing FortiGuard via a web proxy”).
2. Go to System > Config > FortiGuard.
To access this part of the web UI, your administrator's account access profile must have
Read and
Write permission to items in the
Maintenance category. For details, see
“Permissions”.
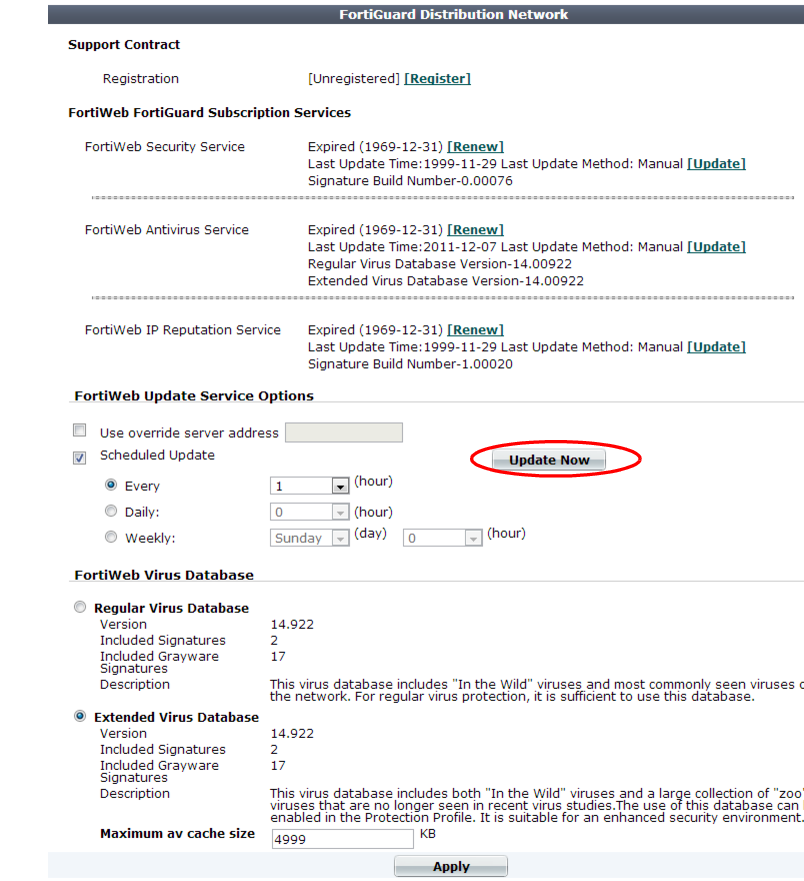
3. If you want your FortiWeb appliance to connect to a specific FDS other than the default for its time zone, enable Use override server address, and enter the IP address and port number of an FDS in the format <FDS_ipv4>:<port_int>, such as 10.0.0.1:443.
4. Click Apply.
5. Click Update Now.
The FortiWeb appliance tests the connection to the FDN and, if any, the server you specified to override the default FDN server. Time required varies by the speed of the FortiWeb appliance’s network connection, and by the number of timeouts that occur before the connection attempt is successful or the FortiWeb appliance determines that it cannot connect. If you have enabled logging in:
• Log & Report > Log Config > Other Log Settings
• Log & Report > Log Config > Global Log Settings
test results are indicated in Log & Report > Log Access > Event. If the connection test did not succeed due to license issues, you would instead see this log message:
FortiWeb is unauthorized
For more troubleshooting information, enter the commands:
diagnose debug enable
diagnose debug application fds 8
This will cause additional information to be output to your CLI console, such as:
FortiWeb # [update]: Poll timeout.
FortiWeb # *ATTENTION*: license registration status changed to 'VALID',please logout and re-login
For example, poll (license and update request) timeouts can be caused by incorrectly configured static routes and DNS settings, links with high packet loss, and other basic connectivity issues. Unless you override the behavior with a specific FDS address (enable and configure Use override server address), FortiWeb appliances connect to the FDN by connecting to the server nearest to the FortiWeb appliance by its configured time zone. Timeouts can therefore also be caused by incorrect time zone.
See also
Choosing the virus signature database & decompression buffer
Most viruses are actively spreading initially, but as hosts are patched and more networks filter them out, their occurrence becomes more rare.
Fortinet’s FortiGuard Global Security Research Team continuously monitor detections of new and older viruses. When a specific virus has not been detected for one year, it is considered to be dormant. It is possible that a new outbreak could revive it, but that is increasingly unlikely as time passes due to replacement of vulnerable hardware and patching of vulnerable software. Therefore dormant viruses’s signatures are removed from the “Regular” database, but preserved in the “Extended” signature database.
If your FortiWeb’s performance is more critical than the risk of these dormant viruses, you can choose to omit signatures for obsolete viruses by selecting the “Regular” database on System > Config > FortiGuard.
Table 11: Selecting the virus database and buffer size on
System > Config > FortiGuard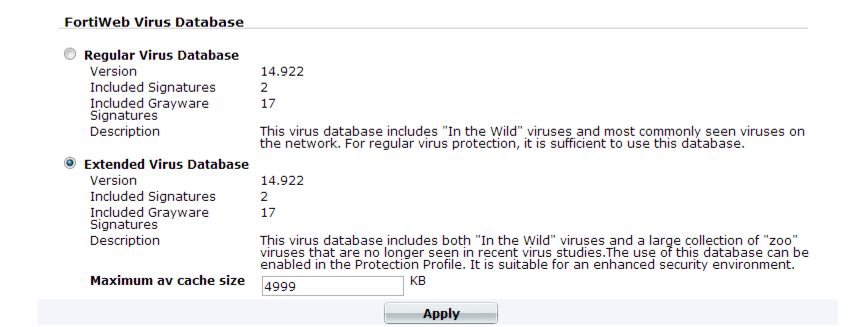
Setting Name | Description |
Regular Virus Database | Select to use only the signatures of viruses and greyware that have been detected by FortiGuard’s networks to be recently spreading in the wild. |
Extended Virus Database | Select to use all signatures, regardless of whether the viruses or greyware are currently spreading. |
Maximum Antivirus Buffer Size | Type the maximum size in kilobytes (KB) of the memory buffer that FortiWeb will use to temporarily undo the compression that a client or web server has applied to traffic, in order to inspect and/or modify it. See “Configuring temporary decompression for scanning & rewriting”. Caution: Unless you configure otherwise, compressed requests that are too large for this buffer will pass through FortiWeb without scanning or rewriting. This could allow viruses to reach your web servers, and cause HTTP body rewriting to fail. If you prefer to block requests greater than this buffer size, configure Body Length. To be sure that it will not disrupt normal traffic, first configure Action to be Alert. If no problems occur, switch it to Alert & Deny. |
See also