Configuring temporary decompression for scanning & rewriting
Similar to SSL/TLS inspection, in order for some features to function, you must configure the appliance for compression inspection, or to decompress and then re-compress traffic.
If the HTTP body is compressed, FortiWeb cannot parse it for rewriting, nor scan for potential problems such as a data leak or virus. Traffic that is encrypted and/or compressed is not a normalized stream. Bodies of compressed responses effectively have low-grade encryption: they are not in clear text, and therefore do not match signatures, and cannot be rewritten.
How, then, can you scan or rewrite compressed traffic?
If your protected web servers compress files themselves (i.e. compression has not been offloaded to FortiWeb), configure a FortiWeb decompression policy.
You can configure FortiWeb to temporarily decompress the body of a response based on its file type, which is specified by the HTTP Content‑Type: header. The appliance can then inspect the traffic. After, if there is no policy-violating content nor rewriting required, the FortiWeb appliance will allow the compressed version of the response to pass. Otherwise, if modification is required, FortiWeb will modify the response before re-compressing it and passing it to the client.
| The maximum compressed file size that FortiWeb can decompress is configured in Maximum Antivirus Buffer Size. By default, files larger than that limit are passed along without scanning or modification. This could allow malware to reach your web servers, and cause HTTP body rewriting to fail. If you prefer to block requests greater than this buffer size, configure Body Length. To be sure that it will not disrupt normal traffic, first configure Action to be Alert. If no problems occur, switch it to Alert & Deny. |
To configure a decompression policy
1. Configure your web servers to compress their responses.
3. Go to Application Delivery > Compression > File Uncompress Policy.
To access this part of the web UI, your administrator’s account access profile must have
Read and
Write permission to items in the
Web Protection Configuration category. For details, see
“Permissions”.
4. Click Create New.
A dialog appears.
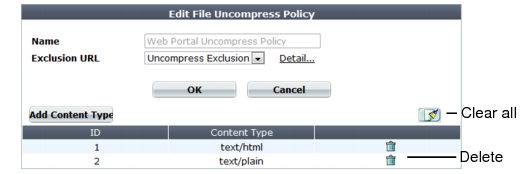
5. In Name, type a name that can be referenced by other parts of the configuration. Do not use spaces or special characters. The maximum length is 35 characters.
6. Click OK.
Optionally, select an exclusion and click the Detail link. The exclusion dialog appears. You can view and edit the exclusion. Use the browser Back button to return.
8. To add or remove a content type, click Add Content Type.
A dialog appears.
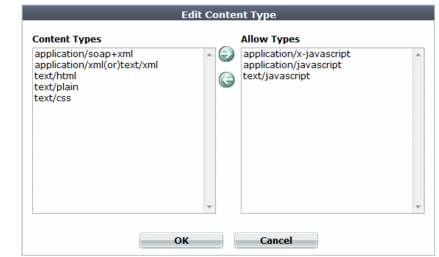
9. In the Content Types list, select the content types that you want to decompress, then click the right arrow (->) to move them to the Allow Types list.
For external JavaScripts, content type strings vary. If you are unsure of the content type string, for maximum coverage, select all JavaScript content type strings. However, due to wide browser compatibility, despite its current deprecated status, many web servers use text/javascript.
10. Click OK.