Combination access control & rate limiting
What if you want to allow a web crawler, but only if it is not too demanding, and comes from a source IP that is known to be legitimate for that crawler? What if you want to allow only a client that is a senior manager’s IP, and only if it hasn’t been infected by malware whose access rate is contributing to a DoS?
Advanced access control rules provide a degree of flexibility for these types of complex conditions. You can combine any or all of these criteria:
• source IP
• rate limit (including rate limiting for specific types of content)
• HTTP header or response code
• URL
• predefined or custom attack or data leak signature violation
• transaction or packet interval timeout
• real browser enforcement
In the rule, add all criteria that you require allowed traffic to match.
FortiWeb includes predefined rules that defend against some popular attacks. You cannot edit these predefined rules, but you can view their settings or create duplicates of them that you can edit (that is, by cloning).
To configure an advanced access control rule
1. Go to Web Protection > Advanced Protection > Custom Rule.
To access this part of the web UI, your administrator’s account access profile must have
Read and
Write permission to items in the
Web Protection Configuration category. For details, see
“Permissions”.
2. Do one of the following:
• To create a new rule, click Create New.
• To create a new rule based on a predefined rule, select the predefined rule to use, and then click Clone.
A dialog appears.
3. If you are cloning a predefined rule, enter a name for your new rule, and then click OK. To edit or review the rule settings, select the rule, and then click Edit.
4. Configure these settings:
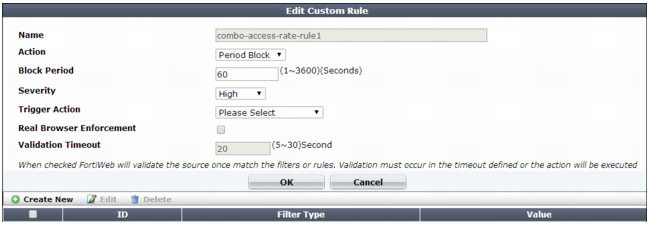
Setting name | Description |
Name | Type a unique name that can be referenced in other parts of the configuration. Do not use spaces or special characters. The maximum length is 35 characters. |
Action | Select which action the FortiWeb appliance will take when it detects a violation of the rule: • Alert — Accept the request and generate an alert email and/or log message. The default value is Alert. Caution: This setting is ignored when Monitor Mode is enabled. Note: Logging and/or alert email will occur only if enabled and configured. See “Logging” and “Alert email”. Note: If you will use this rule set with auto-learning, you should select Alert. If Action is Alert & Deny, or any other option that causes the FortiWeb appliance to terminate or modify the request or reply when it detects an attack attempt, the interruption will cause incomplete session information for auto-learning. |
Block Period | Type the number of seconds that you want to block subsequent requests from the client after the FortiWeb appliance detects that the client has violated the rule. This setting is available only if Action is set to Period Block. The valid range is from 1 to 3,600 (1 hour). The default value is 60. See also “Monitoring currently blocked IPs”. |
Severity | When rule violations are recorded in the attack log, each log message contains a Severity Level (severity_level) field. Select which severity level the FortiWeb appliance will use when it logs a violation of the rule: • Low • Medium • High The default value is Medium. |
Trigger Action | Select which trigger, if any, that the FortiWeb appliance will use when it logs and/or sends an alert email about a violation of the rule. See “Configuring triggers”. |
Real Browser Enforcement | Specifies whether FortiWeb returns a JavaScript to the client to test whether it is a web browser or automated tool when it meets any of the specified conditions. If the client fails the test or does not return results before the Validation Timeout expires, FortiWeb applies the Action. If the client appears to be a web browser, FortiWeb allows the client to exceed the action. See also “Bot analysis”. FortiWeb disables the Real Browser Enforcement option when add any of the following filter types to an advanced access control rule: Transaction Timeout, HTTP Response Code, Packet Interval Timeout, Occurrence. |
Validation Timeout | Enter the maximum amount of time that FortiWeb waits for results from the client for Real Browser Enforcement. |
5. Click OK.
6. Click Create New to add an entry to the set.
A dialog appears.
7. From Filter Type, select one of the following conditions that a request must match in order to be allowed, then click OK.
The Filter Type value determines which settings are displayed in the next dialog box.
• Source IPv4/IPv6 — Type the IP address of a client that is allowed. Depending on your configuration of how FortiWeb derives the client’s IP (see
“Defining your proxies, clients, & X-headers”), this may be the IP address that is indicated in an HTTP header rather than the IP header.
• URL — Type a regular expression that matches one or more URLs, such as /index\.jsp. Do not include the host name.
• HTTP Header — Indicate a single HTTP Header Name such as Host:, and all or part of its value in Header Value.
The request/response matches the condition if that header contains your exact value or matches your regular expression (depending on whether you have selected Simple String or Regular Expression). Value matching is case sensitive.
If you select Header Value Reverse Match, the request/response matches the condition if the header does not contain the exact value or regular expression.
| To prevent accidental matches, specify as much of the header’s value as possible. Do not use an ambiguous substring. For example, entering the value 192.168.1.1 would also match the IPs 192.168.10-19 and 192.168.100-199. This result is probably unintended. The better solution would be to configure either: • a regular expression such as ^192.168.1.1$ or • a source IP condition instead of an HTTP header condition |
• Access Rate Limit — This is the number of requests per second per client IP. Depending on your configuration of how FortiWeb will derive the client’s IP (see
“Defining your proxies, clients, & X-headers”), this may be the IP address that is indicated in an HTTP header rather than the IP header.
You can add only one Access Rate Limit filter to each rule.
• Signature Violation — Matches if FortiWeb detects a selected category of attack signature in the current HTTP transaction. The following categories are available:
• Cross Site Scripting
• Cross Site Scripting (Extended)
• SQL Injection
• SQL Injection (Extended)
• Generic Attacks
• Generic Attacks (Extended)
• Known Exploits
• Custom Signature (group or individual rule)
To use one of these categories in an advanced access control rule, enable the corresponding item in your signatures configuration. For more information, see
“Blocking known attacks & data leaks”.
• Transaction Timeout — Matches if the lifetime of a HTTP transaction exceeds the transaction timeout you specify. Specify a timeout value of 1 to 3600 seconds.
• HTTP Response Code — Matches if a HTTP response code matches a code or range of codes that you specify. For example, 404 or 500-503. To specify more than one response code or range, create additional HTTP Response Code filters.
• Content Type — Matches an HTTP request for a file that matches one of the specified types. Use with
Occurrence to detect and control web scraping (content scraping) activity. (For an example using auto-learning data, see
“Most hit IP table and web scraping detection”.)
• Packet Interval Timeout — Matches if the time period between packets arriving from either the client or server (request or response packets) exceeds the value in seconds you specify for Packet Timeout Interval. Enter a value from 1 to 60.
• Occurrence — Matches if a transaction matches other filter types in the current rule at a rate that exceeds a threshold you specify.
• To measure the rate by counting source client IP address, for Traced By, select Source IP.
• To measure by client, select User.
Note: The
User option requires you to enable the
Session Management option in your protection profile. For more information, see
“Configuring a protection profile for inline topologies”.
8. Click OK to exit the sub-dialog and return to the rule configuration.
9. Repeat the previous steps for each individual criteria that you want to add to the access rule.
For example, you can require both a matching request URL, HTTP header, and client source IP in order to allow a request.
You can add only one Access Rate Limit filter to each rule.
10. Click OK to save the rule.
11. Go to Web Protection > Advanced Protection > Custom Policy.
12. Click Create New. Group the advanced access rules into a policy.
For example, to create a policy that allows rate-limited access by 3 client IPs, you would group the corresponding 3 advanced access rules for each of those IPs into the policy.
In Priority, enter the priority for each rule in relation to other defined rules. Rules with lower numbers (higher priority) are applied first.
Attack log messages contain Custom Access Violation when this feature detects an unauthorized access attempt.