Administration
Configure administrative settings for the FortiAuthenticator device. This section includes:
- System Access
- High Availability
- Firmware Upgrade
- Config Auto-backup
- SNMP
- Licensing
- FortiGuard
- FTP Servers
- Admin Profiles
System Access
To adjust system access settings, go to System > Administration > System Access. The Edit System Access Settings page will open.
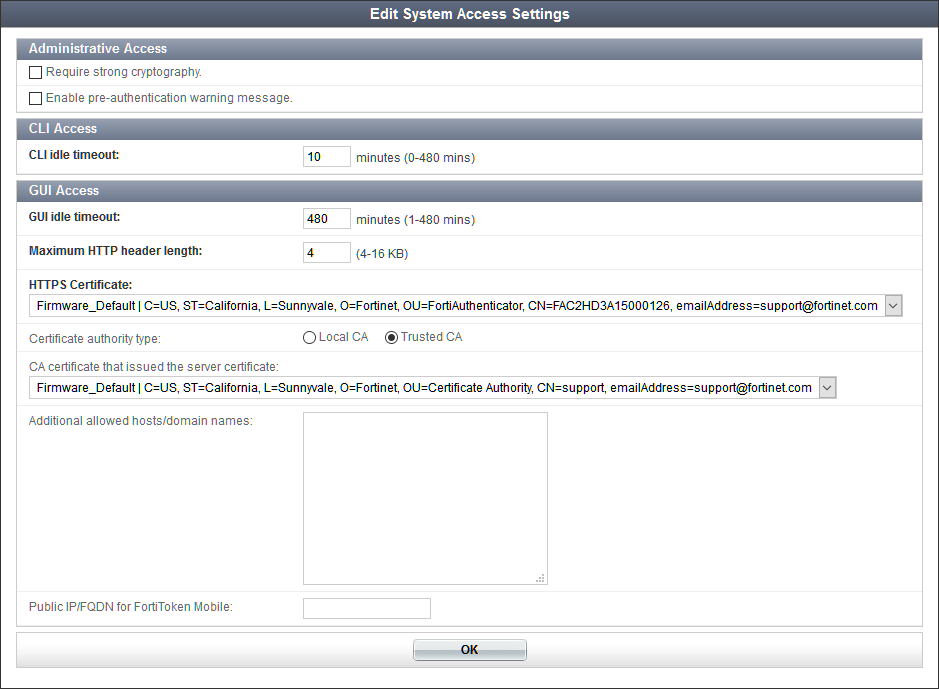
The following settings are available:
Select OK to apply any changes. See Certificate Management for more information about certificates.
High Availability
Multiple FortiAuthenticator units can operate as an HA cluster to provide even higher reliability.
There are three HA roles:
- Cluster member
- Standalone master
- Load-balancing slave
The FortiAuthenticator can operate in two separate HA modes:
- Cluster: Active-passive clustered fail-over mode where all of the configuration is synchronized between the devices.
- Load-balancing: Active-active HA method in which one device acts as a standalone master with up to two additional, geographically separated load-balancing slaves. The load can be distributed across the devices using round-robin DNS, Auth/NAS client load distribution, or external load balancing devices. Load-balancing mode is intended for two-FortiAuthenticator authentication deployments, as only a subset of the configuration is synchronized between the devices.
Both HA modes can be combined with an HA cluster acting as a standalone master for geographically distributed load-balancing slaves.
|
|
If an HA cluster is configured on an interface (such as port 2) and then disabled, it will not be possible to re-enable HA. This is because, when disabled, the interface's IP address is reconfigured to the interface to allow the administrator to access the newly standalone device. To allow the port to be available for use again in a HA cluster, the IP address must be manually removed. |
Cluster member role
In the cluster member role, one unit is active and the other is on standby. If the active unit fails, the standby unit becomes active. The cluster is configured as a single authentication server on your FortiGate units.
Authentication requests made during a failover from one unit to another are lost, but subsequent requests complete normally. The failover process takes about 30 seconds.
|
|
Cluster mode uses Ethernet broadcasts through TCP/720 as part of its master/slave election mechanism and for ongoing communication. Layer 2 connectivity is required between the two devices in an HA cluster, preferably via a crossover cable, as some network devices might block such Ethernet broadcasts. |
To configure FortiAuthenticator HA:
- On each unit, go to System > Administration > High Availability.
- Enter the following information:
- Select OK to apply the settings.
| Enable HA | Enable HA. |
| Role |
Select Cluster member. For more information about the other options, see Standalone master and Load-balancing slave roles below. |
| Interface | Select a network interface to use for communication between the two cluster members. This interface must not already have a IP address assigned and it cannot be used for authentication services. Both units must use the same interface for HA communication. |
| Cluster member IP address | Enter the IP address this unit uses for HA-related communication with the other FortiAuthenticator unit. The two units must have different addresses. Usually, you should assign addresses on the same private subnet. |
| Admin access | Select the types of administrative access to allow from: Telnet, SSH, HTTPS, Admin access, REST API, HTTP, and SNMP. |
| Priority | Set to Low on one unit and High on the other. Normally, the unit with High priority is the master unit. |
| Password | Enter a string to be used as a shared key for IPsec encryption. This must be the same on both units. |
| Load-balancing slaves | Add the other load-balancing cluster members by entering their IP addresses. |
| Monitored interfaces | Enable the interfaces you wish to monitor. |
| Monitored interfaces stability period | Define the stability period for the monitored interfaces in seconds, between 0-3600 (or one hour). The default is set to 30. |
|
|
When one unit has become the master, reconnect to the GUI and complete your configuration. The configuration will automatically be copied to the slave unit. |
Standalone master and Load-balancing slave roles
The load-balancing HA method enables active-active HA across geographically separated locations and Layer 3 networks. Only the following authentication related features can be synchronized:
- Token and seeds
- Local user database
- Remote user database
- Group mappings
- Token and user mappings
Other features, such as FSSO and certificates, cannot be synchronized between devices.
The standalone master is the primary system where users, groups, and tokens are configured. The load-balancing slave is synchronized to the master.
To improve the resilience of the master system, an active-passive master cluster with up to two load-balancing slave devices can be configured.
|
|
Remote administrator users are not synchronized between the master and the load-balancing slave. As a workaround, you can import remote users to slave roles, and change their roles to Administrator. |
To configure load-balancing HA:
- On each unit, go to System > Administration > High Availability.
- Enter the following information:
- Select OK to apply the settings.
Administrative access to the HA cluster
Administrative access is available through any of the network interfaces using their assigned IP addresses or through the HA interface using the Cluster member IP address, assigned on the System > Administration > High Availability page. In all cases, administrative access is available only if it is enabled on the interface.
Administrative access through any of the network interface IP addresses connects only to the master unit. The only administrative access to the slave unit is through the HA interface using the slave unit’s Cluster member IP address.
Configuration changes made on the master unit are automatically pushed to the slave unit. The slave unit does not permit configuration changes, but you might want to access the unit to change HA settings, or for firmware upgrades, shutdown, reboot, or troubleshooting.
|
|
FortiAuthenticator VMs used in a HA cluster each require a license. Each license is tied to a specific IP address. In an HA cluster, all interface IP addresses are the same on the two units, except for the HA interface. Request each license based on either the unique IP address of the unit’s HA interface or the IP address of a non-HA interface which will be the same on both units. |
|
|
If you disable and then re-enable HA operation, the interface that was assigned to HA communication will not be available for HA use. You must first go to System > Network > Interfaces and delete the IP address from that interface. |
Restoring the configuration
When restoring a configuration to an HA cluster master device, the master will reboot and in the interim the slave device will be promoted to master. When the previous master returns to service, it will become a slave and the existing master will overwrite its configuration, defeating the configuration restore. To avoid this, use the following process when restoring a configuration:
- Shutdown the slave unit.
- Restore the configuration on the master unit.
- Wait until the master unit is back online.
- Turn on slave unit — it will synchronize to the restored configuration after booting up.
Firmware upgrade
|
|
For a stable HA configuration, all units in an HA cluster must be running the same firmware version, and have the same sized license for HA devices. |
When upgrading the firmware on FortiAuthenticator devices in an HA cluster, specific steps must be taken to ensure that the upgrade is successful:
- Start the firmware upgrade on the active, or master, device. See Upgrading the firmware.
- Start the firmware upgrade on the new master device.
The device will reboot. While the master device is rebooting, the standby (or slave) device becomes the master.
The device will reboot. Once both devices have rebooted, the original master device will again be the master, while the slave device will return to being the slave.
If a situation arises where both devices are claiming to be the HA master due to a firmware mismatch, and the HA port of the device that is intended to be the slave cannot be accessed (such as when a crossover cable is being used), use the following steps:
- Shutdown the master device to which you have access, or, if physical access to the unit is not available to turn it back on, reboot the device. See System Information widget.
- With the previously inaccessible device now accessible, upgrade its firmware to the required version so that both devices have the same version.
- If you shutdown the device in Step 1, power it back on.
Note that, if rebooting the device, Step 2 below must be completed before the device finishes rebooting, which can be as short as 30 seconds.
The device will reboot.
Once both devices are back online, they will assume the HA roles dictated by their respective HA priorities.
Firmware Upgrade
The FortiAuthenticator firmware can be upgraded by either going to System > Administration > Firmware, or through the System Information widget on the dashboard (see System Information widget).
For instructions on upgrading the device’s firmware, see Upgrading the firmware.
Upgrade history
The upgrade history of the device is shown under the Upgrade History heading in the Firmware Upgrade or Downgrade pane. It displays the version that was upgraded to, the time and date that the upgrade took place, and the user that performed the upgrade. This information can be useful when receiving support to identify incorrect upgrade paths that can cause stability issues.
Always review all sections in the FortiAuthenticator Release Notes prior to upgrading your device.
Config Auto-backup
You can configure the FortiAuthenticator to automatically perform configuration back ups to an FTP or SFTP server.
Even though the backup file is encrypted to prevent tampering, access to the FTP server should be restricted. This configuration file backup includes both the CLI and GUI configurations of the FortiAuthenticator unit. The backed-up information includes users, user groups, FortiToken device list, authentication client list, LDAP directory tree, FSSO settings, remote LDAP and RADIUS, and certificates.
To configure automatic backups, go to System > Administration > Config Auto-backup.
Enter the following information, and then select OK to apply the settings:
| Enable configuration auto-backup | Enable the configuration of automatic configuration backups. | |
| Frequency | Select the automatic backup frequency: Hourly, Daily, Weekly, or Monthly. | |
| Backup time |
Entire a time, select Now, or select the clock icon to set the scheduled time for backups to occur. Note that this options is not available when the frequency is set to hourly. |
|
| FTP directory | Enter the FTP directory where the backup configuration files will be saved. | |
| FTP server | Select the FTP server to which the backup configuration files will be saved. See FTP Servers for information on adding FTP servers. | |
| Secondary FTP server | Select a secondary FTP server. | |
SNMP
Simple Network Management Protocol (SNMP) enables you to monitor hardware on your network. You can configure the hardware, such as the FortiAuthenticator SNMP agent, to report system information and send traps (alarms or event messages) to SNMP managers. An SNMP manager, or host, is typically a computer running an application that can read the incoming trap and event messages from the agent, and send out SNMP queries to the SNMP agents.
By using an SNMP manager, you can access SNMP traps and data from any FortiAuthenticator interface configured for SNMP management access. Part of configuring an SNMP manager is listing it as a host in a community on the FortiAuthenticator unit it will be monitoring. Otherwise, the SNMP monitor will not receive any traps from that unit, or be able to query that unit.
The FortiAuthenticator SNMP implementation is read-only. SNMP v1, v2c, and v3 compliant SNMP managers have read-only access to system information through queries and can receive trap messages from the FortiAuthenticator unit.
To monitor FortiAuthenticator system information and receive FortiAuthenticator traps, your SNMP manager needs the Fortinet and FortiAuthenticator Management Information Base (MIB) files. A MIB is a text file that lists the SNMP data objects that apply to the device to be monitored. These MIBs provide information that the SNMP manager needs to interpret the SNMP trap, event, and query messages sent by the FortiAuthenticator unit SNMP agent.
The Fortinet implementation of SNMP includes support for most of RFC 2665 (Ethernet‑like MIB) and most of RFC 1213 (MIB II). RFC support for SNMP v3 includes Architecture for SNMP Frameworks (RFC 3411), and partial support of User-based Security Model (RFC 3414).
SNMP traps alert you to important events that occur, such as overuse of memory or a high rate of authentication failures.
SNMP fields contain information about the FortiAuthenticator unit, such as CPU usage percentage or the number of sessions. This information is useful for monitoring the condition of the unit on an ongoing basis and to provide more information when a trap occurs.
Configuring SNMP
Before a remote SNMP manager can connect to the Fortinet agent, you must configure one or more interfaces to accept SNMP connections by going to System > Network > Interfaces. Edit the interface, and under Admin access, enable SNMP. See Interfaces.
You can also set the thresholds that trigger various SNMP traps. Note that a setting of zero disables the trap.
To configure SNMP settings:
- Go to System > Administration > SNMP.
- Enter the following information:
- Select OK to apply the changes.
To create a new SNMP community:
- Go to System > Administration > SNMP.
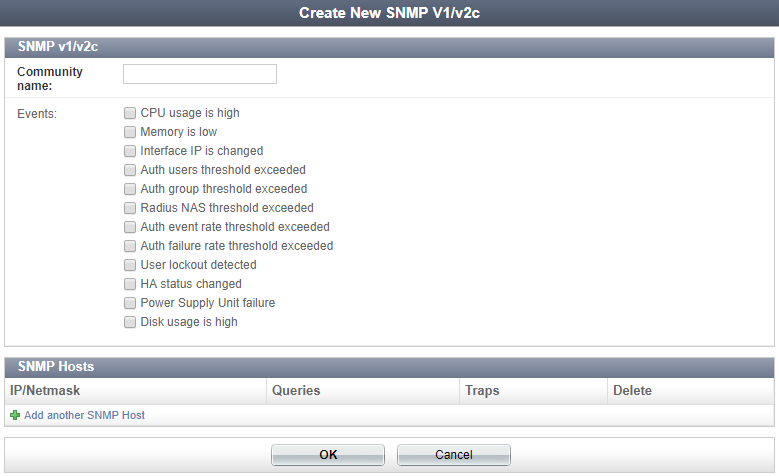
- Select Create New under SNMP v1/v2c. The Create New SNMP V1/v2c window opens.
- Enter the following information in the SNMPv1/v2c section:
- In SNMP Hosts, select Add another SNMP Host and enter the following information:
- Select OK to create the new SNMP community.
| IP/Netmask | Enter the IP address and netmask of the host. |
| Queries | Select if this host uses queries. |
| Traps | Select if this host uses traps. |
| Delete | Select to delete the host. |
To create a new SNMP user:
- Go to System > Administration > SNMP.
- Select Create New under SNMP v3. The Create New SNMP V3 window opens.
- Enter the following information in the General section:
- None: No authentication or encryption.
- Authentication only: Select the Authentication method then enter the authentication key in the Authentication key field.
- Encryption and authentication: Select the Authentication method, enter the authentication key in the Authentication key field, then select the Encryption method and enter the encryption key in the Encryption key field. This option is set by default.
- In SNMP Notification Hosts, select Add another SNMP Notification Host and enter the following information:
- Select OK to create the new SNMP V3 user.
| Username | The name of the SNMP user. |
| Security level |
Select the security level from the dropdown menu: |
| Events | Select the events for which traps are enabled. See Events. |
| IP/Netmask | Enter the IP address and netmask of the notification host. |
| Delete | Select to delete the notification host. |
To download MIB files:
- Go to System > Administration > SNMP.
- Under FortiAuthenticator SNMP MIB, select the MIB file you need to download, options include the FortiAuthenticator MIB and Fortinet Core MIB files.
Licensing
FortiAuthenticator-VM works in evaluation mode until it is licensed. In evaluation mode, only a limited number of users can be configured on the system. To expand this capability, a stackable licence can be applied to the system to increase both the user count, and all other metrics associated with the user count.
When a license is purchased, a registration code is provided. Go to support.fortinet.com and register your device by entering the registration code. You will be asked for the IP address of your FortiAuthenticator unit, and will then be provided with a license key.
Ensure that the IP address specified while registering your unit is configured on one of the device’s network interfaces, then upload the license key to your FortiAuthenticator-VM.
The License Information widget shows the current state of the device license. See License Information widget.
To license FortiAuthenticator:
- Register your device at support.fortinet.com.
- Ensure that one of your device’s network interfaces is configured to the IP address specified during registration.
- Go to System > Administration > Licensing.
- Select Choose File and locate the license file you received from Fortinet.
- Select OK.
FortiGuard
To view and configure FortiGuard connections, go to System > Administration > FortiGuard. The FortiGuard Distribution Network (FDN) page provides information and configuration settings for FortiGuard subscription services. For more information about FortiGuard services, see the FortiGuard web page.
Configure the following settings, then select OK to apply them:
|
|
As of FortiAuthenticator 4.3, FTM Push credentials for Apple and Google can now be updated via FortiGuard without admin user intervention. |
FTP Servers
To view a list of the configured FTP servers, go to System > Administration > FTP Servers.
The following information is shown:
| Create New | Select to create a new FTP server (this will be the only option available if no FTP servers are configured). |
| Delete | Select to delete the selected FTP server or servers. |
| Edit | Select to edit the selected FTP server. |
| Name | The name of the FTP server. |
| Server name/IP | The server name or IP address, and port number. |
To create a new FTP server:
- Select Create New. The Create New FTP Server window will open.
- Enter the following information:
- Select OK to create the new FTP server.
| Name | Enter a name for the FTP server. |
| Connection type | Select the connection type, either FTP or SFTP. |
| Server name/IP | Enter the server name or IP address. |
| Port | Enter the port number. |
| Anonymous | Select to make the server anonymous. |
| Username | Enter the server username (if Anonymous is not selected). |
| Password | Enter the server password (if Anonymous is not selected). |
Admin Profiles
Similar to FortiOS, FortiAuthenticator can incorporate the use of admin profiles. Each administrator can be granted either full permissions or a customized admin profile. Profiles are defined as aggregates of read-only or read/write permission sets. The most commonly used permission sets are pre-defined, but custom permission sets can also be created.
To create a new admin profile, go to System > Administration > Admin Profiles > Create New. You can give the admin profile a Name, a Description, and configure the Permission sets you want for that particular admin profile.
Go to Authentication > User Management > Local Users, and select the admin profile to an administrator. You can assign more than one admin profile to each administrator.
Copyright © 2018 Fortinet, Inc. All Rights Reserved. | Terms of Service | Privacy Policy
