Network
The Network tree menu allows you to configure device interfaces, DNS configuration, static routing, and packet capturing.
Interfaces
To view the interface list, go to System > Network > Interfaces.
The following information is shown:
| Edit | Select to edit the selected interface. |
| Search | Enter a search term in the search text box then select Search to search the interface list. |
| interface | The names of the physical interfaces on your FortiAuthenticator unit. The name, including number, of a physical interface depends on the model. |
| IPv4 | The IPv4 address of the interface. |
| IPv6 | The IPv6 address of the interface, if applicable. |
| Link status | The link status of the interface. |
To edit an interface:
- In the interfaces list, select the interface you need to edit and select the Edit button, or select the interface name. The Edit Network interface window opens.
- Edit the following settings as required.
- Select OK to apply the edits to the network interface.
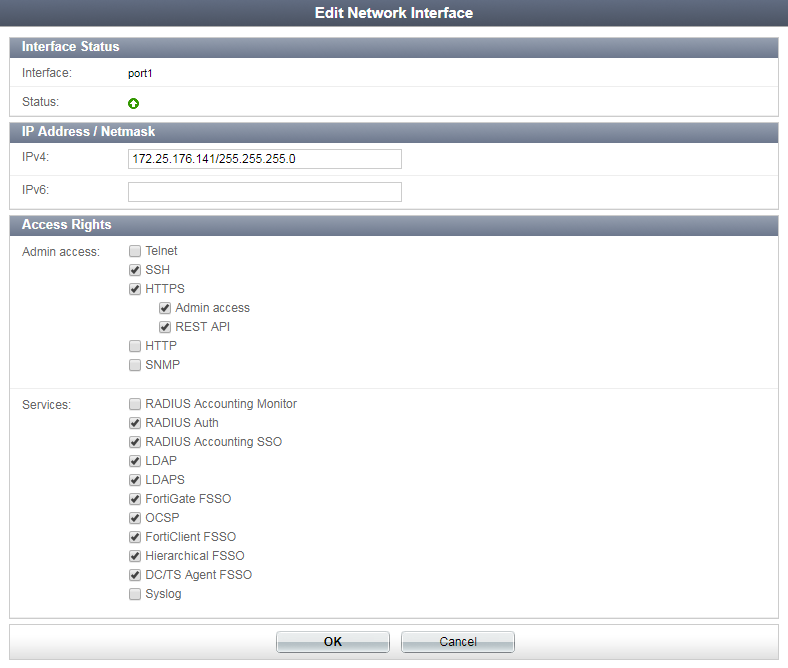
| interface Status | The interface name and its current link status is displayed. | |
| IP Address / Netmask | ||
| IPv4 | Enter the IPv4 address and netmask associated with this interface. | |
| IPv6 | Enter the IPv6 address associated with this interface. | |
| Access Rights | ||
| Admin access |
Select the allowed administrative service protocols from: Telnet, SSH, HTTPS, HTTP, and SNMP. Note that when HTTPS is enabled, you can also specify Admin access and/or REST API access. |
|
| Services |
Select the allowed services from: RADIUS Accounting Monitor, RADIUS Auth, RADIUS Accounting SSO, LDAP, LDAPS, FortiGate FSSO, OCSP, FortiClient FSSO, Hierarchical FSSO, DC/TS Agent FSSO, and Syslog. Note that Syslog is only available if Syslog SSO has been enabled. See General settings for more information. |
|
DNS
To configure DNS settings, go to System > Network > DNS. The primary and secondary server IP addresses can be changed as needed. To apply the changes, select OK.
Static Routing
To view the list of static routes, go to System > Network > Static Routing. Routes can be created, edited, and deleted as required. Use the checkboxes to select the static route entries you wish to either Delete or Edit.
The following information is shown:
| Create New | Select to create a new static route. |
| Delete | Select to delete the selected static route. |
| Edit | Select to edit the selected static route. |
| IP/Mask | The destination IP address and netmask for this route. |
| Gateway | The IP address of the next hop router to which this route directs traffic. |
| Device | The device or interface associated with this route. |
To create a new static route:
- In the static route list, select Create New. The Create New Static Route window opens.
- Edit the following settings as required.
| Destination IP/Mask | Enter the destination IP address and netmask for this route. |
| Network interface | Select the network interface that connects to the gateway. |
| Gateway | Enter the IP address of the next hop router to which this route directs traffic. |
| Comment | Optionally, enter a comment about the route. |
- Select OK to create the new static route.
Packet Capture
Packets can be captured on configured interfaces by going to System > Network > Packet Capture.
The following information is available:
| Edit | Select to edit the packet sniffer on the selected interface. |
| interface | The name of the configured interface for which packets can be captured. For information on configuring an interface, see Interfaces. |
| Maximum packets to capture | The maximum number of packets that can be captured on a sniffer. |
| Status | The status of the packet capture process. Allows you to start and stop the capturing process, and download the most recently captured packets. |
To start capturing packets on an interface, select the Start capturing button in the Status column for that interface. The Status will change to Capturing, and the Stop capturing and download buttons will become available.
To download captured packets:
- Select the download button for the interface whose captured packets you are downloading.
- When prompted, save the packet file (sniffer_[interface].pcap) to your management computer.
If no packets have been captured for that interface, select the Start capturing button.
The file can then be opened using packet analyzer software.
To edit a packet sniffer:
- Select the interface whose packet capture settings you need to configure by either selecting the configured interface name from the interface list, or selecting the checkbox in the interface row and selecting Edit from the toolbar.
- Configure the following options:
- Select OK to apply your changes.
The Edit Packet Sniffer page opens.
Copyright © 2018 Fortinet, Inc. All Rights Reserved. | Terms of Service | Privacy Policy
