3. Configure these settings: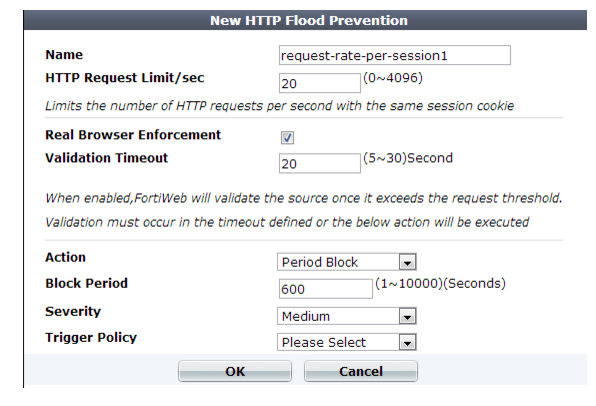
This scan is bypassed if the client’s source IP is a known search engine and you have enabled Allow Known Search Engines. |
Setting name | Description |
Name | Type a unique name that can be referenced in other parts of the configuration. Do not use spaces or special characters. The maximum length is 35 characters. |
HTTP Request Limit/sec | Type the maximum rate of requests per second allowed from a single HTTP client. The valid range is from 0 to 4,096. The default is 0. Fortinet suggests an initial value of 500. See also “Reducing false positives”. |
Real Browser Enforcement | If you want to return a JavaScript to the client to test whether it is a web browser or automated tool when it exceeds the rate limit, enable this option. If either the client fails the test, or if it does not return results before the Validation Timeout, FortiWeb will apply the Action. If the client appears to be a web browser, FortiWeb will allow the client to exceed the action. See also “Bot analysis”. Disable this option to apply the rate limit regardless of whether the client is a web browser such as Firefox or an automated tool such as wget. |
Validation Timeout | Enter the maximum amount of time that FortiWeb will wait for results from the client for Real Browser Enforcement. |
Action | Select which action the FortiWeb appliance will take when it detects a violation of the rule: • Alert — Accept the request and generate an alert email and/or log message. • Alert & Deny — Block the request (or reset the connection) and generate an alert email and/or log message. You can customize the web page that FortiWeb returns to the client with the HTTP status code. See “Customizing error and authentication pages (replacement messages)”. • Period Block — Block subsequent requests from the client for a number of seconds. Also configure Block Period. You can customize the web page that FortiWeb returns to the client with the HTTP status code. See “Customizing error and authentication pages (replacement messages)”. Tip: For improved performance during a confirmed DDoS, select this option. Attackers participating in the DoS will then be blocked at the IP layer, conserving FortiWeb resources that would otherwise be consumed by scanning each attacker’s request at the HTTP layer, compounding the effects of the DDoS. Note: If FortiWeb is deployed behind a NAT load balancer, when using this option, you must also define an X-header that indicates the original client’s IP (see “Defining your proxies, clients, & X-headers”). Failure to do so may cause FortiWeb to block all connections when it detects a violation of this type. The default value is Alert. Caution: This setting will be ignored if Monitor Mode is enabled. Note: Because the new active appliance does not know previous session history, after an HA failover, for existing sessions, FortiWeb will not be able to enforce actions for this feature. See “Sessions & FortiWeb HA”. Note: Logging and/or alert email will occur only if enabled and configured. See “Logging” and “Alert email”. Note: If you will use this rule set with auto-learning, you should select Alert. If Action is Alert & Deny, or any other option that causes the FortiWeb appliance to terminate or modify the request or reply when it detects an attack attempt, the interruption will cause incomplete session information for auto-learning. |
Block Period | Type the number of seconds that you want to block subsequent requests from the client after the FortiWeb appliance detects that the client has violated the rule. This setting is available only if Action is set to Period Block. The valid range is from 1 to 10,000 (2.78 hours). The default value is 0. See also “Monitoring currently blocked IPs”. |
Severity | When rule violations are recorded in the attack log, each log message contains a Severity Level (severity_level) field. Select which severity level the FortiWeb appliance will use when it logs a violation of the rule: • Low • Medium • High The default value is High. |
Trigger Action | Select which trigger, if any, that the FortiWeb appliance will use when it logs and/or sends an alert email about a violation of the rule. See “Configuring triggers”. |