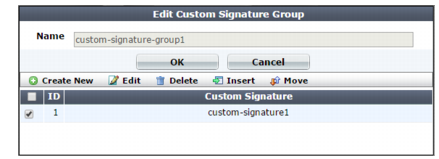
2. Click Create New, then configure these settings: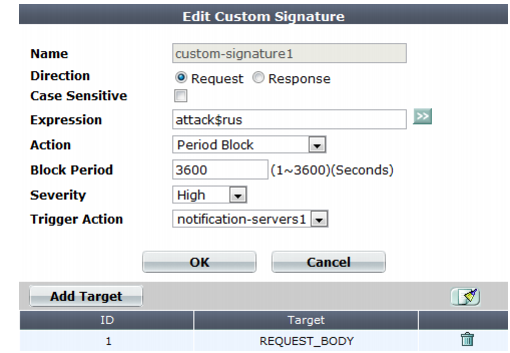
Setting name | Description |
Name | Type a unique name that can be referenced in other parts of the configuration. Do not use spaces or special characters. The maximum length is 35 characters. |
Direction | Select which the expression will be applied to, either: |
Case Sensitive | Enable to differentiate sensitive information according to upper case and lower case letters. For example, when this option is enabled, an HTTP request involving tomcat would not match a sensitive information signature that specifies Tomcat (difference is lower case “t”). |
Expression | Depending on your selection in Direction, type a regular expression that matches either: • an attack from a client • server information disclosure from the server To prevent false positives, it should not match anything else. The maximum length is 2,071 characters. To create and test a regular expression, click the >> (test) icon. This opens the Regular Expression Validator window where you can fine-tune the expression (see “Regular expression syntax”). For an example signature and tips on how to prevent evasive attacks, see “Example: Sanitizing poisoned HTML”. |
Action | Select which action the FortiWeb appliance will take when it detects a violation of the rule: • Alert — Accept the request and generate an alert email and/or log message. Note: If Direction is Data Leakage, does not cloak, except for removing sensitive headers. (Sensitive information in the body remains unaltered.) • Alert & Deny — Block the request (reset the connection) and generate an alert and/or log message. This option is applicable only if Direction is Signature Creation. You can customize the web page that FortiWeb returns to the client with the HTTP status code. See “Customizing error and authentication pages (replacement messages)”. • Alert & Erase — Hide replies with sensitive information (sometimes called “cloaking”). Block the reply (or reset the connection) or remove the sensitive information, and generate an alert email and/or log message. This option is applicable only if Direction is Data Leakage. If the sensitive information is a status code, you can customize the web page that will be returned to the client with the HTTP status code. Note: This option is not fully supported in offline protection mode. Effects will be identical to Alert; sensitive information will not be blocked or erased. • Period Block — Block subsequent requests from the client for a number of seconds. Also configure Block Period. You can customize the web page that FortiWeb returns to the client with the HTTP status code. See “Customizing error and authentication pages (replacement messages)”. Note: If FortiWeb is deployed behind a NAT load balancer, when using this option, you must also define an X-header that indicates the original client’s IP (see “Defining your proxies, clients, & X-headers”). Failure to do so may cause FortiWeb to block all connections when it detects a violation of this type. |
• Redirect — Redirect the request to the URL that you specify in the protection profile and generate an alert and/or log message. Also configure Redirect URL and Redirect URL With Reason. This option is available only if Direction is Signature Creation. • Send 403 Forbidden — Reply with an HTTP 403 Access Forbidden error message and generate an alert and/or log message.This option is available only if Direction is Data Leakage. The default value is Alert. Attack log messages contain Custom Data Leakage Violation: <rule_name> or Custom Signature Creation Violation: <rule_name> (depending on your configuration of Direction) when this feature detects a possible attack. Caution: This setting will be ignored if Monitor Mode is enabled. Note: Logging and/or alert email will occur only if enabled and configured. See “Logging” and “Alert email”. Note: If you will use this rule set with auto-learning, you should select Alert. If Action is Alert & Deny, or any other option that causes the FortiWeb appliance to terminate or modify the request or reply when it detects an attack attempt, the interruption will cause incomplete session information for auto-learning. | |
Block Period | Type the number of seconds that you want to block subsequent requests from the client after the FortiWeb appliance detects that the client has violated the rule. This setting is available only if Action is set to Period Block. The valid range is from 1 to 3,600 (1 hour). The default value is 1. See also “Monitoring currently blocked IPs”. |
Severity | When rule violations are recorded in the attack log, each log message contains a Severity Level (severity_level) field. Select which severity level the FortiWeb appliance will use when it logs a violation of the rule: • Low • Medium • High The default value is High. |
Trigger Action | Select which trigger, if any, that the FortiWeb appliance will use when it logs and/or sends an alert email about a violation of the rule. See “Monitoring currently blocked IPs”. |