4. Configure these settings: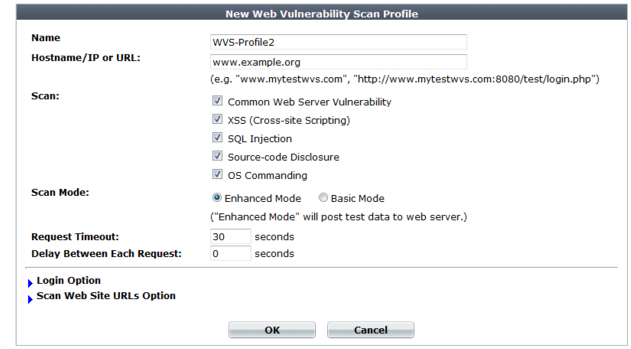
For best results, the account should have permissions to all functionality used by the web site. If URLs and inputs vary by account type, you may need to create multiple accounts — one for each non-overlapping set — and run separate vulnerability scans for each account. |
Setting name | Description |
Name | Type a unique name that can be referenced in other parts of the configuration. Do not use spaces or special characters. The maximum length is 35 characters. |
Hostname/IP or URL | Type the fully qualified domain name (FQDN), IP address, or full URL to indicate which directory of the web site you want to scan. Behavior of the scan varies by the type of the entry: • A FQDN/IP such as www.example.com. Assume HTTP and scan the entire web site located on this host. • A partial URL such as https://webmail.example.com/dir1/. Use the protocol specified in the URL, and scan the web pages located in this directory of the web site. Other directories will be ignored. • A full URL such as http://example.com/dir1/start.jsp. Use the protocol specified in the URL, starting from the web page in the URL, and scan all local URLs reachable via links from this web page that are located within the same subdirectory. Links to external web sites and redirects using HTTP 301 Moved Permanently or 302 Moved Temporarily or Found will not be followed. Unless you will enter an IP address for the host, you must have configured a DNS server that the FortiWeb appliance can use to query for the FQDN. For details, see “Configuring DNS settings”. Note: This starting point for the scan can be overridden if the web server automatically redirects the request after authentication. See Login with HTTP Authentication and Login with specified URL/data. |
Scan | Enable detection of any of the following vulnerabilities that you want to include in the scan report: • Common Web Server Vulnerability (outdated software and software with known memory leaks, buffer overflows, and other problems) • XSS (Cross-site Scripting) • SQL Injection • Source-code Disclosure • OS Commanding |
Scan Mode | Select whether the scan job will use Basic Mode (use HTTP GET only and omit both user-defined and predefined sensitive URLs) or Enhanced Mode (use both HTTP POST and GET, excluding only user-defined URLs). Also configure Exclude scanning following URLs. Basic Mode will avoid alterations to the web site’s databases, but only if all inputs always uses POST requests. It also omits testing of the following URLs, which could be sensitive: • /formathd • /formatdisk • /shutdown • /restart • /reboot • /reset Caution: Fortinet strongly recommends that you do not scan for vulnerabilities on live web sites, even if you use Basic Mode. Instead, duplicate the web site and its database into a test environment, and then use Enhanced Mode with that test environment. Basic Mode cannot be guaranteed to be non-destructive. Many web sites accept input through HTTP GET requests, and so it is possible that a vulnerability scan could result in database changes, even though it does not use POST. In addition, Basic Mode cannot test for vulnerabilities that are only discoverable through POST, and therefore may not find all vulnerabilities. |
Request Timeout | Type the number of seconds for the vulnerability scanner to wait for a response from the web site before it assumes that the request will not successfully complete, and continues with the next request in the scan. It will not retry requests that time out. |
Delay Between Each Request | Type the number of seconds to wait between each request. Some web servers may rate limit the number of requests, or blacklist clients that issue continuous requests and therefore appear to be a web site harvester or denial of service (DoS) attacker. Introducing a delay can be useful to prevent the vulnerability scanner from being blacklisted or rate limited, and therefore slow or unable to complete its scan. Note: Increasing the delay will increase the time required to complete the scan. |

Setting name | Description | |
Login with HTTP Authentication | Enable to use basic HTTP authentication if the web server returns HTTP 401 Unauthorized to request authorization. Also configure User and Password. Alternatively, configure Login with specified URL/data. After authentication, if the web server redirects the request (HTTP 302), the FortiWeb appliance will use this new web page as its starting point for the scan, replacing the URL that you configured in Hostname/IP or URL. Note: If a web site requires authentication and you do not configure the vulnerability scan to authenticate, the scan results will be incomplete. | |
User | Type the user name to provide to the web site if it requests HTTP authentication. | |
Password | Type the password corresponding to the user name. | |
Login with specified URL/data | Enable to authenticate if the web server does not use HTTP 401 Authorization Required, but instead provides a web page with a form that allows the user to authenticate using HTTP POST. Also configure Authenticate URL and Authenticate Data. After authentication, if the web server redirects the request (HTTP 302 Found), the FortiWeb appliance will use this new web page as its starting point for the scan, replacing the URL that you configured in Hostname/IP or URL. Note: If a web site requires authentication and you do not configure it, the scan results will be incomplete. | |
Authenticate URL | Type the URL, such as /login.jsp, that the vulnerability scan will use to authenticate with the web application before beginning the scan. | |
Authenticate Data | Type the parameters, such as userid=admin&password=Re2b8WyUI, that will be accompany the HTTP POST request to the authentication URL, and contains the values necessary to authenticate. Typically, this string will include user name and password parameters, but may contain other variables, depending on the web application. | |
Setting name | Description | |
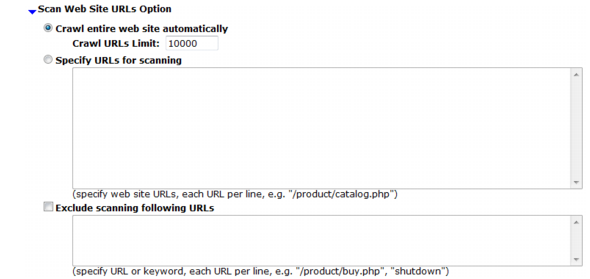
Crawl entire website automatically | Select this option to automatically follow links leading from the initial starting point that you configured in Hostname/IP or URL. The vulnerability scanner will stop following links when it has scanned the number of URLs configured in Crawl URLs Limit. Alternatively, select Specify URLs for scanning. | |
Crawl URLs Limit | Type the maximum number of URLs to scan for vulnerabilities while automatically crawling links leading from the initial starting point. Note: The actual number of URLs scanned could exceed this limit if the vulnerability scanner reaches the limit but has not yet finished crawling all links on a page that it has already started to scan. | |
Specify URLs for scanning | Select this option to manually specify which URLs to scan, such as /login.do, rather than having the vulnerability scanner automatically crawl the web site. Enter each URL on a separate line in the text box. You can enter up to 10,000 URLs. | |
Exclude scanning following URLs | Enable to exclude specific URLs, such as /addItem.cfm, from the vulnerability scan. Enter each URL on a separate line in the text box. This may be useful to accelerate the scan if you know that some URLs do not need scanning. It could also be useful if you are scanning a live web site and wish to prevent the scanner from inadvertently adding information to your databases. You can enter up to 1,000 URLs. | |