Adding a gateway
Static routes direct traffic exiting the FortiWeb appliance based upon the packet’s destination — you can specify through which network interface a packet leaves and the IP address of a next-hop router that is reachable from that network interface. Routers are aware of which IP addresses are reachable through various network pathways and can forward those packets along pathways capable of reaching the packets’ ultimate destinations. Your FortiWeb itself does not need to know the full route, as long as the routers can pass along the packet.
You must configure FortiWeb with at least one static route that points to a router, often a router that is the gateway to the Internet. You may need to configure multiple static routes if you have multiple gateway routers (e.g. each of which should receive packets destined for a different subset of IP addresses), redundant routers (e.g. redundant Internet/ISP links), or other special routing cases.
However, often you will only need to configure one route: a default route.
| True transparent and transparent inspection operation modes require that you specify the gateway when configuring the operation mode. In that case, you have already configured a static route. You do not need to repeat this step. |
For example, if a web server is directly attached to one physical port on the FortiWeb, but all other destinations, such as connecting clients, are located on distant networks, such as the Internet, you might need to add only one route: a default route that indicates the gateway router through which FortiWeb sends traffic towards the Internet.
When you add a static route through the web UI, the FortiWeb appliance evaluates the route to determine if it represents a different route compared to any other route already present in the list of static routes. If no route having the same destination exists in the list of static routes, the FortiWeb appliance adds the static route, using the next unassigned route index number.
You can also configure FortiWeb to route traffic to a specific network interface/gateway combination based on a packet’s source and destination IP address, instead of the static route configuration. For more information, see
“Creating a policy route”.
To add a static route via the web UI
1. Go to System > Network > Static Route.
To access this part of the web UI, your administrator account’s access profile must have
Read and
Write permission to items in the
Router Configuration category. For details, see
“Permissions”.
2. Click Create New.
A dialog appears.
3. Configure these settings:
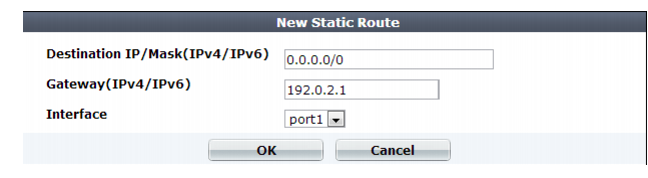
Setting name | Description |
Destination IP/Mask | Type the destination IP address and network mask of packets that will be subject to this static route, separated by a slash ( / ). The value 0.0.0.0/0.0.0.0 or ::/0 results in a default route, which matches the DST field in the IP header of all packets. |
Gateway | Type the IP address of the next-hop router where the FortiWeb forwards packets subject to this static route. This router must know how to route packets to the destination IP addresses that you have specified in Destination IP/Mask, or forward packets to another router with this information. For a direct Internet connection, this is the router that forwards traffic towards the Internet, and could belong to your ISP. Caution: The gateway IP address must be in the same subnet as the interface’s IP address. Failure to do so will cause FortiWeb to delete all static routes, including the default gateway. |
Interface | Select the name of the network interface through which the packets subject to the static route will egress towards the next-hop router. |
| Making a default route for your FortiWeb is a typical best practice: if there is no other, more specific static route defined for a packet’s destination IP address, a default route will match the packet, and pass it to a gateway router so that any packet can reach its destination. If you do not define a default route, and if there is a gap in your routes where no route matches a packet’s destination IP address, packets passing through the FortiWeb towards those IP addresses will, in effect, be null routed. While this can help to ensure that unintentional traffic cannot leave your FortiWeb and therefore can be a type of security measure, the result is that you must modify your routes every time that a new valid destination is added to your network. Otherwise, it will be unreachable. A default route ensures that this kind of locally-caused “destination unreachable” problem does not occur. |
4. Click OK.
The FortiWeb appliance should now be reachable to connections with networks indicated by the mask.
5. To verify connectivity, from a host on the route’s destination network, attempt to connect to the FortiWeb appliance’s web UI via HTTP and/or HTTPS. (At this point in the installation, you have not yet configured a policy, and therefore, if in reverse proxy mode, cannot test connectivity through the FortiWeb.)
If the connectivity test fails, you can use the CLI commands:
execute ping <destination_ip4>
to determine if a complete route exists from the FortiWeb to the host, and
execute traceroute <destination_ipv4>
to determine the point of connectivity failure.
Also enable
PING on the FortiWeb’s network interface, or configure an IP address on the bridge, then use the equivalent
tracert or
traceroute command on the host (depending on its operating system) to test routability for traffic traveling in the opposite direction: from the host to the FortiWeb.
• If these tests
fail, or if you do not want to enable
PING, first examine the static route configuration on both the host and FortiWeb.
To display the routing table, enter the CLI command:
diagnose network route list
You may also need to verify that the physical cabling is reliable and not loose or broken, that there are no IP address or MAC address conflicts or blacklisting, and otherwise rule out problems at the physical, network, and transport layer.
• If these tests succeed, a route exists, but you cannot connect using HTTP or HTTPS, an application-layer problem is preventing connectivity.
Verify that you have enabled
HTTPS and/or
HTTP on the network interface. Also examine routers and firewalls between the host and the FortiWeb appliance to verify that they permit HTTP and/or HTTPS connectivity between them. Finally, you can also use the CLI command:
diagnose system top 5 30
to verify that the daemons for the web UI and CLI, such as
sshd,
newcli, and
httpsd are running and not overburdened. For details, see the
FortiWeb CLI Reference.
To add a default route via the CLI
1. Enter the following commands:
config router static
edit <route_index>
set gateway <gateway_ipv4>
set device <interface_name>
end
where:
• <route_index> is the index number of the route in the list of static routes
• <gateway_ipv4> is the IP address of the gateway router
• <interface_name> is the name of the network interface through which packets will egress, such as port1
The FortiWeb appliance should now be reachable to connections with networks indicated by the mask.
2. To verify connectivity, from a host on the network applicable to the route, attempt to connect to the FortiWeb appliance’s web UI via HTTP and/or HTTPS. (At this point in the installation, you have not yet configured a policy, and therefore, if in reverse proxy mode, cannot test connectivity through the FortiWeb.)
If the connectivity test fails, you can use the CLI commands:
execute ping
to determine if a complete route exists from the FortiWeb to the host, and
execute traceroute
to determine the point of connectivity failure. For details, see the
FortiWeb CLI Reference. Also enable
ping on the FortiWeb (see
“To configure a network interface’s IPv4 address via the CLI”), then use the equivalent
tracert or
traceroute command on the host (depending on its operating system) to test routability for traffic traveling in the opposite direction: from the host to the FortiWeb.
• If these tests
fail, or if you do not want to enable
PING, first examine the static route configuration on both the host and FortiWeb.
To display all routes with their priorities, enter the CLI command:
diagnose network route list
You may also need to verify that the physical cabling is reliable and not loose or broken, that there are no IP address or MAC address conflicts or blacklisting, and otherwise rule out problems at the physical, network, and transport layer.
• If these tests succeed, a route exists, but you cannot connect using HTTP or HTTPS, an application-layer problem is preventing connectivity.
Verify that you have enabled
http and/or
http on the network interface (
“To configure a network interface’s IPv4 address via the CLI”). Also examine routers and firewalls between the host and the FortiWeb appliance to verify that they permit HTTP and/or HTTPS connectivity between them. Finally, you can also use the CLI command:
diagnose system top 5 30
to verify that the daemons for the web UI and CLI, such as
sshd,
newcli, and
httpsd are running and not overburdened. For details, see the
FortiWeb CLI Reference.
See also