Reports
FortiWeb can generate reports based upon:
• attack, event, and traffic log messages
• vulnerability scans for PCI compliance
When generating a log-based or scan-based report, FortiWeb appliances collate information collected from log files and scan results, and present the information in tabular and graphical format.
Before it can generate a report, in addition to log files and scan results, FortiWeb appliances require a report profile in order to generate a report. A report profile is a group of settings that contains the report name, file format, subject matter, and other aspects that the FortiWeb appliance considers when generating the report.
FortiWeb appliances can generate reports automatically, according to the schedule that you configure in the report profile, or manually, when you click the Run now icon in the report profile list.
| Generating reports can be resource intensive. To avoid traffic processing performance impacts, you may want to generate reports during times with low traffic volume, such as at night or weekends. For more information on scheduling the generation of reports, see “Scheduling reports”. To determine the current traffic volume, see “Real Time Monitor widget”. |
| Consider sending reports to your web developers to provide feedback. If your organization develops web applications in-house, this can be a useful way to quickly provide them information on how to improve the security of the application. |
To configure a report profile
1. Before you generate a report, collect log data and/or vulnerability scan data that will be the basis of the report. For information on enabling logging to the local hard disk, see
“Configuring logging” and
“Vulnerability scans”.
2. Go to Log&Report > Report Config > Report Config.
To access this part of the web UI, your administrator’s account access profile must have
Read and
Write permission to items in the
Log & Report category. For details, see
“Permissions”.
3. Click Create New.
A dialog appears.
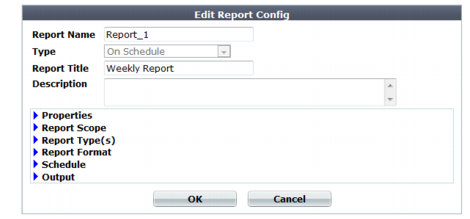
4. In Report Name, type the name of the report as it will be referenced in the configuration. The name cannot contain spaces.
5. If you are creating a new report profile, select from Type either to run the report immediately after configuration (On Demand) or run the report at configured intervals (On Schedule). This cannot be changed later.
| For on-demand reports, the FortiWeb appliance does not save the report profile after the generating the report. If you want to save the report profile, but do not want to generate the report at regular intervals, select On Schedule, but then in the Schedule section, select Not Scheduled. |
6. In Report Title, type a display name that will appear in the title area of the report. The title may include spaces.
7. In Description, type a comment or other description.
8. Click the blue expansion arrow next to each section, and configure the following:
Setting name | Description |
Properties | Select to add logos, headers, footers and company information to customize the report. For more information, see “Customizing the report’s headers, footers, & logo”. |
Report Scope | Select the time span of log messages from which to generate the report. You can also create a data filter to include in the report only those logs that match a set of criteria.For more information, see “Restricting the report’s scope”. |
Report Types | Select one or more subject matters to include in the report. For more information, see “Choosing the type & format of a report profile”. |
Report Format | Select the number of top items to include in ranked report subtypes, and other advanced features. For more information, see “Choosing the type & format of a report profile”. |
Schedule | Select when the FortiWeb appliance will run the report, such as weekly or monthly. For more information, see “Scheduling reports”. This section is available only if Type is On Schedule. |
Output | Select the file formats and destination email addresses, if any, of reports generated from this report profile. For more information, see “Selecting the report’s file type & email delivery”. |
9. Click OK.
On-demand reports are generated immediately. Scheduled reports are generated at intervals set in the schedule. For information on viewing generated reports, see
“Viewing & downloading generated reports”.
To generate a report immediately
1. Mark the check box of the report.
2. Click Run now.
See also