3. Configure the certificate signing request: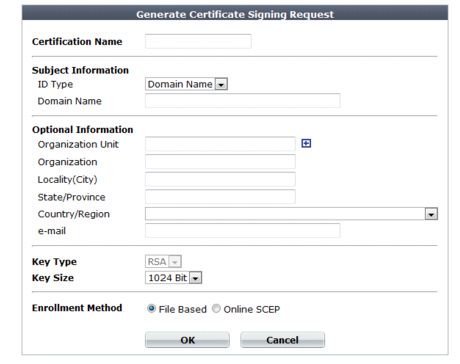
Setting name | Description | |
Certification Name | Enter a unique name for the certificate request, such as www.example.com. This can be the name of your web site. | |
Key Type | Displays the type of algorithm used to generate the key. This option cannot be changed, but appears in order to indicate that only RSA is currently supported. | |
Key Size | Select a secure key size of 512 Bit, 1024 Bit, 1536 Bit or 2048 Bit. Larger keys are slower to generate, but provide better security. | |
Enrollment Method | Select either: • File Based — You must manually download and submit the resulting certificate request file to a certificate authority (CA) for signing. Once signed, upload the local certificate. • Online SCEP — The FortiWeb appliance will automatically use HTTP to submit the request to the simple certificate enrollment protocol (SCEP) server of a CA, which will validate and sign the certificate. For this selection, two options appear. Enter the CA Server URL and the Challenge Password. | |
Subject Information | Includes information that the certificate is required to contain in order to uniquely identify the FortiWeb appliance. This area varies depending on the ID Type selection. | |
ID Type | Select the type of identifier to use in the certificate to identify the FortiWeb appliance: • Host IP — Select if the FortiWeb appliance has a static IP address and enter the public IP address of the FortiWeb appliance in the IP field. If the FortiWeb appliance does not have a public IP address, use E-Mail or Domain Name instead. • Domain Name — Select if the FortiWeb appliance has a static IP address and subscribes to a dynamic DNS service. Enter the FQDN of the FortiWeb appliance, such as www.example.com, in the Domain Name field. Do not include the protocol specification (http://) or any port number or path names. • E-Mail — Select and enter the email address of the owner of the FortiWeb appliance in the e-mail field. Use this if the appliance does not require either a static IP address or a domain name. The type you should select varies by whether or not your FortiWeb appliance has a static IP address, a fully-qualified domain name (FQDN), and by the primary intended use of the certificate. For example, if your FortiWeb appliance has both a static IP address and a domain name, but you will primarily use the local certificate for HTTPS connections to the web UI by the domain name of the FortiWeb appliance, you might prefer to generate a certificate based upon the domain name of the FortiWeb appliance, rather than its IP address. Depending on your choice for ID Type, related options appear. | |
IP | Type the static IP address of the FortiWeb appliance, such as 10.0.0.1. The IP address should be the one that is visible to clients. Usually, this should be its public IP address on the Internet, or a virtual IP that you use NAT to map to the appliance’s IP address on your private network. This option appears only if ID Type is Host IP. | |
Domain Name | Type the fully qualified domain name (FQDN) of the FortiWeb appliance, such as www.example.com. The domain name must resolve to the static IP address of the FortiWeb appliance or protected server. For more information, see “Configuring the network interfaces”. This option appears only if ID Type is Domain Name. | |
E-mail | Type the email address of the owner of the FortiWeb appliance, such as admin@example.com. This option appears only if ID Type is E-Mail. | |
Optional Information | Includes information that you may include in the certificate, but which is not required. | |
Organization unit | Type the name of your organizational unit (OU), such as the name of your department. This is optional. To enter more than one OU name, click the + icon, and enter each OU separately in each field. | |
Organization | Type the legal name of your organization. This is optional. | |
Locality(City) | Type the name of the city or town where the FortiWeb appliance is located. This is optional. | |
State/Province | Type the name of the state or province where the FortiWeb appliance is located. This is optional. | |
Country/Region | Select the name of the country where the FortiWeb appliance is located. This is optional. | |
e-mail | Type an email address that may be used for contact purposes, such as admin@example.com. This is optional. | |