1. Go to Web Anti-Defacement > Web Anti-Defacement > Web Site with Anti‑Defacement.
Anti-defacement backs up web pages only, not databases. Content that will not be backed up includes all database-driven content that is inserted into web pages using AJAX, PHP, JSP, ASP, or ColdFusion, such as bulletin boards, forums, blogs, and shopping carts: page content does not reside within the page markup itself, but instead resides in a back-end database that is queried and whose results are dynamically inserted into page content at runtime when the client requests a page. Separately from configuring anti-defacement, you should regularly back up MySQL, Oracle, PostgreSQL, and other databases and defend them with controls such as FortiDB. |
Before updating a web site where you are using web site anti-defacement, disable both the Enable Monitor and Restore Changed Files Automatically options. Otherwise, the FortiWeb appliance will perceive your changes as a defacement attempt and undo them. |
Field | Description |
Monitor | Indicates whether or not anti-defacement is currently enabled for the web site. • Green icon — Anti-defacement is enabled. • Flashing yellow-to-red icon — Anti-defacement is off because the Enable Monitor option is disabled. |
Connected | Indicates the connection results of the FortiWeb appliance’s most recent attempt to connect to the web site’s server. • Green check mark icon — The connection was successful. • Red X mark icon — The FortiWeb appliance was unable to connect. Verify the IP address/FQDN and login credentials of your anti-defacement configuration. If these are valid, verify that connectivity has not been interrupted by dislodged cables, routers, or firewalls. |
Total Files | Displays the total number of files on the web site. |
Total Backup | Displays the total number of files that have been backed up onto the FortiWeb appliance for recovery purposes. Those files that you choose not to monitor will not be backed up. |
Total Changed | Displays the total number of files that have changed. |
Setting name | Description |
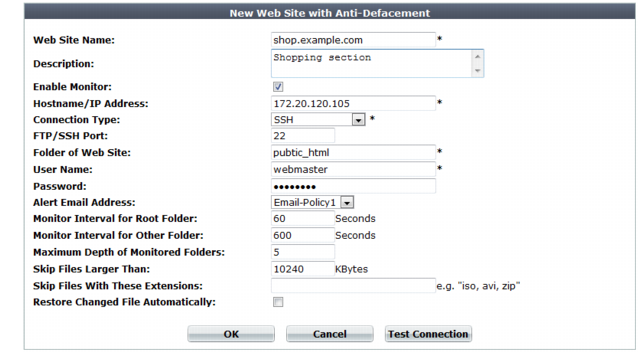
Web Site Name | Type a name for the web site. This name is not used when monitoring the web site. It does not need to be the web site’s FQDN or virtual host name. |
Description | Enter a comment. up to 63 characters long. This field is optional. |
Enable Monitor | Enable to monitor the web site’s files for changes, and to download backup revisions that can be used to revert the web site to its previous revision if the FortiWeb appliance detects a change attempt. Note: While you are intentionally modifying the web site, you must turn off this option and Restore Changed Files Automatically. Otherwise, the FortiWeb appliance will detect your changes as a defacement attempt, and undo them. |
Hostname/IP Address | Type the IP address or FQDN of the web server on which the web site is hosted. This will be used when connecting by SSH or FTP to the web site to monitor its contents and download backup revisions, and therefore could be different from the host name that may appear in the Host: field of HTTP headers. For example, clients might connect to the public DNS name www.example.com, while FortiWeb would connect using the web server’s private network IP address, 192.168.1.1. |
Connection Type | Select which protocol (FTP, SSH, or Windows Share) to use when connecting to the web site in order to monitor its contents and download web site backups. |
FTP/SSH Port | Enter the TCP port number on which the web site’s real server listens. The standard port number for FTP is 21; the standard port number for SSH is 22. |
Windows Share Name | Type the name of the shared folder on the web server, such as Share. Do not include the CIFS host name or workgroup name. This field appears only if Connection Type is Windows Share. |
Folder of Web Site | Type the path to the web site’s folder, such as public_html or wwwroot, on the real server. The path is relative to the initial location when logging in with the user name that you specify in User Name. |
User Name | Enter the user name, such as FortiWeb, that the FortiWeb appliance will use to log in to the web site’s real server. |
Password | Enter the password for the user name you entered in User Name. |
Alert Email Address | From the drop-down list, select existing email settings that contains one or more recipient email addresses (MAIL TO:) to which the FortiWeb appliance will send an email when it detects that the web site has changed. |
Monitor Interval for Root Folder | Enter the time interval in seconds between each monitoring connection from the FortiWeb appliance to the web server. During this connection, the FortiWeb appliance examines Folder of Web Site (but not its subfolders) to see if any files have changed by comparing the files with the latest backup. If it detects any file changes, the FortiWeb appliance will download a new backup revision. If you have enabled Restore Changed Files Automatically, the FortiWeb appliance will revert the files to their previous version. For details, see “Reverting a defaced web site”. |
Monitor Interval for Other Folder | Enter the time interval in seconds between each monitoring connection from the FortiWeb appliance to the web server. During this connection, the FortiWeb appliance examines subfolders to see if any files have been changed by comparing the files with the latest backup. If any file change is detected, the FortiWeb appliance will download a new backup revision. If you have enabled Restore Changed Files Automatically, the FortiWeb appliance will revert the files to their previous version. For details, see “Reverting a defaced web site”. |
Maximum Depth of Monitored Folders | Type how many folder levels deep to monitor for changes to the web site’s files. Files in subfolders deeper than this level are not backed up. |
Skip Files Larger Than | Type a file size limit in kilobytes (KB) to indicate which files will be included in the web site backup. Files exceeding this size will not be backed up. The default file size limit is 10 240 KB. Note: Backing up large files can impact performance. |
Skip Files With These Extensions | Type zero or more file extensions, such as iso, avi, to exclude from the web site backup. Separate each file extension with a comma. Note: Backing up large files, such as video and audio, can impact performance. |
Restore Changed Files Automatically | Enable to automatically restore the web site to the previous revision number when it detects that the web site has been changed. Disable to do nothing. In this case, you must manually restore the web site to a previous revision when the FortiWeb appliance detects that the web site has been changed. See “Reverting a defaced web site”. Note: While you are intentionally modifying the web site, you must turn off this option and Enable Monitor. Otherwise, the FortiWeb appliance will detect your changes as a defacement attempt, and undo them. Note: FortiWeb does not restore your back-end database, if any. If the web site has been defaced using SQL injection or similar attacks and its database-driven content has been affected, even if this option is enabled, you will need to manually restore the database. |
