To specify your back-end web servers, you first define a server pool. Pools contain one or more members that you specify using either their IP addresses or DNS domain names. FortiWeb protects these web servers and they are the recipients of traffic that is forwarded or allowed to pass through by FortiWeb.
|
|
You can also define web servers to be FortiWeb’s virtual servers. This chains multiple policies together, which may be useful in more complex traffic routing or rewriting situations. |
Tests for server availability (called “server health checks” in the web UI) poll web servers that are members of a server pool to determine their responsiveness before forwarding traffic. Server health checks can use TCP, HTTP/HTTPS, or ICMP ECHO_REQUEST (ping).
FortiWeb polls the server at the frequency set in the Interval option. If the appliance does not receive a reply within the timeout period, and you have configured the health check to retry, it attempts a health check again; otherwise, the server is deemed unresponsive. The FortiWeb appliance reacts to unresponsive servers by disabling traffic to that server until it becomes responsive.
|
|
If a web server will be unavailable for a long period, such as when a server is undergoing hardware repair, it is experiencing extended down time, or when you have removed a server from the server pool, you may improve the performance of your FortiWeb appliance by disabling connectivity to the web server, rather than allowing the server health check to continue to check for responsiveness. For details, see Enabling or disabling traffic forwarding to your servers. |
You can create a health check, use one of the predefined health checks, or clone one of the predefined health checks to use as a starting point for a custom health check. (You cannot modify the predefined health checks.)
To simplify health check creation, FortiWeb provides predefined health checks for each of the available protocols. Each predefined health check contains a single rule that specifies one of the available protocols. For example, instead of creating a health check that uses ICMP, you can apply HLTHCK_IMCP.
HLTHCK_HTTP and HLTHCK_HTTPS health checks test server responsiveness using the HEAD method and listening for the response code 200.
Your health check can use more than protocol to check server responsiveness. You can specify that a server is available if it passes a single test in the list of tests or only if it passes all the tests.
To view the status currently detected by server health checks, use the Policy Status dashboard. For details, see Policy Status dashboard.
1. Before configuring a server health check, if it requires a trigger, configure the trigger. For details, see Viewing log messages.
2. Go to Server Objects > Server > Health Check.
To access this part of the web UI, your administrator’s account access profile must have Read and Write permission to items in the Server Policy Configuration category. For details, see Permissions.
3. Do one of the following:
4. Configure these settings:
| Setting name | Description |
|---|---|
| Name |
Type a unique name that can be referenced in other parts of the configuration. Do not use spaces or special characters. The maximum length is 35 characters. Note: The name cannot be changed after this part of the configuration is saved. To rename a part of the configuration, clone it, select it in all parts of the configuration that reference the old name, then delete the item with the old name. |
| Relationship |
|
| Trigger Policy | Select the name of a trigger, if any, that will be used to log or notify an administrator if a server becomes unresponsive. |
5. Click OK.
6. In the rule list, do one of the following:
7. Configure the following settings:
| Setting name | Description |
|---|---|
| Protocol Type |
Select the protocol that the server health check uses to contact the server.
|
| URL Path |
Type the URL that the HTTP or HTTPS request uses to verify the responsiveness of the server (for example, If the web server successfully returns this URL, and its content matches your expression in Matched Content, it is considered to be responsive. This option appears only if Protocol Type is HTTP or HTTPS. The maximum length is 127 characters. |
| Timeout |
Type the maximum number of seconds that can pass after the server health check. If the web server exceeds this limit, it will indicate a failed health check. Valid values are 1 to 30. Default value is 3. |
| Retry Times |
Type the number of times, if any, that FortiWeb retries a server health check after failure. If the web server fails the server health check this number of times consecutively, it is considered to be unresponsive. Valid values are 1 to 10. Default value is 3. |
| Interval |
Type the number of seconds between each server health check. Valid values are 1 to 300. Default value is 10. |
| Method |
Specify whether the health check uses the HEAD, GET, or POST method. Available only when Protocol Type is HTTP or HTTPS. |
| Match Type |
Available only when Protocol Type is HTTP or HTTPS. |
| Matched Content |
Enter one of the following values:
This value prevents the test from falsely indicating that the server is available when it has actually replied with an error page, such as the one produced by Tomcat when a JSP application is not available. To create and test a regular expression, click the >> (test) icon. This opens a Regular Expression Validator window where you can fine-tune the expression (see Regular expression syntax) Available only if Protocol Type is HTTP or HTTPS and Match Type is All or Matched Content. |
| Response Code |
Enter the response code that you require the server to return to confirm that it is available. Available only if Protocol Type is HTTP or HTTPS and Match Type is All or Matched Content. |
8. Click OK to save the settings and close the rule.
9. Add any additional tests you want to include in the health check by adding additional rules.
10. Click OK to save and close the health check.
11. To use the server health check, select it in a server pool or server pool member configuration (see Creating a server pool).
After FortiWeb has forwarded the first packet from a client to a pool member, some protocols require that subsequent packets also be forwarded to the same back-end server until a period of time passes or the client indicates that it has finished transmission.
A session persistence configuration specifies a persistence method and timeout. You apply the configuration to Server Balance server pools to apply the persistence setting to all members of the pool.
1. Go to Server Objects > Server > Persistence.
2. Complete the following settings:
| Setting name | Description |
|---|---|
| Name | Type a unique name that can be referenced in other parts of the configuration. Do not use spaces or special characters. The maximum length is 63 characters. |
| Type |
Specifies how FortiWeb determines which pool member to forward subsequent requests from a client after it has forwarded the client’s initial request. For the initial request, FortiWeb selects a pool member using the load balancing method specified in the server pool configuration.
|
| Cookie Name | When the value of Type is Persistent Cookie, specifies the cookie name to match in an initial request from a client. If the cookie name in the initial request matches Persistent Cookie, FortiWeb forwards any subsequent requests with that cookie value the same pool member as the initial request. |
| Persistence Timeout |
Specifies the maximum amount of time between requests that FortiWeb maintains persistence, in seconds. FortiWeb stops forwarding requests according to the established persistence after this amount of time has elapsed since it last received a request from the client with the associated property (for example, an IP address or cookie). Instead, it again selects a pool member using the load balancing method specified in the server pool configuration. |
3. Click OK.
For information on applying the configuration to a pool, see Creating a server pool.
When FortiWeb maintains session persistence using cookies (Persistent Cookie, Insert Cookie), it tracks or inserts the cookie for the first transaction of a session only. It does not track or insert a cookie in subsequent transactions in the session, even if the transaction does not contain a control cookie.
This method maintains session persistence in most environments. However, it does not work if your environment uses TCP multiplexing, which combines HTTP requests from multiple clients in a single session for load balancing or other purposes.
To avoid this problem, use the following CLI command to configure the cookie-based session persistence feature to track or insert a control cookie for each transaction in a TCP session that does not already have a control cookie:
config server-policy policy
edit <policy_name>
set sessioncookie-enforce enable
You cannot use the web UI to enable this option. For more information, see the FortiWeb CLI Reference.
FortiWeb supports server-side SNI (Server Name Indication). You use this feature when you have the following configuration requirements:
In true transparent proxy mode, use the following CLI command to enable server-side SNI for the appropriate pool member:
config server-policy server-pool
edit <server-pool_name>
config pserver-list
edit <entry_index>
set server-side-sni {enable | disable}
In reverse proxy mode, use the following CLI command to enable server-side SNI in the appropriate server policy:
config server-policy policy
edit <policy_name>
set server-side-sni {enable | disable}
You cannot use the web UI to enable this option. For more information, see the FortiWeb CLI Reference.
Server pools define a group of one or more physical or domain servers (web servers) that FortiWeb distributes connections among, or where the connections pass through to, depending on the operating mode. (Reverse proxy mode actively distributes connections; offline protection and both transparent modes do not.)
Reverse proxy mode — When the FortiWeb appliance receives traffic destined for a virtual server, it forwards the traffic to a server pool. If the pool has more than one member, the physical or domain server that receives the connection depends on your configuration of load-balancing algorithm, weight, and server health checking.
For pools with multiple members, to prevent traffic from being forwarded to unavailable web servers, you can use a health check to verify the availability of members. The availability of other members and the Deployment Mode option in the policy determine whether the FortiWeb appliance redistributes or drops the connection when a physical or domain server in a server pool is unavailable.
A server can belong to more than one server pool.
1. Before you configure a server pool, do the following:
2. Go to Server Objects > Server > Server Pool.
To access this part of the web UI, your administrator’s account access profile must have Read and Write permission to items in the Server Policy Configuration category. For details, see Permissions.
3. Click Create New.
A dialog appears.
4. Configure these settings:
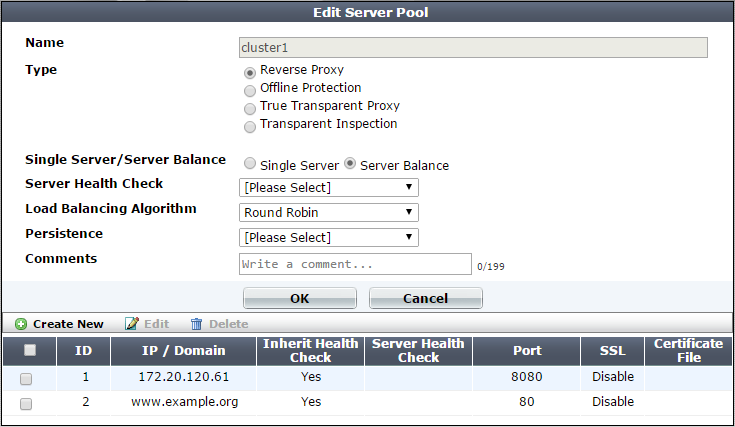
| Setting name | Description |
|---|---|
| Name | Type a name that can be referenced by other parts of the configuration. Do not use spaces or special characters. The maximum length is 63 characters. |
| Type |
Select the current operation mode of the appliance to display the corresponding pool options. For full information on the operating modes, see How to choose the operation mode. |
| Single Server/Server Balance |
Available only when Type is Reverse Proxy. |
| Server Health Check |
Specifies a test for server availability. By default, this health check is used for all pool members, but you can use the pool member configuration to assign a different health check to a member. For more information, see Configuring server up/down checks Available only when Type is Reverse Proxy and Single Server/Server Balance is Server Balance. |
| Load Balancing Algorithm |
Available only when Type is Reverse Proxy and Single Server/Server Balance is Server Balance. |
| Persistence |
Select a configuration that specifies a session persistence method and timeout to apply to the pool members. For more information, see Configuring session persistence. |
| Comments | Type a description of the server pool. The maximum length is 63 characters. |
6. Click Create New.
A dialog appears.
7. Configure these settings:

| Setting name | Description |
|---|---|
| ID |
The index number of the member entry within the server pool. FortiWeb automatically assigns the next available index number. For round robin-style load-balancing, the index number indicates the order in which FortiWeb distributes connections. The valid range is from 0 to 65,535. You can use the |
| Status |
|
| Server Type | Select either IP or Domain to indicate how you want to define the pool member. |
|
or |
Specify the IP address or fully-qualified domain name of the web server to include in the pool. Tip: The IP or domain server is usually not the same as a protected host names group. See Protected web servers vs. allowed/protected host names. Warning: Server policies do not apply features that do not yet support IPv6 to servers specified using IPv6 addresses or domain servers whose DNS names resolve to IPv6 addresses. Tip: For domain servers, FortiWeb queries a DNS server to query and resolve each web server’s domain name to an IP address. For improved performance, do one of the following:
The Server Type value determines the name of this option. |
| Port | Type the TCP port number where the pool member listens for connections. The valid range is from 1 to 65,535. |
| Weight |
If the pool member is part of a pool that uses the weighted round-robin load-balancing algorithm, type the weight of the member when FortiWeb distributes TCP connections. Members with a greater weight receive a greater proportion of connections. Weighting members can be useful when, for example, some servers in the pool are more powerful or if a member is already receiving fewer or more connections due to its role in multiple web sites. This field appears only if Type is Server Balance. |
| Inherit Health Check | Clear to use the health check specified by Server Health Check Check in this server pool rule instead of the one specified in the server pool configuration. |
| Server Health Check |
Specifies an availability test for this pool member. For more information, see Configuring server up/down checks. |
| SSL |
For reverse proxy, offline protection, and transparent inspection modes, enable to use SSL/TLS for connections between FortiWeb and the pool member. For true transparent proxy:
For offline protection and transparent inspection modes, also configure Certificate File. FortiWeb uses the certificate to decrypt and scan connections before passing the encrypted traffic through to the pool members (SSL inspection). Note: Ephemeral (temporary key) Diffie-Hellman exchanges are not supported if the FortiWeb appliance is operating in transparent inspection or offline protection mode. For true transparent proxy, also configure Certificate File, Client Certificate, and the settings described in step 8. FortiWeb handles SSL negotiations and encryption and decryption, instead of the pool member (SSL offloading). For reverse proxy mode
Note: When this option is enabled, the pool member must be configured to apply SSL. |
| Certificate File |
Do one of the following:
For true transparent proxy operating mode, also complete the settings described in described in step 8. Available when:
|
| Client Certificate |
If connections to this pool member require a valid client certificate, select the client certificate that FortiWeb uses. Available when:
Upload a client certificate for FortiWeb using the steps you use to upload a server certificate. See Uploading a server certificate. |
| Weight |
If the pool member is part of a pool that uses the weighted round-robin load-balancing algorithm, type the weight of the member when FortiWeb distributes TCP connections. Members with a greater weight receive a greater proportion of connections. Weighting members can be useful when, for example, some servers in the pool are more powerful or if a member is already receiving fewer or more connections due to its role in multiple web sites. This field appears only if Type is Server Balance. |
8. If the operating mode is transparent proxy and SSL is enabled, complete the following additional settings to complete the SSL offloading configuration:
| Setting name | Description |
|---|---|
| Certificate Intermediate Group |
Select the name of a group of intermediate certificate authority (CA) certificates, if any, that FortiWeb presents to clients. An intermediate CA can complete the signing chain and validate the server certificate’s CA signature. Configure this option when clients receive certificate warnings that an intermediary CA has signed the server certificate specified by Certificate File, not a root CA or other CA currently trusted by the client directly. Alternatively, you can include the entire signing chain in the server certificate itself before you upload it to FortiWeb. See Uploading a server certificate and Supplementing a server certificate with its signing chain. |
| Show/Hide advanced SSL settings |
Click to show or hide the settings that allow you to specify a Server Name Indication (SNI) configuration, increase security by disabling specific versions of TLS and SSL for this pool member, and other advanced SSL settings. For example, if FortiWeb can use a single certificate to decrypt and encrypt traffic for all the web sites that reside on the pool member, you may not have to set any advanced SSL settings. For more information, see the descriptions of the individual settings. |
| Add HSTS Header |
Enable to combat MITM attacks on HTTP by injecting the RFC 6797 strict transport security header into the reply, such as: Strict-Transport-Security: max-age=31536000; includeSubDomains This header forces clients to use HTTPS for subsequent visits to this domain. If the certificate is invalid, the client’s web browser receives a fatal connection error and does not display a dialog that allows the user to override the certificate mismatch error and continue. |
| Certificate Verification |
Select the name of a certificate verifier, if any, that FortiWeb uses to validate an HTTP client’s personal certificate. However, if you select Enable Server Name Indication (SNI) and the domain in the client request matches an entry in the specified SNI policy, FortiWeb uses the SNI configuration to determine which certificate verifier to use. If you do not select a verifier, clients are not required to present a personal certificate. See also How to apply PKI client authentication (personal certificates). Personal certificates, sometimes also called user certificates, establish the identity of the person connecting to the web site (PKI authentication). You can require that clients present a certificate instead of, or in addition to, HTTP authentication (see Offloading HTTP authentication & authorization). Note: The client must support SSL 3.0, TLS 1.0, TLS 1.1, or TLS 1.2. When the operating mode is reverse proxy, you can select this option in the server policy. |
| Enable URL Based Client Certificate | Specifies whether FortiWeb uses a URL-based client certificate group to determine whether a client is required to present a personal certificate. |
| URL Based Client Certificate Group |
Specifies the URL-based client certificate group that determines whether a client is required to present a personal certificate. If the URL the client requests does not match an entry in the group, the client is not required to present a personal certificate. For information on creating a group, see Use URLs to determine whether a client is required to present a certificate. |
| Max HTTP Request Length |
Specifies the maximum allowed length for an HTTP request with a URL that matches an entry in the URL-based client certificate group. FortiWeb blocks any matching requests that exceed the specified size. This setting prevents a request from exceeding the maximum buffer size. |
| Client Certificate Forwarding |
Enable to configure FortiWeb to include the X.509 personal certificate presented by the client during the SSL/TLS handshake, if any, in an FortiWeb still validates the client certificate itself, but this forwarding action can be useful if the web server requires the client certificate for the purpose of server-side identity-based functionality. |
| Enable Server Name Indication (SNI) |
Select to use a Server Name Indication (SNI) configuration instead of or in addition to the server certificate specified by Certificate File. The SNI configuration enables FortiWeb to determine which certificate to present on behalf of the pool member based on the domain in the client request. See Allowing FortiWeb to support multiple server certificates. If you specify both an SNI configuration and Certificate File, FortiWeb uses the certificate specified by Certificate File when the domain in the client request does not match a value in the SNI configuration. If you select Enable Strict SNI, FortiWeb always ignores the value of Certificate File. |
| Enable Strict SNI |
Select to configure FortiWeb to ignore the value of Certificate File when it determines which certificate to present on behalf of the pool member, even if the domain in a client request does not match a value in the SNI configuration. Available only if Enable Server Name Indication (SNI) is selected. |
| SNI Policy |
Select the Server Name Indication (SNI) configuration that FortiWeb uses to determine which certificate it presents on behalf of this pool member. Available only if Enable Server Name Indication (SNI) is selected. |
| SSL Protocols |
Specify which versions of the SSL or TLS cryptographic protocols clients can use to connect securely to this pool member. For more information, see Supported cipher suites & protocol versions. |
| SSL/TLS encryption level |
Specify whether the set of cipher suites that FortiWeb allows creates a medium-security or high-security configuration. For more information, see Supported cipher suites & protocol versions. |
| Enable Perfect Forward Secrecy |
Enable to configure FortiWeb to generate a new public-private key pair when it establishes a secure session with a Diffie–Hellman key exchange. Perfect forward secrecy (PFS) improves security by ensuring that the key pair for a current session is unrelated to the key for any future sessions. |
| Prioritize RC4 Cipher Suite |
Enable to configure FortiWeb to use the RC4 cipher when it first attempts to create a secure connection with a client. This option protects against a BEAST (Browser Exploit Against SSL/TLS) attack, a TLS 1.0 vulnerability. Enable only when TLS 1.0 is enabled in SSL Protocols and SSL/TLS encryption level is Medium. |
| Disable Client-Initiated SSL Renegotiation |
Select to ignore requests from clients to renegotiate TLS or SSL. This setting protects against denial-of-service (DoS) attacks that use TLS/SSL renegotiation to overburden the server. |
9. Repeat the previous steps for each IP address or domain that you want to add to the server pool.
10. Click OK.
11. To apply the server pool configuration, do one of the following:
See Configuring a server policy and Routing based on HTTP header content, source IP, or cookie.
Instead of dynamically routing requests to a server pool simply based upon load or connection distribution at the TCP/IP layers, as basic load balancing does, you can forward them based on headers in the HTTP layer.
HTTP header-based routes (called “HTTP content routing policies” in the web UI) define how FortiWeb routes requests to server pools. They are based on one or more of the following HTTP header elements:
This type of routing can be useful if, for example, a specific web server or group of servers on the back end support specific web applications, functions, or host names. That is, your web servers or server pools are not identical, but specialized. For example:
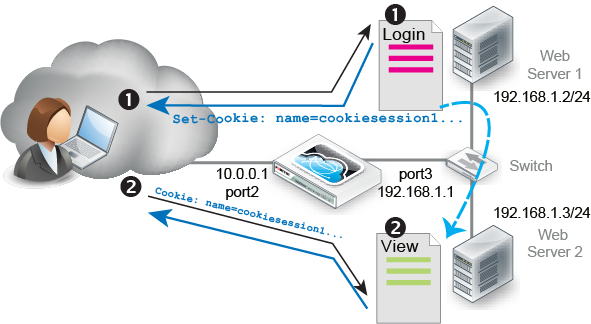
Another example is a topology where back-end servers or a traffic controller (TC) server externally manage how FortiWeb routes and balances the traffic load. The TC embeds a cookie that indicates how to route the client’s next request. In the diagram, if a request has no cookie (that is, it initializes a session), FortiWeb’s HTTP content routing is configured to forward that request to the TC, Web Server 1. For subsequent requests, as long as the cookie exists, FortiWeb routes those requests to Web Server 2.,
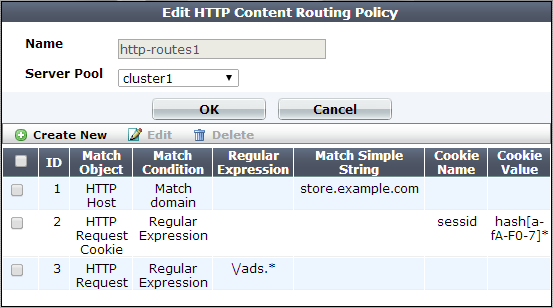
1. Go to Server Objects > Server > HTTP Content Routing.
To access this part of the web UI, your administrator’s account access profile must have Read and Write permission to items in the Server Policy Configuration category. For details, see “Permissions” on page 51.
2. Click Create New.
3. For Name, enter a unique name that can be referenced in other parts of the configuration. Do not use spaces or special characters. The maximum length is 63 characters.
4. For Server Pool, select a server pool. FortiWeb forwards traffic to this pool when the traffic matches rules in this policy.
You select only one server pool for each HTTP content routing configuration. However, multiple HTTP content routing configurations can use the same server pool.
For more information, see Creating a server pool.
5. Click OK, then click Create New.
6. Configure these settings:

|
|
If you have configured request rewriting, configure HTTP content-based routing based on the original request, as it appears beforeFortiWeb has rewritten it. For more information on rewriting, see Rewriting & redirecting. |
| Setting name | Description |
|---|---|
| Match Object |
Select one of the following as the object that FortiWeb examines for matching values:
|
| Match Condition |
Specifies whether the value to match is a literal value that appears in the object or a regular expression. The value of Match Object determines which content types you can select. For HTTP Host, HTTP Request, and HTTP Referer only:
For HTTP Host only:
For example, if Match Simple String is
However, the same Match Simple String value does not match the following hostnames:
For HTTP Request, and HTTP Referer only:
For example, if Match Simple String is
However, the same Match Simple String value does not match the following hostnames:
For all object types:
|
| Match Simple String |
Specifies a value to match in the object element specified by Match Object and Match Condition. Displayed when the condition to match is a prefix, suffix, part of the domain name, or other literal object value. For example, a literal URL, such as |
| Regular Expression |
Specifies a regular expression to match a value in the object element specified by Match Object and Match Condition. Displayed when the value of Match Condition is Regular Expression. For example, an expression, such as To create and test a regular expression, click the >> (test) icon. This opens the Regular Expression Validator window where you can fine-tune the expression (see Regular expression syntax). |
| Cookie Name |
Enter a regular expression to match the name of the cookie that appears in an HTTP header. For example, the name of a cookie embedded by traffic controller software on one of the servers. Displayed when Match Object is HTTP Request Cookie. To create and test a regular expression, click the >> (test) icon. This opens the Regular Expression Validator window where you can fine-tune the expression (see Regular expression syntax). |
| Cookie Value |
Enter a regular expression that matches all and only the cookie values you want the rule to apply to. For example, To create and test a regular expression, click the >> (test) icon. This opens the Regular Expression Validator window where you can fine-tune the expression (see Regular expression syntax). |
7. Click OK.
8. Repeat the rule creation steps for each HTTP host, HTTP request, or other object that you want to route to this server pool.
9. Click OK.
10. Repeat the policy creation procedure for each server pool, as required. You can also create additional policies that select the same server pool.
11. To apply a HTTP content routing policy, select it in a server policy. When you add HTTP content routing polices to a policy, you also select a default policy. The default policy routes traffic that does not match any conditions found in the specified routing policies.
For more information, see Configuring a server policy.
Your FortiWeb appliance might have one virtual server (the front end) protecting three physical web servers (the back end).
From the perspective of clients connecting to the front end, there is one domain name: www.example.com. At this host name, there are three top-level URLs:
In a client’s web browser, therefore, they might go to the location:
http://www.example.com/games
Behind the FortiWeb, however, each of those 3 web applications actually resides on separate back-end web servers with different IP addresses, and each has its own server pool:
In this case, you configure HTTP content routing so FortiWeb routes HTTP requests to http://www.example.com/school to the server pool that contains 10.0.0.12. Similarly, requests for the URL /games go to a pool that contains 10.0.0.11, and requests for the URL /work go to a pool that contains 10.0.0.13.
Your FortiWeb appliance might have one virtual server (the front end) protecting three physical web servers (the back end).
From the perspective of clients connecting to the front end, Example Company’s web site has a few domain names:
Public DNS resolves all of these domain names to one IP address: the virtual server on FortiWeb.
At the data center, behind the FortiWeb, separate physical web servers host some region-specific web sites. Other web sites have lighter traffic and are maintained by the same person, and therefore a shared server hosts them. Each back-end web server has a DNS alias. When you configure the server pools, you define each pool member using its DNS alias, rather than its IP address:
While public DNS servers all resolve these aliases to the same IP address — FortiWeb’s virtual server — your private DNS server resolves these DNS names to separate IPs on your private network: the back-end web servers.
In this case, you configure HTTP content routing to route requests from clients based on the original Host: field in the HTTP header to a server pool that contains the appropriate DNS aliases. The destination back-end web server is determined at request time using server health check statuses, as well as private network DNS that resolves the DNS alias into its current private network IP address:
If you need to maintain HTTP session continuity for web applications, ensure the pool have a persistence policy that forwards subsequent requests from a client to the same back-end web server as the initial request.
In some cases, HTTP header-based routing is not enough. It must be, or should be, combined with request or response rewriting.
Example.com hosts calendar, inventory, and customer relations management web applications separately: one app per specialized server. Each web application resides in its web server’s root folder ( / ). Each back-end web server is named after the only web application that it hosts:
Therefore each request must be routed to a specific back-end web server. Requests for the calendar application forwarded to crm.example.com, for example, would result in an HTTP 404 error code.
These back-end DNS names are publicly resolvable. However, for legacy reasons, clients may request pages as if all apps were hosted on a single domain, www.example.com:
Because the URLs requested by clients (prefixed by /calendar etc.) do not actually exist on the back-end servers, HTTP header-based routing is not enough. Alone, HTTP header-based routing with these older location structures would also result in HTTP 404 error codes, as if the clients’ requests were effectively for:
To compensate for the new structure on the back end, request URLs must be rewritten: FortiWeb removes the application name prefix in the URL.
![]()
For performance reasons, FortiWeb also rewrites the Host: field. All subsequent requests from the client use the correct host and URL and do not require any modification or HTTP-based routing. Otherwise, FortiWeb would need to rewrite every subsequent request in the session, and analyze the HTTP headers for routing every subsequent request in the session.