
Managing a FortiSwitch with a FortiGate
This handbook chapter provides information about how to set up and configure managed FortiSwitches using the FortiGate (termed “using FortiSwitch in FortiLink mode”).
FortiLink is not supported in Transparent mode.
The maximum number of supported FortiSwitches depends on the FortiGate model:
| FortiGate Model Range | Number of FortiSwitches Supported |
|---|---|
| Up to FortiGate-98 and FortiGate-VM01 | 8 |
| FortiGate-100 to 280 and FortiGate-VM02 | 24 |
| FortiGate-300 to 5xx | 48 |
| FortiGate-600 to 900 and FortiGate-VM04 | 64 |
| FortiGate-1000 and up | 128 |
| FortiGate-3xxx and up, and FortiGate-VM08 and up | 256 |
Supported models
The following table shows the FortiSwitch models that support FortiLink mode when paired with the corresponding FortiGate models and the listed minimum software releases.
| FortiGate and FortiWiFi Models | Earliest FortiOS | FortiSwitch Models |
|---|---|---|
|
FGT-90D |
5.2.2 | FS-224D-POE |
| FGT-60D FGT-100D, 140D, 140D-POE, 140D-T1 FGT-200D, 240D, 280D, 280D-POE FGT-600C FGT-800C FGT-1000C, 1200D, 1500D FGT-3700D, FGT-3700DX |
5.2.3 |
FSR-112D-POE FS-108D-POE FS-124D (POE) FS-224D-POE and FPOE |
|
5.4.0 |
All FortiSwitch D-series models. FortiSwitchOS 3.3.x or 3.4.0 is recommended. |
|
| FGT and FWF-30D, 30D-POE, 30E
FGT and FWF-50E, 51E FGR-60D FGT-70D, 70D-POE FGT-80D FGR-90D FGT and FWF-92D FGT-94D-POE, 98D-POE FGT-300D FGT-400D FGT-500D FGT-600D FGT-900D FGT-1000D FGT-3000D, 3100D, 3200D, 3240C, 3600C, 3810D, 3815D FGT_VM, VM64, VM64-AWS, VM64- AWSONDEMAND, VM64-HV, VM64-KVM, VM-VMX, VM64-XEN |
5.4.1 | All FortiSwitch D-series models. FortiSwitchOS 3.4.2 or later is required for all managed switches. |
| FGT and FWF- 60E, 61E
FGT-100E, 101E |
5.4.2 | All FortiSwitch D-series models.
FortiSwitch 3.4.2 or later is required for all managed switches. |
| FGT-80E, 80E-POE, 81E, 81E-POE FGT-100EF |
5.4.3 | All FortiSwitch D-series models.
FortiSwitch 3.4.2 or later is required for all managed switches. |
| FGT-90E, 91E FGT-200E, 201E FGT-2000E, 2500E |
5.6.0 | All FortiSwitch D-series models.
FortiSwitch 3.5.4 or later is required for all managed switches. |
| FGT-500E | 5.6.3 | All FortiSwitch D-series and E-series models.
FortiSwitch 3.6.0 or later is required for all managed switches. |
Refer to Managing a FortiSwitch with a FortiGate for details about the features supported on each FortiSwitch model.
Before you begin
Before you start administrating your FortiSwitch unit, it is assumed that you have completed the initial configuration of the FortiSwitch unit, as outlined in the QuickStart Guide for your FortiSwitch model and have administrative access to the FortiSwitch unit’s Web-based manager and CLI.
Whatʼs new for managed FortiSwitches in FortiOS 5.6.3 with FortiSwitch 3.6.3 (and later releases)
This section describes new managed FortiSwitch features in FortiOS 5.6.3 with FortiSwitch 3.6.3.
Firewall policy now required for RADIUS traffic (434470)
In FortiLink mode, you must manually create a firewall policy to allow RADIUS traffic for 802.1x authentication from the FortiSwitch (for example, from the FortiLink interface) to the RADIUS server through the FortiGate.
STP root guard (376015)
Enable root guard on all ports that should not be root bridges. Do not enable root guard on the root port. You must have STP enabled to be able to use root guard.
Using the FortiGate GUI
- Go to WiFi & Switch Controller > Managed FortiSwitch.
- Right-click on a port.
- Select Enable or Disable.
Using the FortiGate CLI
config switch-controller managed-switch
edit <switch-id>
config ports
edit <port name>
set stp-root-guard {enabled | disabled}
end
end
STP BPDU guard (406182)
When BPDU guard is enabled on STP edge ports, any BPDUs received cause the ports to go down for a specified number of minutes. The BPDUs are not forwarded, and the network edge is enforced.
There are two prerequisites for using BPDU guard:
- You must define the port as an edge port with the
set edge-port enablecommand. - You must enable STP on the switch interface with the
set stp-state enabledcommand.
Using the FortiGate GUI
- Go to WiFi & Switch Controller > Managed FortiSwitch.
- Right-click on a port.
- Select Enable or Disable.
Using the FortiGate CLI
config switch-controller managed-switch
edit <switch-id>
config ports
edit <port name>
set stp-bpdu-guard {enabled | disabled}
set stp-bpdu-guard-time <0-120>
end
end
FortiSwitch log message changes (438738)
More details are now provided in exported FortiSwitch logs, for example:
- New Switch-Controller user field and daemon-name ui fields.
- Removed Switch-Controller keyword from the msg field
- Changed UpdSwConf keyword in msg field to FortiSwitch in flcfgd logs
- Removed the VDOM keyword from the msg field in flcfgd logs
- Removed the Fortiswitch keyword before SN in the msg field
- Changed syslog to have switch SN first followed by a space and then the first word following with a capital (in the msg field)
Use the following CLI commands to enable the export of FortiSwitch logs and to set the level of logging included. The system logs all messages at and above the logging severity level you select. For example, if you select error, the system logs error, critical, alert, and emergency level messages.
config switch-controller switch-log
set status (*enable | disable)
set severity [emergency | alert | critical | error | warning | notification | *information | debug]
end
Support FSW BPDU Guard (442921) (442922)
With standard STP, a device that sends BPDU(s) to any switch port becomes a member of that switch’s STP network topology. In order to enforce a network edge, the access ports on the switch can be configured with BPDU guard. With BPDU guard enabled, the port does not forward BPDUs upstream (toward its root bridge). Instead, when a BPDU guard enabled port receives any BPDU, it immediately puts the port into a blocking state and alerts the user.
This prevents the access port from accepting the downstream device, removing it from the receiving switch’s STP calculations. In order to unblock the port after bpdu guard has triggered, the user must execute a reset command. After the port is reset, it will resume normal operation and return to a blocking state only if another BPDU is received.
BPDU guard is typically used in conjunction with Root Guard to enforce a specific network topology.
Syntax
config switch-controller managed-switch
edit <switch SN>
config ports
edit <port>
set stp-bpdu-guard <enable | *disable>
set stp-bpdu-guard-timeout <time> (0-120 in minutes)
next
end
next
end
config switch-controller managed-switch
edit <switch SN>
config ports
edit <port>
set stp-root-guard <enable | *disable>
next
end
next
end
diagnose switch-controller dump stp <switch SN> <instance>
diagnose switch-controller bpdu-guard-status <switch SN>
Managed switch CLI features added to GUI (448722)
Added new optional columns "Edge Port", "LLDP Profile", "QoS Policy", "STP BPDU Guard", "STP Root Guard" in WiFi & Switch Controller > FortiSwitch Ports.
This would allow administrators to make changes to the features above to multiple switch ports at the same time.
Added unit in help-text when setting max-rate/min-rate under switch-controller qos queue-policy (449487) (449869)
Modified the CLI help-text on the FortiGate to show priority under strict schedule when setting max-rate/min-rate under switch-controller qos queue-policy.
Syntax
set priority-0
queue-0 COS queue 0. (lowest priority)
queue-1 COS queue 1.
queue-2 COS queue 2.
queue-3 COS queue 3.
queue-4 COS queue 4.
queue-5 COS queue 5.
queue-6 COS queue 6.
queue-7 COS queue 7. (highest priority)
Added FortiSwitch factory-reset functionality to the FortiOS GUI (393205)
Added a Factory Reset button to the WiFi & Switch Controller > Managed FortiSwitch page when a FortiSwitch document is selected.
Syntax
execute switch-controller factory-rest <switch sn>
Whatʼs new for managed FortiSwitches in FortiOS 5.6.1 with FortiSwitch 3.6.0 (and later releases)
This section describes new managed FortiSwitch features in FortiOS 5.6.1 with FortiSwitch 3.6.0.
Simplified method to convert a FortiSwitch to standalone mode (393205)
There is an easier way to convert a FortiSwitch from FortiLink mode to standalone mode so that it will no longer be managed by a FortiGate:
execute switch-controller factory-reset <switch-id>
This command returns the FortiSwitch to the factory defaults and then reboots the FortiSwitch. If the FortiSwitch is configured for FortiLink auto-discovery, FortiGate can detect and automatically authorize the FortiSwitch.
execute switch-controller set-standalone <switch-id>
This command returns the FortiSwitch to the factory defaults, reboots the FortiSwitch, and prevents the FortiGate from automatically detecting and authorizing the FortiSwitch.
You can disable FortiLink auto-discovery on multiple FortiSwitches using the following commands:
config switch-controller global
set disable-discovery <switch-id>
end
You can also add or remove entries from the list of FortiSwitches that have FortiLink auto-discovery disabled using the following commands:
config switch-controller global
append disable-discovery <switch-id>
unselect disable-discovery <switch-id>
end
Quarantines (410828)
Quarantined MAC addresses are blocked on the connected FortiSwitches from the network and the LAN.
You must enable the quarantine feature in the FortiGate CLI using the set quarantine enable command. You can add MAC addresses to the quarantine list before enabling the quarantine feature, but the quarantine does not go into effect until enabled.
Quarantining a MAC address
Using the FortiGate GUI
- Select the host to quarantine.
- Go to Security Fabric > Physical Topology, right-click on a host, and select Quarantine Host on FortiSwitch.
- Go to Security Fabric > Logical Topology, right-click on a host, and select Quarantine Host on FortiSwitch.
- Go to FortiView > Sources, right-click on an entry in the Source column, and select Quarantine Host on FortiSwitch.
- Click OK to confirm that you want to quarantine the host.
Using the FortiGate CLI
config switch-controller quarantine
set quarantine enable
edit <MAC_address>
set description <string>
set tags <tag1 tag2 tag3 ...>
next
next
end
| Option | Description |
|---|---|
| MAC_address | A layer-2 MAC address in the following format: 12:34:56:aa:bb:cc |
| string | Optional. A description of the MAC address being quarantined. |
| tag1 tag2 tag3 ... | Optional. A list of arbitrary strings. |
Viewing quarantine entries
Quarantine entries are created on the FortiGate that is managing the FortiSwitch.
Using the FortiGate GUI
- Go to Monitor > Quarantine Monitor.
- Click Quarantined on FortiSwitch.
Using the FortiGate CLI
Use the following command to view the quarantine list of MAC addresses:
show switch-controller quarantine
When the quarantine feature is enabled on the FortiGate, it creates a quarantine VLAN (qtn.<FortiLink_port_name>) on the virtual domain. The quarantine VLAN is applied to the allowed and untagged VLANs on all connected FortiSwitch ports.
Use the following command to view the quarantine VLAN:
show system interface qtn.<FortiLink_port_name>
Use the following command to view how the quarantine VLAN is applied to the allowed and untagged VLANs on all connected FortiSwitch ports:
show switch-controller managed-switch
Releasing MAC addresses from quarantine
Using the FortiGate GUI
- Go to Monitor > Quarantine Monitor.
- Click Quarantined on FortiSwitch.
- Right-click on one of the entries and select Delete or Remove All.
- Click OK to confirm your choice.
Using the FortiGate CLI
Use the following commands to delete a quarantined MAC address:
config switch-controller quarantine
config targets
delete <MAC_address>
end
When the quarantine feature is disabled, all quarantined MAC addresses are released from quarantine. Use the following commands to disable the quarantine feature:
config switch-controller quarantine
set quarantine disable
end
Assign untagged VLANs to a managed FortiSwitch port (410828)
Use the following commands to assign untagged VLANs to a managed FortiSwitch port:
config switch-controller managed-switch
edit <managed-switch>
config ports
edit <port>
set untagged-vlans <VLAN-name>
next
end
next
end
View, create, and assign multiple 802.1X policy definitions (408389 and 403901)
Previously, you could create one 802.1X policy for all managed FortiSwitches in a virtual domain. Now, you can create multiple 802.1X policies and assign a different 802.1X policy to each managed FortiSwitch port.
View security policies for managed FortiSwitches
You can view security policies for managed FortiSwitches in two places:
- Go to WiFi & Switch Controller > FortiSwitch Security Policies.
- Go to WiFi & Switch Controller > FortiSwitch Ports and click the + next to a FortiSwitch. The security policy for each port is listed in the Security Policy column.
Create and assign multiple 802.1X policy definitions for managed FortiSwitches
Previously, you could create one 802.1X policy for all managed FortiSwitches in a virtual domain. Now, you can create multiple 802.1X policies and assign a different 802.1X policy to each managed FortiSwitch port.
To create an 802.1X security policy:
- Go to WiFi & Switch Controller > FortiSwitch Security Policies.
- Click Create New.
- Enter a name for the new FortiSwitch security policy.
- For the security mode, select Port-based or MAC-based.
- Click + to select which user groups will have access.
- Enable or disable guest VLANs on this interface to allow restricted access for some users.
- Enter the number of seconds for authentication delay for guest VLANs. The range is 60-900 seconds.
- Enable or disable authentication fail VLAN on this interface to allow restricted access for users who fail to access the guest VLAN.
- Enable or disable MAC authentication bypass (MAB) on this interface.
- Enable or disable EAP pass-through mode on this interface.
- Enable or disable whether the session timeout for the RADIUS server will overwrite the local timeout.
- Click OK.
To apply an 802.1X security policy to a managed FortiSwitch port:
- Go to WiFi & Switch Controller > FortiSwitch Ports.
- Click the + next to a FortiSwitch.
- In the Security Policy column for a port, click + to select a security policy.
- Click OK to apply the security policy to that port.
Override 802.1X settings
To override the 802.1X settings for a virtual domain:
- Go to WiFi & Switch Controller > Managed FortiSwitch.
- Click on a FortiSwitch faceplate and click Edit.
- In the Edit Managed FortiSwitch page, move the Override 802-1X settings slider to the right.
- In the Reauthentication Interval field, enter the number of minutes before reauthentication is required. The maximum interval is 1,440 minutes. Setting the value to 0 minutes disables reauthentication.
- In the Max Reauthentication Attempts field, enter the maximum times that reauthentication is attempted. The maximum number of attempts is 15. Setting the value to 0 disables reauthentication.
- Select Deauthenticate or None for the link down action. Selecting Deauthenticate sets the interface to unauthenticated when a link is down, and reauthentication is needed. Selecting None means that the interface does not need to be reauthenticated when a link is down.
- Click OK.
Enable and disable switch-controller access VLANs through FortiGate (406718)
Access VLANs are VLANs that aggregate client traffic solely to the FortiGate. This prevents direct client-to-client traffic visibility at the layer-2 VLAN layer. Clients can only communicate with the FortiGate. After the client traffic reaches the FortiGate, the FortiGate can then determine whether to allow various levels of access to the client by shifting the clientʼs network VLAN as appropriate.
Use enable to allow traffic only to and from the FortiGate and to block FortiSwitch port-to-port traffic on the specified VLAN. Use disable to allow normal traffic on the specified VLAN.
config system interface
edit <VLAN name>
set switch-controller-access-vlan {enable | disable}
next
end
Override the admin password for all managed FortiSwitches (416261)
By default, each FortiSwitch has an admin account without a password. To replace the admin passwords for all FortiSwitches managed by a FortiGate, use the following commands:
config switch-controller switch-profile
edit default
set login-passwd-override {enable | disable}
set login-passwd <password>
next
end
If you had already applied a profile with the override enabled and the password set and then decide to remove the admin password, you need to apply a profile with the override enabled and use the unset login-passwd command; otherwise, your previously set password will remain in the FortiSwitch.
Configure an MCLAG with managed FortiSwitches (366617)
To configure a multichassis LAG (MCLAG) with managed FortiSwitches:
- For each MCLAG peer switch, log into the FortiSwitch to create a LAG:
config switch trunk
edit "LAG-member"
set mode lacp-active
set mclag-icl enable
set members "<port>" "<port>"
next
- Enable the MCLAG on each managed FortiSwitch:
config switch-controller managed-switch
edit "<switch-id>"
config ports
edit "<trunk name>"
set type trunk
set mode {static | lacp-passive | lacp-active}
set bundle {enable | disable}
set members "<port>,<port>"
set mclag {enable | disable}
next
end
next
- Log into each managed FortiSwitch to check the MCLAG configuration:
diagnose switch mclag
After the FortiSwitches are configured as MCLAG peer switches, any port that supports advanced features on the FortiSwitch can become a LAG port. When mclag is enabled and the LAG port names match, an MCLAG peer set is automatically formed. The member ports for each FortiSwitch in the MCLAG do not need to be identical to the member ports on the peer FortiSwitch.
Configure QoS with managed FortiSwitches (373581)
Quality of Service (QoS) provides the ability to set particular priorities for different applications, users, or data flows. NOTE: FortiGate does not support QoS for hard or soft switch ports.
To configure the QoS for managed FortiSwitches:
- Configure a Dot1p map.
config switch-controller qos dot1p-map
edit <Dot1p map name>
set description <text>
set priority-0 <queue number>
set priority-1 <queue number>
set priority-2 <queue number>
set priority-3 <queue number>
set priority-4 <queue number>
set priority-5 <queue number>
set priority-6 <queue number>
set priority-7 <queue number>
next
end
- Configure a DSCP map.
config switch-controller qos ip-dscp-map
edit <DSCP map name>
set description <text>
configure map <map_name>
edit <entry name>
set cos-queue <COS queue number>
set diffserv {CS0 | CS1 | AF11 | AF12 | AF13 | CS2 | AF21 | AF22 | AF23 | CS3 | AF31 | AF32 | AF33 | CS4 | AF41 | AF42 | AF43 | CS5 | EF | CS6 | CS7}
set ip-precedence {network-control | internetwork-control | critic-ecp | flashoverride | flash | immediate | priority | routine}
set value <DSCP raw value>
next
end
end
- Configure the egress QoS policy.
config switch-controller qos queue-policy
edit <QoS egress policy name>
set schedule {strict | round-robin | weighted}
config cos-queue
edit [queue-<number>]
set description <text>
set min-rate <rate in kbps>
set max-rate <rate in kbps>
set drop-policy {taildrop | random-early-detection}
set weight <weight value>
next
end
next
end
- Configure the overall policy that will be applied to the switch ports.
config switch-controller qos qos-policy
edit <QoS egress policy name>
set default-cos <default CoS value 0-7>
set trust-dot1p-map <Dot1p map name>
set trust-ip-dscp-map <DSCP map name>
set queue-policy <queue policy name>
next
end
- Configure each switch port.
config switch-controller managed-switch
edit <switch-id>
config ports
edit <port>
set qos-policy <CoS policy>
next
end
next
end
Reset PoE-enabled ports from the GUI (387417)
If you need to reset PoE-enabled ports, go to WiFi & Switch Control > FortiSwitch Ports, right-click on one or more PoE-enabled ports and select Reset PoE from the context menu.
You can also go to WiFi & Switch Control > Managed FortiSwitch and click on a port icon for the FortiSwitch of interest. In the FortiSwitch Ports page, right-click on one or more PoE-enabled ports and select Reset PoE from the context menu.
Adding preauthorized FortiSwitches (382774)
After you preauthorize a FortiSwitch, you can assign the FortiSwitch ports to a VLAN.
To preauthorize a FortiSwitch:
- Go to WiFi & Switch Controller > Managed FortiSwitch.
- Click Create New.
- In the New Managed FortiSwitch page, enter the serial number, model name, and description of the FortiSwitch.
- Move the Authorized slider to the right.
- Click OK.
The Managed FortiSwitch page shows a FortiSwitch faceplate for the preauthorized switch.
What's new for managed FortiSwitches in FortiOS 5.6 with FortiSwitch 3.6.0 (and later releases)
IGMP snooping (387515)
The GUI and CLI support the ability to configure IGMP snooping for managed switch ports.
To enable IGMP snooping from the GUI, go to WiFi & Switch Controller > FortiSwitch VLANs, edit a VLAN and turn on IGMP Snooping under Networked Devices.
From the CLI, start by enabling IGMP snooping on the FortiGate:
config switch-controller igmp-snooping
set aging-time <int>
set flood-unknown-multicast (enable | disable)
end
Then enable IGMP snooping on a VLAN:
config system interface
edit <vlan>
set switch-controller-igmp-snooping (enable | disable)
end
Use the following command to enable IGMP snooping on switch ports, and to override the global parameters for a specific switch.
config switch-controller managed-switch
edit <switch>
config ports
edit port <number>
set igmp-snooping (enable | disable)
set igmps-flood-reports (enable | disable)
next
config igmp-snooping globals
set aging-time <int>
set flood-unknown-multicast (enable | disable)
end
next
end
User-port link aggregation groups (378470)
The GUI now supports the ability to configure user port LAGs on managed FortiSwitches.
To create a link aggregation group for FortiSwitch user ports:
- Go to WiFi & Switch Controller > FortiSwitch Ports
- Click Create New > Trunk.
- In the New Trunk Group page:
- Enter a name for the trunk group
- Select two or more physical ports to add to the trunk group
- Select the mode: Static, Passive LACP, or Active LACP
- Click OK.
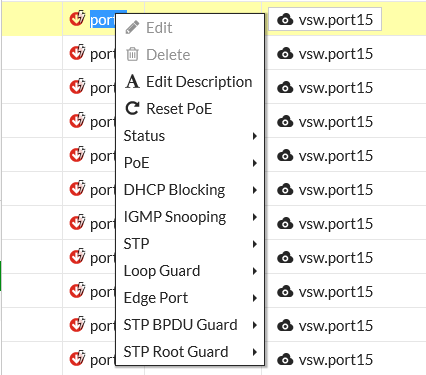
DHCP blocking, STP, and loop guard on managed FortiSwitch ports (375860)
The managed FortiSwitch GUI now supports the ability to enable/disable DHCP blocking, STP and loop guard for FortiSwitch user ports.
Go to to WiFi & Switch Controller > FortiSwitch Ports. For any port you can select DHCP Blocking, STP, or Loop Guard. STP is enabled on all ports by default. Loop guard is disabled by default on all ports.
Switch profile enhancements (387398)
Defaults switch profiles are bound to every switch discovered by the FortiGate. This means that an administrator can establish a password for this profile or create a new profile and bind that profile to any switch. Consquently, the password provided shall be configured on the FortiSwitch against the default "admin" account already present.
Number of switches per FortiGate based on model (388024)
The maximum number of supported FortiSwitches depends on the FortiGate model:
| FortiGate Model Range | Number of FortiSwitches Supported |
|---|---|
| Up to FortiGate-98 and FortiGate-VM01 | 8 |
| FortiGate-100 to 280 and FortiGate-VM02 | 24 |
| FortiGate-300 to 5xx | 48 |
| FortiGate-600 to 900 and FortiGate-VM04 | 64 |
| FortiGate-1000 and up | 128 |
| FortiGate-3xxx and up, and FortiGate-VM08 and up | 256 |
Miscellaneous configuration option changes
- The default value of
dhcp-snooping(also called DHCP-blocking) is changed fromtrustedin FortiOS 5.4 tountrustedin FortiOS 5.6. - The default value of
edge-portis changed fromdisabledin FortiOS 5.4 toenabledin FortiOS 5.6.0. - The default value for DHCP snooping on the FortiLink VLAN (system interface) is changed from “enabled” in FortiOS 5.6.2 and earlier to “disabled” in FortiOS 5.6.3 and later. Note that, in the GUI, DHCP snooping is automatically changed to “enable” when the DHCP server is enabled on the interface.
Additional GUI support
- Link aggregation of FortiSwitch ports
- DHCP trusted/untrusted, loop guard, and STP for FortiSwitch ports
- Connect to CLI support for FortiSwitch
What's new for managed FortiSwitches in FortiOS 5.6 with FortiSwitch 3.5.4 (and later releases)
This section describes new managed FortiSwitch features in FortiOS 5.6 with FortiSwitch 3.5.4.
Aggregating FortiSwitches into groups (397950)
In larger networks, the number of switches can be large. Different models and device purposes might exist. Furthermore, the topology might have "built-in" redundancy. Use the following command to create a FortiSwitch group allowing you to perform an operation on the entire group instead of one switch at a time.
config switch-controller switch-group
edit <name>
set description <string>
set members <..> <..>
end
end
Pre-authentication and replacements of FortiSwitches (298533)
FortiSwitch configuration templates allow you to replace a FortiSwitch and have the configuration of the original FortSwitch installed on the replacement.
Use the execute replace-device fortiswitch <sn-old> <sn-new> to transfer the configuration for the FortiSwitch with serial number <sn-old> to the replacement FortiSwitch with serial number <sn-new>.
LLDP MED on managed FortiSwitches (372288)
FortiOS 5.6 supports configuring link layer discovery protocol-media endpoint discovery (LLDP MED) for managed FortiSwitches. Additionally, you can use FortiGate CLI commands display the information collected by LLDP on the FortiSwitch.
You can use the following command to add media endpoint discovery (MED) features to an LLDP profile.
config switch-controller lldp-profile
edit <lldp-profle>
config med-network-policy
edit guest-voice
set status {disable | enable}
next
edit guest-voice-signaling
set status {disable | enable}
next
edit guest-voice-signaling
set status {disable | enable}
next
edit softphone-voice
set status {disable | enable}
next
edit streaming-video
set status {disable | enable}
next
edit video-conferencing
set status {disable | enable}
next
edit video-signaling
set status {disable | enable}
next
edit voice
set status {disable | enable}
next
edit voice-signaling
set status {disable | enable}
end
config custom-tlvs
edit <name>
set oui <identifier>
set subtype <subtype>
set information-string <string>
end
end
Enhanced 802.1x including FortiSwitch port security policy framework (389102)
New FortiSwitch port security features include:
- Dynamic VLAN Assignment
- “guest” and “auth-fail” VLAN
- Mac Address Bypass (MAB)
- Multiple host support on single physical port
Global settings applied across the network
config switch-controller 802.1x-settings
set reauth-period < int >
set max-reauth-attempt < int >
set link-down-auth < *set-unauth | no-action >
end
Local switch overrides
config switch-controller managed-switch
edit < switch >
config 802.1x-settings
set local-override {disable | enable}
set reauth-period <int>
set max-reauth-attempt <int>
set link-down-auth {set-unauth | no-action}
end
next
end
Policy definitions (802.1x and captive-portal)
config switch-controller security-policy 802.1x
edit 8021X-policy-default
set user-group <user.group>
set mac-auth-bypas {disable | enable}
set guest-vlan {disable | enable}
set guest-vlanid <vlan-id>
set guest-auth-delay <int>
set auth-fail-vlan {disable | enable}
set auth-fail-vlanid <vlan-id>
radius-timeout-overwrite {disable | enable}
end
end
config switch-controller security-policy captive-portal
edit captive-portal-default
set vlan <vlan-id>
config users
edit 1
set user-group <usergroup>
set vlanid <vlan-id>
next
end
end
end
Port settings
config switch-controller managed-switch
edit <managed-switch>
config ports
edit <port>
set port-security-policy {802.1x-policy | captive-portal-policy}
next
end
next
end
Firmware upgrade management and compatible version information (385171)
You can view the current firmware version of a FortiSwitch and upgrade the FortiSwitch to a new firmware version by going to WiFi & Switch Controller > Managed FortiSwitch and editing one of the FortiSwitches. Under Firmware you can see the current firmware version and select Update to update it.
Changed managed-switch display format for 'dynamic-capability' (387239)
FortiOS 5.6.0 displays capability flags as strings such as: dynamic-capability, igmp-snooping, dhcp-snooping, and so on. For example:
config switch-controller managed-switch
edit S124DP3X15000315
get
switch-id : S124DP3X15000315
name :
description :
fsw-wan1-peer : port9
fsw-wan1-admin : enable
fsw-wan2-peer :
fsw-wan2-admin : discovered
directly-connected : 0
connected : 1
version : 1
pre-provisioned : 0
dynamic-capability : igmp-snooping,dhcp-snooping
switch-device-tag :
dynamically-discovered: 1
Connecting to a managed switch CLI from the FortiGate GUI (378119)
To connect to a FortiSwitch CLI, go to WiFi & Switch Controller > Managed FortiSwitch, right click on the FortiSwitch to connect to and select Connect to CLI. You can also open the FortiGate CLI console and use the execute telnet <ip> command, where <ip> is the management IP address of the FortiSwitch.
Firmware upgrade of stacked or tiered switches (355050)
From your FortiGate CLI, you can upgrade the firmware of all of the managed FortiSwitches of the same model using a single execute command. The command includes the name of a firmware image file and all of the managed FortiSwitches compatible with that firmware image file are upgraded. For example:
execute switch-controller stage-tiered-swtp-image ALL <firmware-image-file>
You can also use the following new command to restart all of the managed FortiSwitches after a 2-minute delay.
execute switch-controller restart-swtp-delayed ALL
More information displayed by the execute switch-controller get-conn-status command (388751)
The get-conn-status command now displays more information for each managed switch including the ID of each switch, the version of the firmware running on the switch, the status of the switch, the IP address for managing the switch, and its join time.
execute switch-controller get-conn-status
Managed-devices in current vdom root:

STACK-NAME: FortiSwitch-Stack-port3
SWITCH-ID        VERSION  STATUS          ADDRESS     JOIN-TIME NAME FS108D3W16001177 v3.4     Authorized/Down 169.254.1.2 N/A       My-Switch
User-port link aggregation groups available on the GUI (378470)
The GUI now supports the ability to configure user port LAGs on managed FortiSwitches.
To create a link aggregation group for FortiSwitch user ports:
- Go to WiFi & Switch Controller > FortiSwitch Ports.
- Click Create New > Trunk.
- In the New Trunk Group page enter a Name for the trunk group.
- Select two or more physical ports to add to the trunk group.
- Select the Mode: Static, Passive LACP, or Active LACP.
- Click OK.

DHCP blocking, STP, and loop guard on managed FortiSwitch ports on the GUI (375860)
The managed FortiSwitch GUI now supports the ability to enable/disable DHCP blocking, STP and loop guard for FortiSwitch user ports.
Go to WiFi & Switch Controller > FortiSwitch Ports. For any port you can select DHCP Blocking, STP, or Loop Guard. STP is enabled on all ports by default. Loop guard is disabled by default on all ports.
New switch profiles (387398)
Switch profiles allow specific settings to be applied to all authorized FortiSwitches. The default switch profile is automatically bound to every switch discovered by the FortiGate. You can create additional profiles as needed.
Within a switch profile, you can control the behavior of the FortiSwitch’s admin account.You can add a password to a profile or create a new profile and bind that profile to any switch. The password provided in the profile is configured on the FortiSwitch to the default admin administrator account.
Miscellaneous configuration option changes
- On a switch port, the default value of
dhcp-snooping(also called DHCP-blocking) is changed fromtrustedin FortiOS 5.4 tountrustedin FortiOS 5.6. - On a switch port, the default value of STP
edge-portis changed fromdisabledin FortiOS 5.4 toenabledin FortiOS 5.6.0. - The default value of
fortilink-split-portis changed fromdisablein FortiOS 5.4.1/5.4.2 toenablein FortiOS 5.4.3 onward. This command applies to FortiGate aggregate interfaces.config system interface
edit <name of the FortiLink interface>
set fortilink-split-interface enable
end
- The default value for DHCP snooping on the FortiLink VLAN (system interface) is changed from “enabled” in FortiOS 5.6.2 and earlier to “disabled” in FortiOS 5.6.3 and later. Note that, in the GUI, DHCP snooping is automatically changed to “enable” when the DHCP server is enabled on the interface.
Before you begin
Before you configure the managed FortiSwitch unit, the following assumptions have been made in the writing of this manual:
- You have completed the initial configuration of the FortiSwitch unit, as outlined in the QuickStart Guide for your FortiSwitch, and you have administrative access to the FortiSwitch Web-based manager and CLI.
- You have installed a FortiGate unit on your network and have administrative access to the FortiGate Web-based manager and CLI.
How this guide is organized
This guide contains the following sections:
- Connecting FortiLink ports - information about connecting FortiSwitch ports to FortiGate ports.
- FortiLink configuration using the FortiGate GUI
- FortiLink configuration using the FortiGate CLI
- Network topologies for managed FortiSwitches - describes the configuration for various stacking topologies.
- Optional setup tasks - describes other setup tasks.
- FortiSwitch features configuration - describes configuring managed FortiSwitch features including VLANs.
- FortiSwitch port features - configure ports and PoE from the FortiGate unit.
- FortiSwitch port security policy - describes setting up FortiSwitch security policies.
- Additional capabilities - describes extra FortiSwitch features.
- Troubleshooting - describes techniques for troubleshooting common problems.
Copyright © 2021 Fortinet, Inc. All Rights Reserved. | Terms of Service | Privacy Policy
