
FortiSwitch features configuration
This section describes how to configure global FortiSwitch settings using FortiGate CLI commands. These settings will apply to all of the managed FortiSwitches. You can also override some of the settings on individual FortiSwitches.
VLAN configuration
Use Virtual Local Area Networks (VLANs) to logically separate a LAN into smaller broadcast domains. VLANs allow you to define different policies for different types of users and to set finer control on the LAN traffic. (Traffic is only sent automatically within the VLAN. You must configure routing for traffic between VLANs.)
From the FortiGate, you can centrally configure and manage VLANs for the managed FortiSwitches.
In FortiSwitchOS 3.3.0 and later releases, the FortiSwitch supports untagged and tagged frames in FortiLink mode. The switch supports up to 1,023 user-defined VLANs. You can assign a VLAN number (ranging from 1-4095) to each of the VLANs.
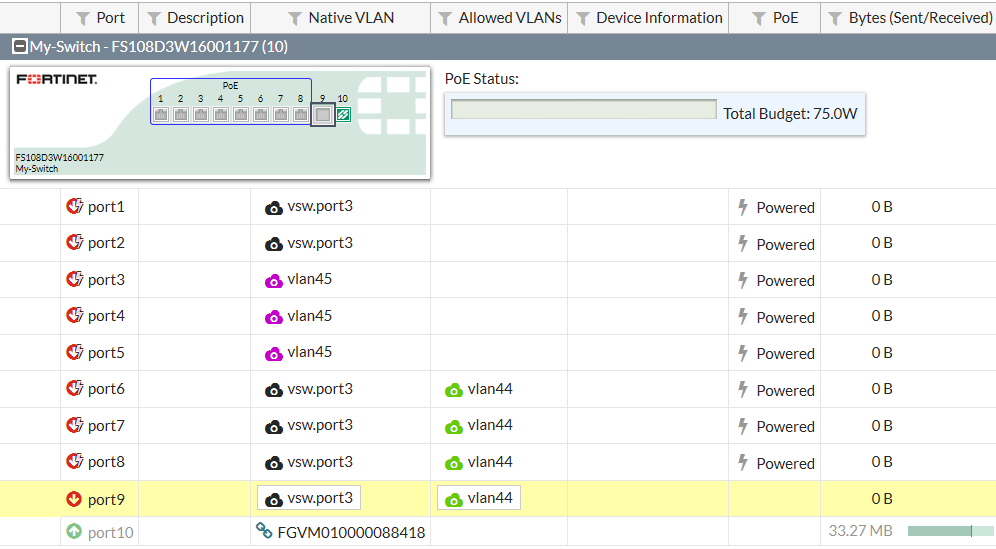
You can configure the default VLAN for each FortiSwitch port as well as a set of allowed VLANs for each FortiSwitch port.
FortiSwitch VLANs display
The WiFi & Switch Controller > FortiSwitch VLANs page displays VLAN information for the managed switches.
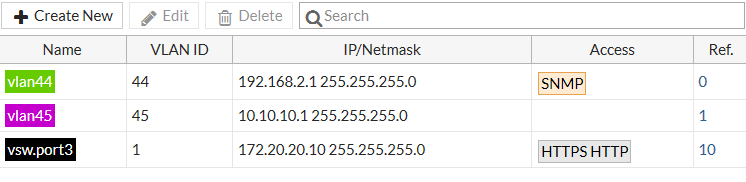
Each entry in the VLAN list displays the following information:
- Name - name of the VLAN
- VLAN ID - the VLAN number
- IP/Netmask - address and mask of the subnetwork that corresponds to this VLAN
- Access - administrative access settings for the VLAN
- Ref - number of configuration objects referencing this VLAN
Enabling and disabling switch-controller access VLANs through FortiGate
Access VLANs are VLANs that aggregate client traffic solely to the FortiGate. This prevents direct client-to-client traffic visibility at the layer-2 VLAN layer. Clients can only communicate with the FortiGate. After the client traffic reaches the FortiGate, the FortiGate can then determine whether to allow various levels of access to the client by shifting the client's network VLAN as appropriate.
Use enable to allow traffic only to and from the FortiGate and to block FortiSwitch port-to-port traffic on the specified VLAN. Use disable to allow normal traffic on the specified VLAN.
config system interface
edit <VLAN name>
set switch-controller-access-vlan {enable | disable}
next
end
Creating VLANs
Setting up a VLAN requires you to create the VLAN and assign FortiSwitch ports to the VLAN. You can do this with either the Web GUI or CLI.
Using the Web administration GUI
To create the VLAN:
- Go to WiFi & Switch Controller > FortiSwitch VLANs, select Create New, and change the following settings:
Interface Name VLAN name VLAN ID Enter a number (1-4094) Color Choose a unique color for each VLAN, for ease of visual display. IP/Network Mask IP address and network mask for this VLAN. - Enable DHCP Server and set the IP range.
- Set the Admission Control options as required.
- Select OK.
To assign FortiSwitch ports to the VLAN:
- Go to WiFi & Switch Controller > FortiSwitch Ports.
- Click the desired port row.
- Click the Native VLAN column in one of the selected entries to change the native VLAN.
- Select a VLAN from the displayed list. The new value is assigned to the selected ports.
- Click the + icon in the Allowed VLANs column to change the allowed VLANs.
- Select one or more of the VLANs (or the value all) from the displayed list. The new value is assigned to the selected port.
Using the FortiSwitch CLI
- Create the marketing VLAN.
config system interface
edit <vlan name>
set vlanid <1-4094>
set color <1-32>
set interface <FortiLink-enabled interface>
end
- Set the VLAN’s IP address.
config system interface
edit <vlan name>
set ip <IP address> <Network mask>
end
- Enable a DHCP Server.
config system dhcp server
edit 1
set default-gateway <IP address>
set dns-service default
set interface <vlan name>
config ip-range
set start-ip <IP address>
set end-ip <IP address>
end
set netmask <Network mask>
end
- Assign ports to the VLAN.
config switch-controller managed-switch
edit <Switch ID>
config ports
edit <port name>
set vlan <vlan name>
set allowed-vlans <vlan name>
or
set allowed-vlans-all enable
next
end
end
Assign untagged VLANs to a managed FortiSwitch port:
config switch-controller managed-switch
edit <managed-switch>
config ports
edit <port>
set untagged-vlans <VLAN-name>
next
end
next
end
Configure MAC address aging interval
Use the following commands to configure how long an inactive MAC address is saved in the FortiSwitch hardware. The range is 10 to 1,000,000 seconds. The default value is 300. After this amount of time, the inactive MAC address is deleted from the FortiSwitch hardware.
config switch-controller global
set mac-aging-interval <10 to 1000000>
end
Enable multiple FortiLink interfaces
Only the first FortiLink interface has GUI support.
Use the following command to enable or disable multiple FortiLink interfaces.
config switch-controller global
set allow-multiple-interfaces {enable | disable}
end
Configure IGMP settings
Use the following command to configure the global IGMP settings.
Aging time is the maximum number of seconds that the system will retain a multicast snooping entry. Enter an integer value from 15 to 3600. The default value is 300.
Flood-unknown-multicast controls whether the system will flood unknown multicast messages within the VLAN.
config switch-controller igmp-snooping
set aging-time <15-3600>
set flood-unknown-multicast {enable | disable}
end
Configure LLDP profiles
Use the following commands to configure LLDP profiles:
config switch-controller lldp-profile
edit <profile number>
set 802.1-tlvs port-vlan-id
set 802.3-tlvs max-frame-size
set auto-isl {enable | disable}
set auto-isl-hello-timer <1-30>
set auto-isl-port-group <0-9>
set auto-isl-receive-timeout <3-90>
set med-tlvs (inventory-management | network-policy)
end
Configure LLDP settings
Use the following commands to configure LLDP settings:
config switch-controller lldp-settings
set status < enable | disable >
set tx-hold <int>
set tx-interval <int>
set fast-start-interval <int>
set management-interface {internal | management}
end
| Variable | Description |
| status | Enable or disable |
| tx-hold | Number of tx-intervals before the local LLDP data expires. Therefore, the packet TTL (in seconds) is tx-hold times tx-interval. The range for tx-hold is 1 to 16, and the default value is 4. |
| tx-interval | How often the FortiSwitch transmits the LLDP PDU. The range is 5 to 4095 seconds, and the default is 30 seconds. |
| fast-start-interval | How often the FortiSwitch transmits the first 4 LLDP packets when a link comes up. The range is 2 to 5 seconds, and the default is 2 seconds. Set this variable to zero to disable fast start. |
| management-interface | Primary management interface to be advertised in LLDP and CDP PDUs. |
Create LLDP asset tags for each managed FortiSwitch
You can use the following commands to add an LLDP asset tag for a managed FortiSwitch:
config switch-controller managed-switch
edit <fsw>
set switch-device-tag <string>
end
Add media endpoint discovery (MED) to an LLDP configuration
You can use the following commands to add media endpoint discovery (MED) features to an LLDP profile:
config switch-controller lldp-profile
edit <lldp-profle>
config med-network-policy
edit guest-voice
set status {disable | enable}
next
edit guest-voice-signaling
set status {disable | enable}
next
edit guest-voice-signaling
set status {disable | enable}
next
edit softphone-voice
set status {disable | enable}
next
edit streaming-video
set status {disable | enable}
next
edit video-conferencing
set status {disable | enable}
next
edit video-signaling
set status {disable | enable}
next
edit voice
set status {disable | enable}
next
edit voice-signaling
set status {disable | enable}
end
config custom-tlvs
edit <name>
set oui <identifier>
set subtype <subtype>
set information-string <string>
end
end
Display LLDP information
You can use the following commands to display LLDP information:
diagnose switch-controller dump lldp stats <switch> <port>
diagnose switch-controller dump lldp neighbors-summary <switch>
diagnose switch-controller dump lldp neighbors-detail <switch>
Configure the MAC sync interval
Use the following commands to configure the global MAC synch interval.
The MAC sync interval is the time interval between MAC synchronizations. The range is 30 to 600 seconds, and the default value is 60.
config switch-controller mac-sync-settings
set mac-sync-interval <30-600>
end
Configure STP settings
Use the following CLI commands for global STP configuration. This configuration applies to all managed FortiSwitches:
config switch-controller stp-settings
set name <name>
set revision <stp revision>
set hello-time <hello time>
set forward-time <forwarding delay>
set max-age <maximum aging time>
set max-hops <maximum number of hops>
end
You can override the global STP settings for a FortiSwitch using the following commands:
config switch-controller managed-switch
edit <switch-id>
config stp-settings
set local-override enable
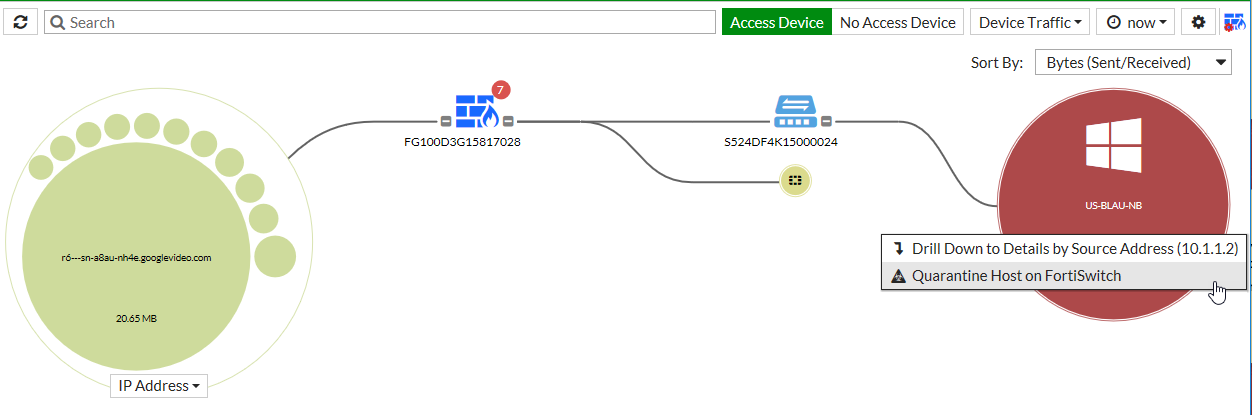
Quarantines
Quarantined MAC addresses are blocked on the connected FortiSwitches from the network and the LAN.
Quarantining a MAC address
Using the FortiGate GUI
In the FortiGate GUI, the quarantine feature is automatically enabled when you quarantine a host.
- Select the host to quarantine.
- Go to Security Fabric > Physical Topology, right-click on a host, and select Quarantine Host on FortiSwitch.
- Go to Security Fabric > Logical Topology, right-click on a host, and select Quarantine Host on FortiSwitch.
- Go to FortiView > Sources, right-click on an entry in the Source column, and select Quarantine Host on FortiSwitch.
- Click OK to confirm that you want to quarantine the host.
Using the FortiGate CLI
You must enable the quarantine feature in the FortiGate CLI using the set quarantine enable command. You can add MAC addresses to the quarantine list before enabling the quarantine feature, but the quarantine does not go into effect until enabled.
config switch-controller quarantine
set quarantine enable
config targets
edit <MAC_address>
set description <string>
set tags <tag1 tag2 tag3 ...>
next
end
end
| Option | Description |
|---|---|
| MAC_address | A layer-2 MAC address in the following format: 12:34:56:aa:bb:cc |
| string | Optional. A description of the MAC address being quarantined. |
| tag1 tag2 tag3 ... | Optional. A list of arbitrary strings. |
For example:
config switch-controller quarantine
set quarantine enable
config targets
edit 00:00:00:aa:bb:cc
set description "infected by virus"
set tags "quarantined"
next
end
end
Viewing quarantine entries
Quarantine entries are created on the FortiGate that is managing the FortiSwitch.
Using the FortiGate GUI
- Go to Monitor > Quarantine Monitor.
- Click Quarantined on FortiSwitch.
The Quarantined on FortiSwitch button is only available if a device is detected behind the FortiSwitch, which requires Device Detection to be enabled.

Using the FortiGate CLI
Use the following command to view the quarantine list of MAC addresses:
show switch-controller quarantine
For example:
show switch-controller quarantine
config switch-controller quarantine
set quarantine enable
config targets
edit 00:11:22:33:44:55
next
edit 00:01:02:03:04:05
next
end
end
When the quarantine feature is enabled on the FortiGate, it creates a quarantine VLAN (qtn.<FortiLink_port_name>) on the virtual domain. The quarantine VLAN is applied to the allowed and untagged VLANs on all connected FortiSwitch ports.
Use the following command to view the quarantine VLAN:
show system interface qtn.<FortiLink_port_name>
For example:
show system interface qtn.port7
config system interface
edit "qtn.port7"
set vdom "vdom1"
set description "Quarantine VLAN"
set security-mode captive-portal
set replacemsg-override-group "auth-intf-qtn.port7"
set device-identification enable
set device-identification-active-scan enable
set snmp-index 34
set switch-controller-access-vlan enable
set color 6
set interface "port7"
set vlanid 4093
next
end
Use the following command to view how the quarantine VLAN is applied to the allowed and untagged VLANs on all connected FortiSwitch ports:
show switch-controller managed-switch
For example:
show switch-controller managed-switch
config switch-controller managed-switch
edit "FS1D483Z15000036"
set fsw-wan1-peer "port7"
set fsw-wan1-admin enable
set version 1
set dynamic-capability 503
config ports
edit "port1"
set vlan "vsw.port7"
set allowed-vlans "qtn.port7"
set untagged-vlans "qtn.port7"
next
edit "port2"
set vlan "vsw.port7"
set allowed-vlans "qtn.port7"
set untagged-vlans "qtn.port7"
next
edit "port3"
set vlan "vsw.port7"
set allowed-vlans "qtn.port7"
set untagged-vlans "qtn.port7"
next
...
end
end
Releasing MAC addresses from quarantine
Using the FortiGate GUI
- Go to Monitor > Quarantine Monitor.
- Click Quarantined on FortiSwitch.
- Right-click on one of the entries and select Delete or Remove All.
- Click OK to confirm your choice.

Using the FortiGate CLI
Use the following commands to delete a quarantined MAC address:
config switch-controller quarantine
config targets
delete <MAC_address>
end
When the quarantine feature is disabled, all quarantined MAC addresses are released from quarantine. Use the following commands to disable the quarantine feature:
config switch-controller quarantine
set quarantine disable
end
Copyright © 2021 Fortinet, Inc. All Rights Reserved. | Terms of Service | Privacy Policy
