FortiAuthenticator’s user database has the benefit of being able to associate extensive information with each user, as you would expect of RADIUS and LDAP servers. This information includes: whether the user is an administrator, uses RADIUS authentication, uses two-factor authentication, and personal information such as full name, address, password recovery options, and the groups that the user belongs to.
The RADIUS server on the FortiAuthenticator unit is configured using default settings. For a user to authenticate using RADIUS, the option Allow RADIUS Authentication must be selected for that user’s entry, and the FortiGate unit must be added to the authentication client list. See RADIUS service.
This section includes the following subsections:
Administrator accounts on FortiAuthenticator are standard user accounts that are flagged as administrators. Both local users and remote LDAP users can be administrators.
Once flagged as an administrator, a user account’s administrator privileges can be set to either full access or customized to select their administrator rights for different parts of the FortiAuthenticator unit.
The subnets from which administrators are able to log in can be restricted by entering the IP addresses and netmasks of trusted management subnets.
There are log events for administrator configuration activities. Administrators can also be configured to authenticate to the local system using two-factor authentication.
An account marked as an administrator can be used for RADIUS authentication if Allow RADIUS Authentication is selected. See RADIUS service. These administrator accounts only support Password Authentication Protocol (PAP).
See Configuring a user as an administrator for more information.
Local user accounts can be created, imported, exported, edited, and deleted as needed. Expired local user accounts can be purged manually or automatically (see General).
To manage local user accounts, go to Authentication > User Management > Local Users.
The local user account list shows the following information:
| Create New | Select to create a new user. |
| Import | Select to import local user accounts from a CSV file or FortiGate configuration file. If using a CSV file, it must have one record per line, with the following format: user name (30 characters max), first name (30 characters max), last name (30 characters max), email address (75 characters max), mobile number (25 characters max), password (optional, 128 characters max). If the optional password is left out of the import file, the user will be emailed temporary login credentials and requested to configure a new password. Note: Even if an optional field is empty, it still must be defined with a comma. |
| Export Users | Select to export the user account list to a CSV file. |
| Purge Expired | Select to manually purge expired local users. |
| Edit | Select to edit the selected user account. |
| Delete | Select to delete the selected user account or accounts. |
| Search | Enter a search term in the search field, then select Search to search the user account list. |
| Username | The user accounts’ usernames. |
| First name | The user accounts’ first names, if included. |
| Last name | The user accounts’ last names, if included. |
| Email address | The user accounts’ email addresses, if included. |
| Admin | If the user account is set as an administrator, a green circle with a check mark is shown. |
| Status | If the user account is enabled, a green circle with a check mark is shown. |
| Token | The token that is assigned to that user account. Select the token name to edit the FortiToken, see FortiToken device maintenance. |
| Groups | The group or groups to which the user account belongs. |
| Authentication Method | The authentication method used for the user account. |
| Expiration | The date and time that the user account expires, if an expiration date and time have been set for the account. |
When creating a user account, there are three ways to handle the password:
You will be redirected to the Change user window to continue the user configuration.
If the password creation method was set to No password, FortiToken authentication only you will be required to associate a FortiToken with the user before the user can be enabled. See Configuring token based authentication.
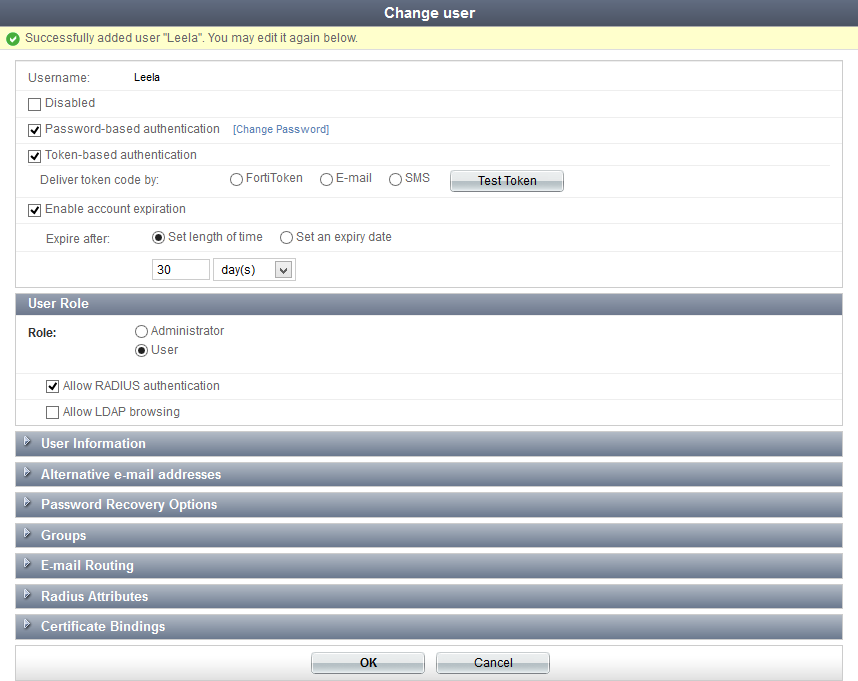
User accounts can be edited at any time. When creating a new user, you will be immediately redirected to the Change user window to complete the user configuration.
To view the Change user window, go to the user account list, select the user you will be editing, and then select Edit from the toolbar. Conversely, selecting the username in the user list will also open the Change user window.
The following information can be viewed or configured:
| Username | The user’s username. This cannot be changed. | |
| Disabled | Select to disable the user account. | |
| Password-based authentication | Select to enable password based authentication. Select Change Password to open the Change password window, where you can change the user’s password. |
|
| Token-based authentication | Select to enable FortiToken based authentication. See Configuring token based authentication. | |
| Enable account expiration | Select to enable account expiration. See Enable account expiration. | |
| User Role | Configure the user’s role. | |
| Role | Select Administrator or User. If setting a user as an administrator, see Configuring a user as an administrator. |
|
| Allow RADIUS authentication | Select to allow RADIUS authentication. This applies only to non-administrator users. | |
| Allow LDAP browsing | Select to Allow LDAP browsing. This applies only to non-administrator users. | |
| User Information | Enter user information, such as their address and phone number. See Adding user information. | |
| Alternative e-mail addresses | Add alternate email addresses for the user. | |
| Password Recovery Options | Configure password recovery options for the user. See Configuring password recovery options | |
| Groups | Assign the user to one or more groups. See User groups. | |
| E-mail Routing | Enter a mail host and routing address into their respective fields to configure email routing for the user. | |
| Radius Attributes | Add RADIUS attributes. See RADIUS attributes. | |
| Certificate Bindings | Add, edit, or removed certificate bindings for the user account. See Configuring certificate bindings. Select the certificate name to view the certificate, or select the Revoke Certificate button to revoke the certificate. |
|
Select OK when you have finished editing the user’s information and settings.
Token-based authentication requires one of the following:
If a FortiToken device or FortiToken Mobile app will be used, it must first be registered in Authentication > User Management > FortiTokens. See FortiTokens for more information.
The device must be known to the FortiAuthenticator unit. See FortiToken devices and mobile apps.
Optionally, select Configure a temporary e-mail/SMS token to receive a temporary token code via email or SMS.
|
|
By default, token-based authentication must be completed within 60 seconds after the token passcode is sent by email or SMS. To change this timeout, go to Authentication > User Account Polices > Lockouts and modify the Email/SMS Token Timeout field, see Lockouts. |
See Administrators for more information.
If Custom is selected, find the permissions that the user will have in the Available user permissions list, and move them to the Selected user permissions list.
User information can be added in the Change user window. Some information can be required depending on how the user is configured. For example, is the user is using token-based authentication by SMS, then a mobile number and SMS gateway must be configured before the user can be enabled.
The following user information can be entered:
|
First name |
Last name |
|
Email address |
Phone number |
|
Mobile number |
SMS gateway: select from the drop-down list. Select Test SMS to send a test message. |
|
Street address |
|
|
City |
State/Province |
|
Country: Select from the drop-down list. |
|
|
Language: select a specific language from the drop-down list, or use the default language. |
|
|
Organization: select an organization from the drop-down list. See Organizations. |
|
|
Max. devices: Select either Use global configuration, or Specify a custom number. |
|
|
User has: The number of device the user currently has. |
|
|
Custom user fields: See Custom user fields for more information. |
|
To replace a lost or forgotten password, the FortiAuthenticator unit can send the user a password recovery link by email or in a browser in response to a pre-arranged security question. The user then must set a new password.
In the event of password recovery, an email message will be sent to all configured email addresses — both the user information email address and the alternative email addresses.
Security policies must be in place on the FortiGate unit to allow these sessions to be established.
This information is used to select the user account. If your information does not match a user account, password recovery cannot be completed.
The recovery options available depend on the settings in the user account.
The user can now authenticate using the new password.
To use a local certificate as part of authenticating a user, you need to:
CN=rgreen then enter rgreen.Remote LDAP users must be imported into the FortiAuthenticator user database from LDAP servers, see LDAP. A maximum of five users can be imported.
|
|
A FortiToken device already allocated to a local account cannot be allocated to an LDAP user as well; it must be a different FortiToken device. |
Remote RADIUS users can be created, migrated to LDAP users, edited, and deleted.
|
|
An LDAP server must already be configured to select it in the drop-down list. See Remote authentication servers for information on adding a remote LDAP server. |
The Import Remote LDAP Users window opens in a new browser window.
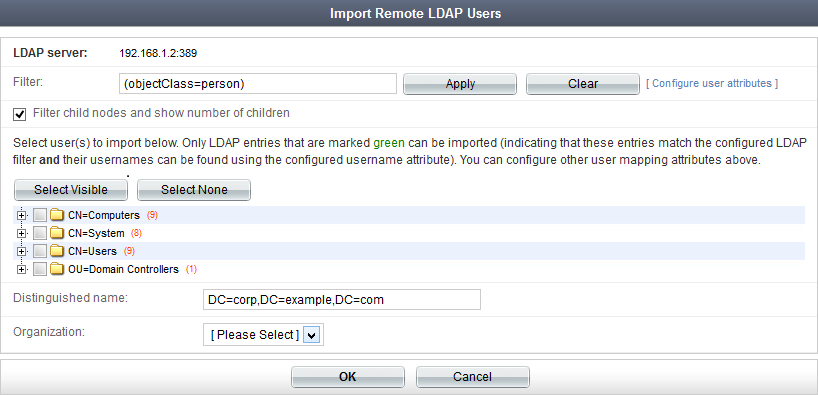
Selecting the field, FirstName for example, presents a list of attributes which have been detected and can be selected. This list is not exhaustive and additional, non-displayed attributes may be available for import. Consult your LDAP administrator for a list of available attributes.
The amount of time required to import the remote users will vary depending on the number of users being imported.
To view remote RADIUS users, go to Authentication > User Management > Remote Users and select RADIUS users in the toolbar. See RADIUS for more information about remote RADIUS servers.
The following options are available:
| Create New | Select to create a new remote RADIUS user. |
| Delete | Select to delete the selected user or users. |
| Edit | Select to edit the selected user. |
| Migrate | Select to migrate the selected user or users. See To migrate RADIUS users to LDAP users:. |
| Token-based Auth | Select to enforce or bypass token-based authentication for the selected user or users. |
| Search | Search the remote RADIUS user list. |
| Username | The remote user’s name. |
| Remote RADIUS server | The remote RADIUS server or which the user resides. |
| Token | The FortiToken used by the user, if applicable. |
| Enforce token-based authentication | Whether or not token-based authentication is enforced. |
| Remote RADIUS | Select the remote RADIUS server on which the user will be created from the drop-down list. For more information on remote RADIUS servers, see RADIUS. | |
| Username | Enter a username. | |
| Enforce token-based authentication if configured below | Select to enforce the token-based authentication, if you are configuring token-based authentication. | |
| Token-based authentication | Select to configure token-based authentication. | |
| Deliver token code by | Select the method by which token code will be delivered. One of:
|
|
| User Information | Enter user information as needed. The following options are available:
|
|
Synchronization rules can be created to control how and when remote users are synchronized. To view a list of the remote user synchronization rules, go to Authentication > User Management > Remote User Sync Rules.
| Name | Enter a name for the synchronization rule. |
| Remote LDAP | Select a remote LDAP server from the drop-down list. To configure a remote LDAP server, see Remote authentication servers. |
| Sync every | Select the amount of time between synchronizations. |
| LDAP filter | Optionally, enter an LDAP filter. Select Test Filter to test that the filter functions as expected. |
| Token-based authentication sync priorities | Select the required authentication synchronization priorities. Drag the priorities up and down in the list change the priority order. |
| Sync as | Select to synchronize as a remote user or as a local user. Selecting either option will open a pop-up dialog box displaying the user fields that will be synchronized for that selection. |
| Group to associate users with | Optionally, select a group from the drop-down list with which to associate the users with, or select Create New to create a new user group. See User groups. |
| Organization | Optionally, select an organization from the drop-down list with which to associate the users with, or select Create New to create a new organization. See Organizations. |
| LDAP User Mapping Attributes | Optionally, edit the remote LDAP user mapping attributes. |
| Preview Mapping | Select to preview the LDAP user sync mappings in a new window. |
| Show Sync Fields | Select to view the user fields that will be synchronized. |
Users can be assigned to groups during user account configuration (see Editing a user), or by editing the groups to add users to it.
To view the user groups list, go to Authentication > User Management > User Groups.
| Name | Enter a name for the group. |
| Type | Select the type of group, Local, Remote LDAP, or Remote RADIUS. |
| Users | Select users from the Available users box and move them to the Selected users box to add them to the group. This option is only available if Type is Local. |
| User retrieval | Determine group membership by selecting either Specify an LDAP filter or Set a list of imported remote users. This option is only available if Type is Remote LDAP. |
| Remote LDAP | Select a remote LDAP server from the drop-down list. At least one remote LDAP server must already be configured, see Remote authentication servers. This option is only available if Type is Remote LDAP. |
| Remote RADIUS | Select a remote RADIUS server from the drop-down list. At least one remote RADIUS server must already be configured, see Remote authentication servers. This option is only available if Type is Remote RADIUS. |
| LDAP filter | Enter an LDAP filter. Optionally, select Test filter to ensure that the filter works as expected. This option is only available if Type is Remote LDAP and User retrieval is set to Specify an LDAP filter. |
| LDAP users | Select remote LDAP users from the Available LDAP users box and move them to the Selected LDAP users box to add them to the remote group. This option is only available if Type is Remote LDAP and User retrieval is set to Set a list of imported remote users. |
| RADIUS users | Select remote RADIUS users from the Available RADIUS users box and move them to the Selected RADIUS users box to add them to the remote group. This option is only available if Type is Remote RADIUS. |
Organizations include a name and logo. An organization can be associated with local and remote users.
When a user provisions FortiToken Mobile on their device, the organization name and logo are automatically pushed to the device, allowing the FortiToken Mobile App’s user interface to be rebranded.
Organizations can be created, edited, and deleted as needed. Organization are applied to users from the various user management pages. See Local users, Remote users, and Remote user sync rules.
To manage organizations, go to Authentication > User Management > Organizations.
|
|
The image can be a maximum of 320x320 pixels, and must be 24-bit, and in the .PNG format. |
Go to Authentication > User Management > FortiTokens to view a list of configured FortiTokens. From here, FortiTokens can be added, imported, exported, edited, deleted, and activated. For more information, see FortiToken devices and mobile apps.
The following information is shown:
| Create New | Create a new FortiToken, see To add FortiTokens manually:. |
| Import | Import a list of FortiTokens, see To import FortiTokens from a CSV file: and To import FortiTokens from a FortiGate unit:. |
| Export | Export the FortiToken list, see To export FortiTokens:. |
| Delete | Delete the selected FortiToken or FortiTokens. |
| Edit | Edit the selected FortiToken or FortiTokens. |
| Activate | Activate the selected FortiToken or FortiTokens. |
| Search | Enter a search term in the search field, then select Search to search the FortiToken list. |
| Serial number | The FortiToken’s serial number. |
| Token type | The FortiToken type, either FortiToken 200 or FortiToken Mobile. |
| Status | Whether or not the FortiToken is activated. |
| Comment | Comments about the token. |
| User | The user to whom the FortiToken applies. |
| Size | The size of the token. |
| Drift | The time difference between the FortiAuthenticator and the FortiToken. For information on removing the drift, see FortiToken drift adjustment. |
| Timestep | The FortiToken timestep. |
| FTM License | The FTM license applied to the FortiToken. |
Non-802.1X compliant devices can be identified and accepted onto the network using MAC address authentication. See Non-compliant devices for more information.
Some services can receive information about an authenticated user through RADIUS vendor-specific attributes. FortiAuthenticator user groups and user accounts can include RADIUS attributes for Fortinet and other vendors.
Attributes in user accounts can specify user-related information. For example, the Default attribute Framed-IP-Address specifies the VPN tunnel IP address to be sent to the user by the Fortinet SSL VPN.
Attributes in user groups can specify more general information, applicable to the whole group. For example, specifying third-party vendor attributes to a switch could enable administrative level login to all members of the Network_Admins group, or authorize the user to the correct privilege level on the system.