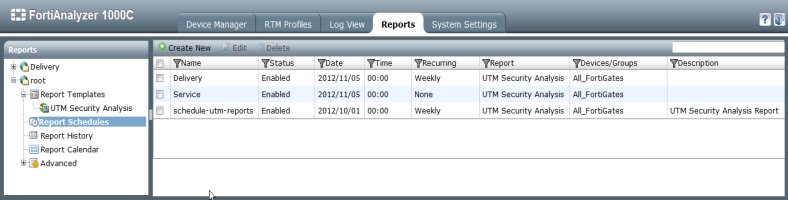
Schedules
Report schedules provide a way to schedule a daily, monthly, or weekly report so that the report will be generated at a specific time. You can also manually run a report schedule at any time and enable or disable report schedules.
To create a new schedule:
1. Go to the Reports tab and select Report Schedules in the tree menu.
2. Select Create New on the tool bar, or right-click in the schedule list and select New from the pop-up menu.
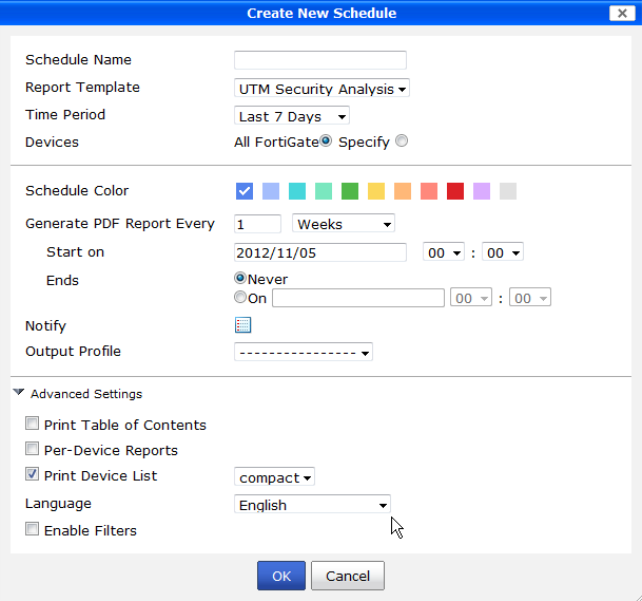
The Create New Schedule dialog box opens.
3. Enter the following information:
Schedule Name | Enter a name for the new report schedule. |
Report Template | Select a report template from the drop-down list. |
Time Period | Select the time period that the report covers from the drop-down list. |
Devices | Select the specific devices that the report will cover, or select All FortiGate to cover all the devices. |
Schedule Color | Select the color for the report schedule that will be visible on the report calendar. |
Generate PDF Report Every | Select when the report is generated: • Enter a number for the frequency of the report based on the time period selected from the drop-down list, or select On Demand to only run the report manually. • If On Demand is not selected, enter a starting and ending date and time for the file generation, or set it for never ending. |
Notify | Select to add notification email recipients. |
Output Profile | Select an output profile for the report (optional). See “Output profiles” for more information. |
Advanced Settings |
| Print Table of Contents | Select the check-box to include a table of contents in the report. |
| Per-Device Reports | Select the check-box to generate a separate report for each managed device. |
| Print Device List | Select the check-box to include a device list in the report. Three styles are available from the drop-down list: • Compact: Display a compact comma-separated list of device names. • Count: Display only the number of devices. • Detailed: Display a table of device information for each device. |
| Language | Select the report language from the drop-down menu. The default language is English. |
| Enable Filters | Select the check-box to enable filters for the report schedule. The available filters are: users, groups, LDAP queries, hostnames, sources, and destinations. |
4. Select OK to create the report schedule.
To edit a report schedule:
1. Go to the Reports tab and select Report Schedules in the tree menu.
2. Select the schedule you would like to edit and then select Edit on the tool bar, or right-click on the schedule list and select Edit from the pop-up menu.
The
Edit Schedule dialog box opens. It contains all the same settings as the Create New Schedule dialog box, see
Figure 110.
3. Edit the report schedule as required and select OK to apply the changes.
To delete a report schedule:
1. Go to the Reports tab and select Report Schedules in the tree menu.
2. Select the schedule you would like to delete and then select Delete on the tool bar, or right-click on the schedule list and select Delete from the pop-up menu.
To delete multiple report schedules, select multiple reports and then select Delete from the tool bar or right-click menu.
To delete all report schedules, right click and select Select All from the pop-up menu, then select Delete from the tool bar or right-click menu.
3. Select OK in the confirmation dialog box to delete the report schedule.
To manually run a report schedule:
1. Go to the Reports tab and select Report Schedules in the tree menu.
2. Right-click on the schedule you would like to run and select Run from the pop-up menu.
The report schedule will run and the report will be generated. See
“History” for information on viewing the report.
To enable/disable a report schedule:
1. Go to the Reports tab and select Report Schedules in the tree menu.
2. Select the schedule or schedules you would like to enable or disable and then right-click on the schedule list and select Enable or Disable from the pop-up menu.
To enable or diable all report schedules, right click and select Select All from the pop-up menu, then select Enable or Disable from the right-click menu.