Limiting file uploads
A file upload restriction policy can perform the following tasks:
- Restrict file uploads based upon file type and size.
- Scan uploaded files for viruses and trojans
- Submit uploaded files to FortiSandbox for evaluation and generate attack log messages for files that FortiSandbox has identified as threats.
Restricting uploads by file type and size
Detection and restriction are performed by scanning Content-Type: and Content‑Length: headers in HTTP PUT and POST request methods submitted to your web servers.
For example, if you want to allow only specific types of files (MP3 audio files, PDF text files and GIF and JPG picture files) to be uploaded to:
http://www.example.com/upload.php
create a file upload restriction policy that contains rules that define only those specific file types. When FortiWeb receives an HTTP PUT or POST request for the /upload.php URL with Host: www.example.com, it scans the HTTP request and allows only the specified file types to be uploaded. FortiWeb blocks file uploads for any HTTP request that contains non-specified file types.
Using FortiSandbox to evaluate uploaded files
You can configure FortiWeb to submit all files that match your upload restriction rules to FortiSandbox. FortiWeb packs each of the files in TAR format and sends the TAR archives to FortiSandbox.
FortiSandbox evaluates whether the file poses a threat and returns the result to FortiWeb. If FortiSandbox determines that the file is malicious, FortiWeb performs the following tasks:
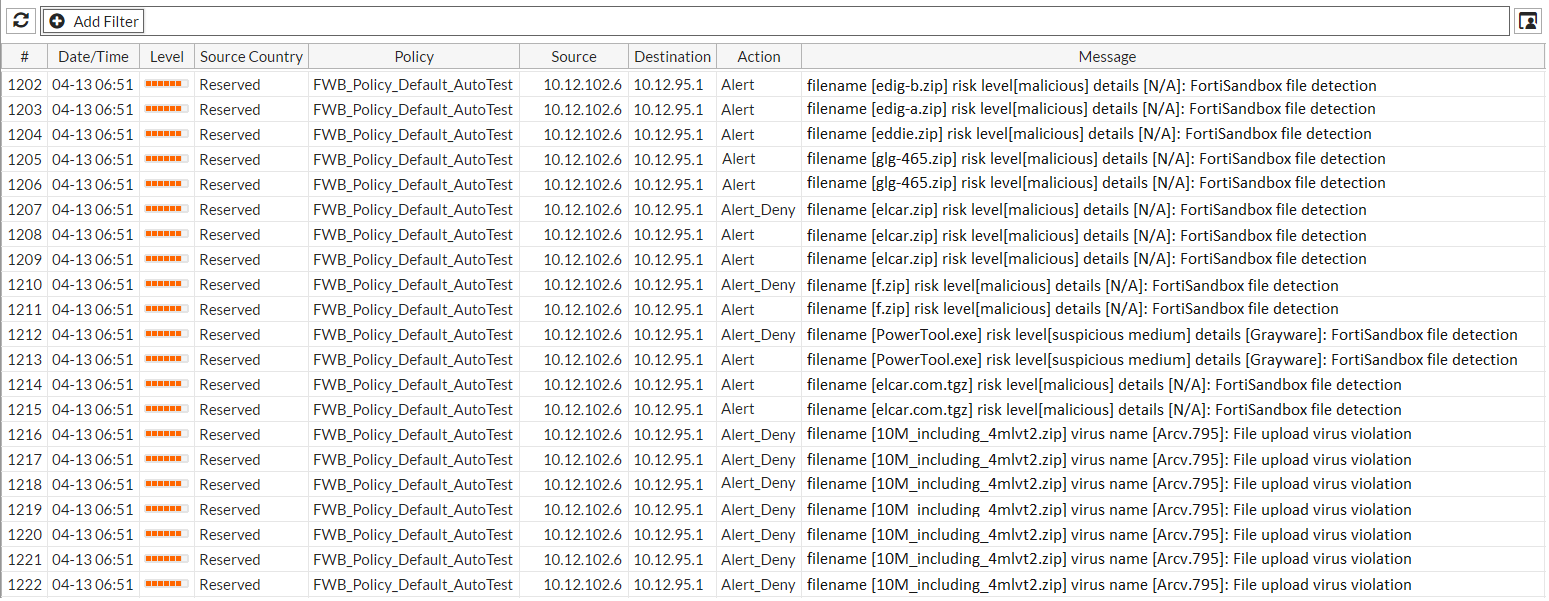
- Generates an attack log message that contains the result (for example, messages with the Alert action in the illustration).
- After it receives the FortiSandbox results, takes the action specified by the file upload restriction policy. During this time, it does not re-submit the file to FortiSandbox (for example, messages with the Alert_Deny action in the illustration).

|
By default, FortiWeb does not log a file transfer to FortiSandbox. You can manually enable it through the CLI command set elog enable in system fortisandbox. For details, see the FortiWeb CLI Reference.
When elog is enabled, FortiWeb generates a log only if a file is successfully transferred to the FortiSandbox. No logs are generated for failed transfers. You can see the logs in Log&Report > Log Access > Event.
|
Attack log with FortiSandbox file scan results
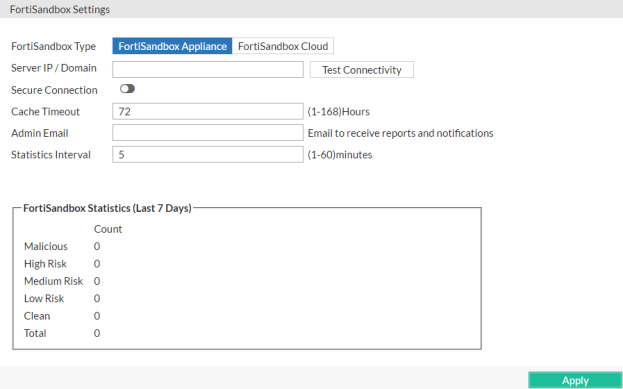
Go to System > Config > FortiSandbox to:
- Specify whether FortiWeb sends files to a physical appliance or VM version of FortiSandbox, or FortiSandbox Cloud.
- Specify the email address that the FortiSandbox sends weekly reports to.
- View results from FortiSandbox for the last 7 days.
-
To configure a file upload restriction
1. Go to Web Protection > Input Validation > File Upload Restriction and select the File Restriction Upload Rule tab.
To access this part of the web UI, your administrator’s account access profile must have Read and Write permission to items in the Web Protection Configuration category. For details, see Permissions.
2. Click Create New.
A dialog appears.
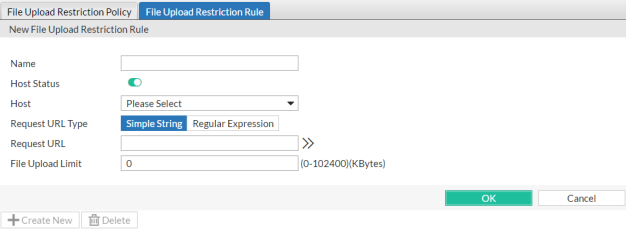
3. In Name, type a unique name that can be referenced by other parts of the configuration. Do not use spaces or special characters. The maximum length is 35 characters.
4. If you want to apply this file upload restriction rule only to requests for specific web hosts:
- Enable Host Status.
- From Host, select the IP address or FQDN of a protected host.
Disable Host Status to match the file upload restriction rule based upon the other criteria, such as the URL, but regardless of the Host: field
5. In Request URL, type the literal URL, such as /upload.php, to which the file upload restriction applies. The URL must begin with a slash ( / ).
Do not include the name of the host, such as www.example.com, which is configured separately in the Host drop-down list.
6. In File Upload Limit, type a number to represent the maximum size in kilobytes for any individual file. The upload rule rejects allowed files larger than this number. The valid range is from 0 to 102400 kilobytes (100 MB); FortiWeb 1000D, 3000D, 4000D, and E series have a valid range from 0 to 204800 kilobytes (200MB).
7. Click OK.
8. To add or remove file types, click Create New.
A dialog appears.
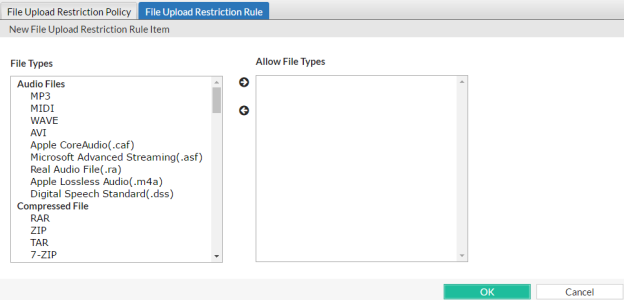
9. In the File Types pane, select the file types to allow, then click the right arrow (->) to move them to the Allow Files Types pane.
|
|
Microsoft Office Open XML file types such as .docx, xlsx, .pptx, and .vsdx are a type of ZIP-compressed XML. If you specify restrictions for them, those signatures will take priority. However, if you do not select a MSOOX restriction but do have an XML or ZIP restriction, the XML and ZIP restrictions will still apply, and the files will still be restricted. |
10. Click OK.
11. Go to Web Protection > Input Validation > File Upload Restriction and select the File Upload Restriction Policy tab.
To access this part of the web UI, your administrator’s account access profile must have Read and Write permission to items in the Web Protection Configuration category. For details, see Permissions.
12. Click Create New.
A dialog appears.
13. Configure these settings:

| Name |
Type a unique name that can be referenced in other parts of the configuration. Do not use spaces or special characters. The maximum length is 35 characters. |
| Action |
Select which action the FortiWeb appliance will take when it detects a violation of the rule:
- Alert — Accept the connection and generate an alert email and/or log message.
-
Alert & Deny — Block the request (reset the connection) and generate an alert and/or log message.
You can customize the web page that FortiWeb returns to the client with
the HTTP status code. See Customizing error and authentication pages (replacement messages).
-
Period Block — Block subsequent requests from the client for a number of seconds. Also configure Block Period.
You can customize the web page that FortiWeb returns to the client with
the HTTP status code. See Customizing error and authentication pages (replacement messages).
Note: If FortiWeb is deployed behind a NAT load balancer, when using this option, you must also define an X-header that indicates the original client’s IP (see Defining your proxies, clients, & X-headers). Failure to do so may cause FortiWeb to block all connections when it detects a violation of this type.
The default value is Alert & Deny.
Caution: This setting will be ignored if Monitor Mode is enabled.
Note: Logging and/or alert email will occur only if enabled and configured. See Logging and Alert email.
Note: If you will use this rule set with auto-learning, you should select Alert. If Action is Alert & Deny, or any other option that causes the FortiWeb appliance to terminate or modify the request or reply when it detects an attack attempt, the interruption will cause incomplete session information for auto-learning.
|
| Block Period |
Type the number of seconds that you want to block subsequent requests from the client after the FortiWeb appliance detects that the client has violated the rule.
This setting is available only if Action is set to Period Block. The valid range is from 1 to 3,600 (1 hour). The default value is 60. See also Monitoring currently blocked IPs.
|
| Severity |
When rule violations are recorded in the attack log, each log message contains a Severity Level (severity_level) field. Select which severity level the FortiWeb appliance will use when it logs a violation of the rule:
The default value is Low.
|
| Trigger Action |
Select which trigger, if any, that the FortiWeb appliance will use when it logs and/or sends an alert email about a violation of the rule. See Viewing log messages. |
| Trojan Detection |
Enable to scan for trojans, viruses, malware, and greyware. You must also configure a file upload restriction where you enable Antivirus Scan.
Attack log messages contain the file name and signature ID (for example, filename [eicar.com] virus name [EICAR_TEST_FILE]: Waf anti-virus) when this feature detects a possible virus.
In the Limiting file uploads column, select what FortiWeb does when it detects this type of attack.
To configure which database of signatures to use, select either Regular Virus Database, Extended Virus Database or FortiSandbox Malware Signature Database (see Choosing the virus signature database & decompression buffer).
Caution: Files greater than the scan buffer configured in Maximum Antivirus Buffer Size are too large for FortiWeb to decompress, and will pass through without being scanned. This could allow malware to reach your web severs. To block oversized files, you must configure Body Length.
Caution: To remain effective as new malware emerges, it is vital that your FortiWeb can connect to FortiGuard services to regularly update its engine and signatures. Failure to do so will cause this feature to become less effective over time, and may allow viruses to pass through your FortiWeb. For instructions on how to verify connectivity and enable automatic updates, see Connecting to FortiGuard services.
|
| Antivirus Scan |
Enable to scan for viruses, malware, and greyware.
Attackers often modify the HTTP header so that Content‑Type: indicates an allowed file type even though the byte code contained in the body is actually a virus. This scan ensures that the request actually contains the file type specified by Content‑Type: and is not infected.
|
| Scan Uploaded Files with FortiSandbox |
Enable to send matching files to FortiSandbox for evaluation.
Also specify the FortiSandbox settings for your FortiWeb. See To configure a FortiSandbox connection.
FortiSandbox evaluates the file and returns the results to FortiWeb.
If Antivirus scan is enabled and FortiWeb detects a virus, it does not send the file to FortiSandbox. |
14. Click OK.
15. Click Create New to include a rule in the set.
A dialog appears.
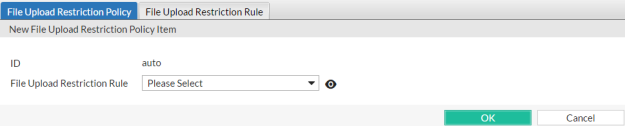
16. From the File Upload Restriction Rule drop-down list, select an existing file upload restriction rule that you want to use in the policy.
To view or change the information associated with the item, select the Detail link. The File Upload Restriction Rule dialog appears. Use the browser Back button to return.
17. Click OK.
18. Repeat the previous steps for each rule that you want to add to the file upload restriction policy.
19. To apply the file upload restriction policy, select it in an inline or offline protection profile (see Configuring a protection profile for inline topologies or Configuring a protection profile for an out-of-band topology or asynchronous mode of operation).
See also
To configure a FortiSandbox connection
- Go to System > Config > FortiSandbox.
- Complete the following settings:
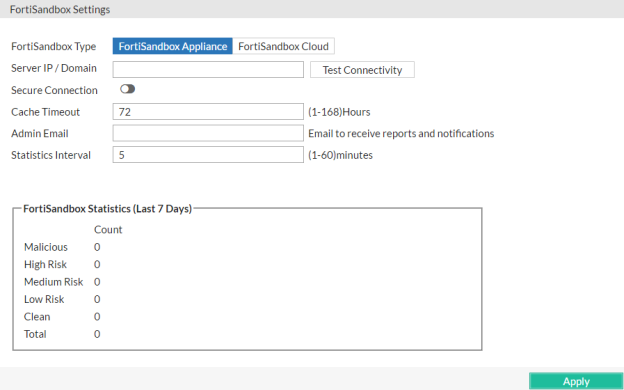
| FortiSandbox Type |
- FortiSandbox Appliance — Submit files that match the upload restriction rules to a FortiSandbox physical appliance or FortiSandbox-VM.
- FortiSandbox Cloud — Submit files to FortiSandbox Cloud. Requires you to register your FortiWeb and a FortiWeb FortiGuard Sandbox Cloud Service subscription.
|
| Server IP / Domain |
Enter the IP address or domain name of the FortiSandbox.
Available only when FortiSandbox Appliance is selected.
|
| Secure Connection |
Select to communicate with the specified FortiSandbox using SSL. |
| Cache Timeout |
After it receives the FortiSandbox results, FortiWeb takes the action specified by the file upload restriction policy. During this time, it does not re-submit the file to FortiSandbox; the range for the Cache Timeout is 1-168 hours. |
| Admin Email |
Enter the email address that FortiSandbox sends weekly reports and notifications to. |
| Statistics Interval |
Specifies how often FortiWeb retrieves statistics from FortiSandbox, in minutes. |
- Click Apply.
Open topic with navigation