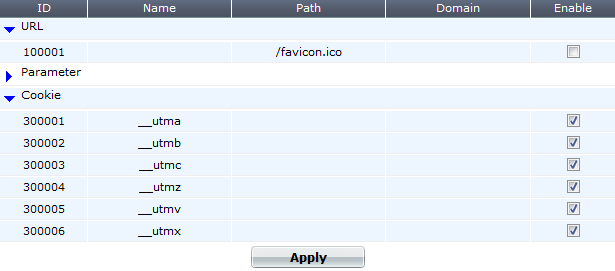
Server Objects > Global > Predefined Global White List displays a predefined list of common Internet entities, such as:
cookiesession1__utma/favicon.ico__LASTFOCUSthat your FortiWeb appliance can ignore when it enforces your policies. FortiGuard FortiWeb Security Service service updates the predefined global white list. However, you can also whitelist your own custom URLs, cookies, and parameters on Server Objects > Global > Custom Global White List.
When enabled, whitelisted items are not flagged as potential problems, nor incorporated into auto-learning data. This feature reduces false positives and improves performance.
To include white list items during policy enforcement and auto-learning reports, you must first disable them in the global white list.
1. Go to Server Objects > Global > Predefined Global White List.

To access this part of the web UI, your administrator’s account access profile must have Read and Write permission to items in the Server Policy Configuration category. For details, see Permissions.
2. To see the items that each section contains and to expose those items’ Enable check box, click the blue expansion arrows.
3. In the row of the item that you want to disable, clear the check box in the Enable column.
4. Click Apply.
5. To verify that an item is no longer whitelisted, you can enable auto-learning, then make a request to a protected web site. The auto-learning report should omit any items that you have disabled, such as the /favicon.ico URL. Alternatively, use the parameter or URL to attempt to trigger an attack signature that should block it.
1. Go to Server Objects > Global > Custom Global White List.
To access this part of the web UI, your administrator’s account access profile must have Read and Write permission to items in the Server Policy Configuration category. For details, see Permissions.
2. Click Create New.

3. From Type, select the part of the HTTP request where you want to white list an object. Available configuration fields vary by the type that you choose.
| Request Type | Indicate whether the Request URL field will contain a literal URL (Simple String), or a regular expression designed to match multiple URLs (Regular Expression). |
| Request URL |
Depending on your selection in the Request Type field, enter either:
Do not include the domain name, such as To create and test a regular expression, click the >> (test) icon. This opens the Regular Expression Validator window where you can fine-tune the expression (see Regular expression syntax) |
If Type is Parameter, in Name, type the name of the variable exactly as it appears in the URL or HTTP body (varies by HTTP GET/POST method).
For example, if the URL ends with the parameter substring ?userName=rowan, you would type userName (note the capital letter).
| Name | Type the name of the cookie as it appears in the HTTP request, such as NID. |
| Domain |
Type the partial or complete domain name or IP address as it appears in the cookie, such as:
If clients sometimes access the host via IP address instead of DNS, create white list objects for both. Caution: Do not whitelist untrusted subdomains that use vulnerable cookies. It could compromise the security of that domain and its network. |
| Path | Type the path as it appears in the cookie, such as / or /blog/folder. |
4. Click OK.
5. To verify that an item is now whitelisted, you can enable auto-learning, then make a request to a protected web site. The auto-learning report should include any items that you have whitelisted. Alternatively, use the parameter or URL to attempt to trigger an attack signature that would normally block it; the item should now be allowed.