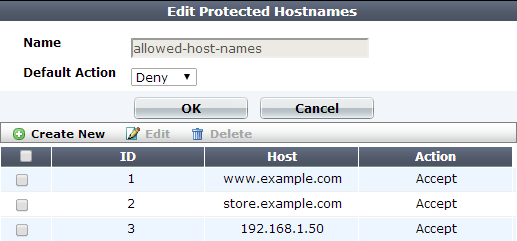
You use protected host names in a server policy to restrict requests to specific hostnames. If you want to specify specific hosts to apply a policy to, use the HTTP content routing feature. See Routing based on HTTP content.
A protected host group (also called “allowed hosts” or “protected host names”, depending on how the host name is used in each context) defines one or more IP addresses or fully qualified domain names (FQDNs). Each entry in the group defines a virtual or real web host, according to the Host: field in the HTTP header of requests. You can use these entries to determine which host names:
For example, if your FortiWeb receives requests with HTTP headers, such as:
Host: www.example.com
you might define a protected host group with an entry of www.example.com and select it in Protected Hostnames in the policy. This would block requests that are not for that host.
|
|
A protected host names group is usually not the same as a back-end web server. See Protected web servers vs. allowed/protected host names. You use protected host names in a server policy to restrict requests to specific hostnames. If you want to specify specific hosts to apply a policy to, use the HTTP content routing feature. See Routing based on HTTP content. |
Used differently, you might select the www.example.com entry in Host when defining requests where the parameters should be validated. This would apply protection only for that host.
Unlike a web server, which is a single IP at the network layer, a protected host group should contain all network IPs, virtual IPs (VIP), and domain names that clients use to access the web server at the HTTP layer.
For example, clients often access a web server via a public network such as the Internet. Therefore, the protected host group contains public domain names, IP addresses and virtual IPs on a network edge router or firewall, such as:
But in reverse proxy mode, the physical or domain server is the IP address or domain name that the FortiWeb appliance uses to forward traffic to the back-end web server behind the NAT and, therefore, is often a private network address:
As another example, for entry level or virtualized web hosting, many Apache virtual hosts:
may exist on one or more back-end web servers which each have one or more network adapters, each with one or more private network IP addresses that are hidden behind a reverse proxy FortiWeb:
The virtual hosts would be added to the list of FortiWeb’s protected host names, while the network adapters’ IP addresses would be added to the list of physical servers.
1. Go to Server Objects > Protected Hostnames > Protected Hostnames.
To access this part of the web UI, your administrator’s account access profile must have Read and Write permission to items in the Server Policy Configuration category. For details, see Permissions.
2. Click Create New.
A dialog appears.

3. In Name, type a name that can be referenced by other parts of the configuration. Do not use spaces or special characters. The maximum length is 35 characters.
4. From Default Action, select whether to accept or deny HTTP requests that do not match any of the host definitions in this protected host group. (In step 8, you can override this default for specific hosts.)
For example, let’s say that you have 10 web hosts protected by FortiWeb. You want to allow 8 and block 2. To do this, first set Default Action to Accept. Then in step 8, you will create 2 entries for the host names that you want to block, and in their Action, select Deny.
5. Click OK.
6. If you want to treat one or more hosts differently than indicated in Default Action, click Create New.
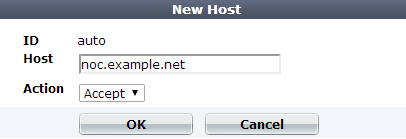
A dialog appears.

7. For , enter the IP address or FQDN of a real or virtual host, according to the Host: field in HTTP requests.
If clients connect to your web servers through the IP address of a virtual server on the FortiWeb appliance, this should be the IP address of that virtual server or any domain name to which it resolves, not the IP address of the protected web server.
For example, if a virtual server 10.0.2.1/24 forwards traffic to the physical server 192.0.2.1, for protected host names, you would enter:
10.0.2.1, the address of the virtual serverwww.example.com, the domain name that resolves to the virtual serverYour entry must match the whole host name exactly. Wild cards such as *.example.com are not supported. If you require wild card host name matches, use HTTP Host: header access control rules instead (see Combination access control & rate limiting).
8. In Action, select whether to Accept or Deny HTTP requests whose Host: field matches this Host entry.
9. Click OK.
10. Repeat the previous steps for each host that you want to add to the protected host group.
11. To apply a protected host group, select it in a server policy (see Configuring a server policy). Policies use protected host definitions to block connections that are not destined for a protected host. If you do not select a protected host group in a server policy, and you do not configure a combination access control rule with an HTTP Host: condition either, FortiWeb accepts or blocks connections regardless of the Host: field.