When viewing a report generated from auto-learning data, you can generate an inline protection profile or an offline protection profile suitable for the HTTP sessions observed. If some observed sessions are not indicative of typical traffic and you do not want to include elements in the generated profile, or you want to select an action other than the default for a type of observed attack, you can selectively change the action for that type of attack.
In addition to the generated profile itself, the FortiWeb appliance also generates all rules and other auxiliary configurations that the profile requires.
For example, FortiWeb observes HTTP PUT requests that require a password and a user name that is an email address. When it generates a profile, it also uses the data types and maximum lengths of the arguments observed in the HTTP sessions to generate the required parameter validation rules and input rules.
You can edit the generated profiles and auxiliary configurations or use them as the starting point for additional configuration.
1. Go to Auto Learn > Auto Learn Report > Auto Learn Report.
To access this part of the web UI, your administrator’s account access profile must have Read and Write permission to items in the Autolearn Configuration category. For details, see Permissions.
2. Mark the check box in the row that corresponds to the auto-learning profile whose data you want to view.
3. Click View.
The report appears.
4. Review the configuration suggestions from auto-learning.
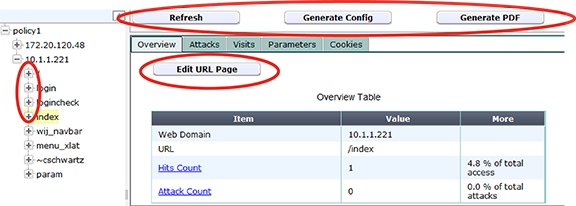
If you want to adjust the behavior of the profile and components to generate, in the left-hand pane, click the expand icon ( + ) next to items to expand the tree, then click the name of the single URL whose protection you want to manually configure.
Buttons and drop-down lists in the report display pane may vary. For most URLs, they enable you to adjust the profile that FortiWeb generates.
Auto-learning suggests an appropriate configuration based upon the traffic that it observed. If a suggestion is not appropriate, you can manually override it.
Configure these settings:
| Setting name | Description | |
|---|---|---|
| Overview tab | ||
| Edit Protected Servers |
Click to open a pop-up dialog. Enable or disable the IP addresses and/or domain names that will be members of the generated protected host names group. For details, see Defining your protected/allowed HTTP “Host:” header names. This appears only if you have selected the name of the auto-learning profile in the navigation pane. |
|
| Edit URL Page |
Click to open a pop-up dialog. Enable or disable whether the currently selected URL will be included in start pages and white/black IP list rules in the generated profile. This appears only if you have selected a URL in the navigation pane. For more information on those rule types, see Specifying URLs allowed to initiate sessions and Access control. |
|
| Attacks Tab | ||
| Action and Enable |
Select from the Enable drop-down list to enable or disable detection of each type of attack, and select from Action which action that the generated profile will take. The availability of these lists varies with the level of the item selected in the navigation pane. For details, see the actions in Configuring a protection profile for inline topologies or Configuring a protection profile for an out-of-band topology or asynchronous mode of operation. |
|
| Visits Tab | ||
| Edit Allow Method |
Click to open a pop-up dialog. Change the Status option to select which HTTP request methods to allow in the generated profile. This appears only if you have selected a profile in the navigation pane. For details, see Configuring a protection profile for inline topologies and Configuring a protection profile for an out-of-band topology or asynchronous mode of operation. |
|
| Edit URL Access |
Click to open a pop-up dialog. This appears only if you have selected a profile in the navigation pane. For details, see Access control. |
|
| Edit Start Page |
Click to open a pop-up dialog. This appears only if you have selected a profile in the navigation pane. For details, see Specifying allowed HTTP methods. |
|
| Edit Exception Method |
Click to open a pop-up dialog. This appears only if you have selected a URL in the navigation pane. For details, see Configuring allowed method exceptions. |
|
| Most hit IP table: Edit Content Type |
Click to edit the values that FortiWeb adds to the Content Type filter in an automatically generated Advanced Protection custom rule. This rule is designed to detect web scraping (content scraping) activity. Available only if a policy or host is selected in the navigation pane. For more information, see Most hit IP table and web scraping detection. |
|
| Most hit IP table: row selection button |
Selects the data that FortiWeb uses to create an Occurrence filter in an Advanced Protection custom rule in the generated profile. This rule is designed to detect web scraping activity. Available only if a policy or host is selected in the navigation pane. For more information, see Most hit IP table and web scraping detection. |
|
| Parameters tab | ||
| Set |
Type the data type and maximum length of the parameter, and indicate whether or not the parameter is required input. These settings will appear in the generated parameter validation rule and input rules. For details, see Validating parameters (“input rules”) and Preventing zero-day attacks. Caution: Before you leave the page, mark the Custom check boxes for rows where you have clicked this icon. Failure to do so will cause FortiWeb appliance to discard your settings when you leave the page. |
|
| Custom | Before you click Set or leave the page, enable this option for each row whose manual settings you want to save. | |
5. Above the display pane, click Generate Config.
A pop-up dialog appears.
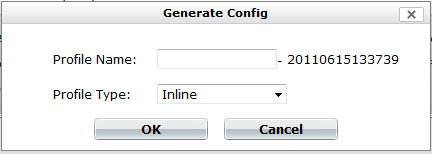
6. In Profile Name, type a name prefix, such as generated-profile.
The FortiWeb appliance adds a dash ( - ) to the profile name followed by a number indicating the year, month, day, and time on which the profile was generated in order to indicate the data on which the profile was based.
7. From Profile Type, select which type of web profile you want to generate, either Inline (to generate an inline protection profile) or Offline (to generate an offline protection profile).
8. Click OK.
The generated profile appears in either:
|
|
Adjust configuration items used by the generated profile, such as input rules, when necessary. Generated configuration items are based on auto-learning data current at the time that the profile is generated. Data may have changed while you were reviewing the auto-learning report, and/or after you have generated the profiles. |
If you do not configure any settings, by default, the FortiWeb appliance generates a profile that allows the HTTP GET method and any other methods whose usage exceeded the threshold, and adds the remaining methods to an allowed method exception. It also creates start page rules and trusted IP rules for the most commonly requested URLs, and blacklist IP addresses that commonly requested suspicious URLs. Attack signatures are disabled or exceptions added according to your configurations in Generating a profile from auto-learning data and Generating a profile from auto-learning data.
9. Continue with Transitioning out of the auto-learning phase.