Configuring virtual servers on your FortiWeb
Before you can create a server policy, you must first configure a virtual server that defines the network interface or bridge and IP address where traffic destined for a server pool arrives. When the FortiWeb appliance receives traffic destined for a virtual server, it can then forward the traffic to a a single web server (for Single Server server pools) or distribute sessions/connections among servers in a server pool.

|
A virtual server on your FortiWeb is not the same as a virtual host on your web server. A virtual server is more similar to a virtual IP on a FortiGate. It is not an actual server, but simply defines the listening network interface. Unlike a FortiGate VIP, it includes a specialized proxy that only picks up HTTP and HTTPS.
By default, in reverse proxy mode, FortiWeb’s virtual servers do not forward non-HTTP/HTTPS traffic from virtual servers to your protected web servers. (It only forwards traffic picked up and allowed by the HTTP reverse proxy.) You may be able to provide connectivity by either deploying in a one-arm topology where other protocols bypass FortiWeb, or by enabling FortiWeb to route other protocols. See also Topology for reverse proxy mode and the config router setting command in the FortiWeb CLI Reference.
|
The FortiWeb appliance identifies traffic as being destined for a specific virtual server if:
- the traffic arrives on the network interface or bridge associated with the virtual server
- for reverse proxy mode, the destination address is the IP address of a virtual server (the destination IP address is ignored in other operation modes, except that it must not be identical to the web server’s IP address)

|
Virtual servers can be on the same subnet as real web servers. This configuration creates a one-arm HTTP proxy. For example, the virtual server 10.0.0.1/24 could forward to the web server 10.0.0.2.
However, this is not usually recommended. Unless your network’s routing configuration prevents it, it would allow clients that are aware of the web server’s IP address to bypass the FortiWeb appliance by accessing the back-end web server directly. The topology may be required in some cases, however, such as IP-based forwarding, mentioned above. |
To configure a virtual server
1. Go to Server Objects > Server > Virtual Server.

Each server entry includes an Enable check box, marked by default. Clear this check box if you need to disable the server. See Enabling or disabling traffic forwarding to your servers.
To access this part of the web UI, your administrator’s account access profile must have Read and Write permission to items in the Server Policy Configuration category. For details, see Permissions.
2. Click Create New.
A dialog appears.
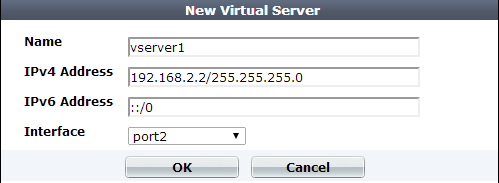
3. In Name, type a unique name that can be referenced by other parts of the configuration. Do not use spaces or special characters. The maximum length is 35 characters.
4. In IP Address, type the IP address and subnet of the virtual server.
If the FortiWeb appliance is operating in offline protection mode or either of the transparent modes, this IP address is ignored when deciding whether or not to apply a server policy to the connection, and can therefore be any IP address. There is one exception: it must not be identical to the web server. If the virtual server’s IP is identical to the real web server, the configuration will not function.
|
|
If a policy has any virtual servers with IPv6 addresses, it will not apply features that do not yet support IPv6, even if they are selected. |
5. In Interface, select the network interface or bridge to which the virtual server is bound, and where traffic destined for the virtual server will arrive. To configure an interface or bridge, see Network interface or bridge?.
6. Click OK.
7. To define the listening port of the virtual server, create a custom service (see Defining your network services).
8. To use the virtual server, select both it and the custom service in a server policy (see Configuring a server policy).
See also
Open topic with navigation