Watching recorded video clips
In addition to live video feeds, you can also watch the recorded video clips, which include the scheduled recording, motion detection recording, and manual recording.
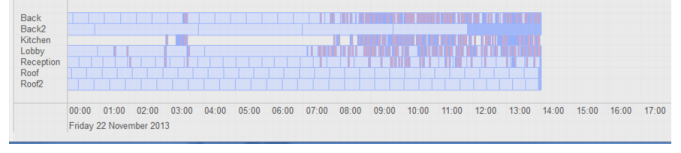
Time periods in the time line panel are color-coded:
• Yellow — A system event such as a software update, system reboot, or camera reboot. Recordings cannot be stored while FortiRecorder is unavailable.
• Light blue — The lightest blue denotes previously recorded clips, the darker blue denotes temporary recording (see descriptions below), the darkest blue denotes manually initiated recording. If a camera is not currently recording a continuous or motion detection-triggered video, operators can manually trigger the camera to record video using the Control pane. Bright blue — A bright blue tag over a video clip represents recording with an attached annotation/marker. While a camera is recording, you can insert markers with notes about what is currently being seen. If the camera is not recording, after you enter the marker and click Insert Marker, the camera will start to record.
• Red — A motion detection-based recording that was not initiated by schedule.
• A white/blank space means there is no recording at that period of time.
About temporary recording
If the camera is not scheduled to record, but you are watching live feed from the camera, the video feed from the camera will be temporarily recorded in memory but not saved on the hard drive. When you stop watching the live feed from that camera, the temporary recording will be deleted. However, if you initiate manual recording while watching the live feed from the camera, the temporary recording will be saved on the hard drive.
To watch the recorded video
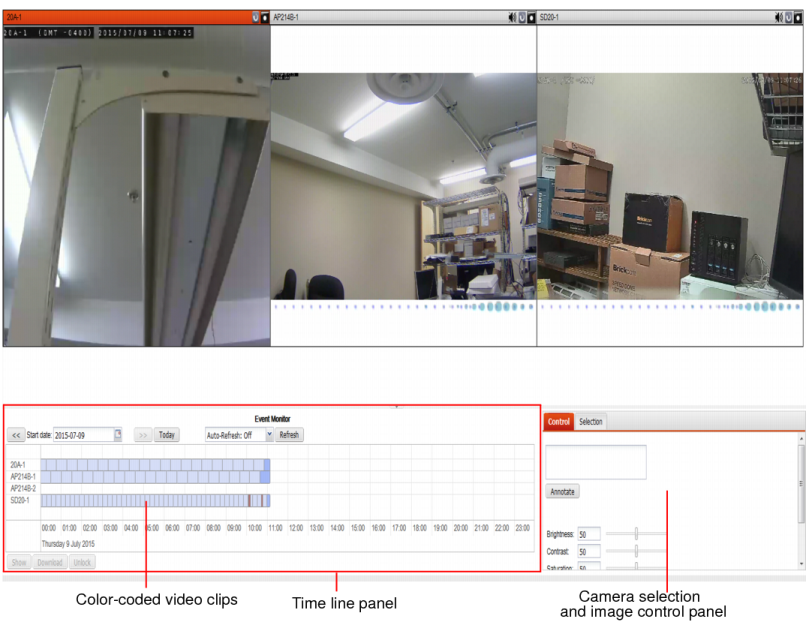
1. Go to Monitor > Video Monitor. The recorded video clips are in the Event Monitor area and the video clips for each camera appears as a time line.
2. Be default, the time frame is minimized. To easily select a video clip, use the scroll wheel on your mouse to zoom in a time frame. Ensure that the mouse cursor is centered in the area that you want to zoom in. See the following pictures:
3. After you select the segment (if it is a motion-detection clip, a few key frames will appear for preview purpose), you can do the following:
• Click the Show button to view clip.
• Click the
Download button to download the clip for archival or viewing on another computer. If your cameras have recorded a crime or other incident, you may need to provide the video clip to the police or other authorities. Your FortiRecorder NVR uses the .mp4 file format with the H.264 video codec, which can be viewed on Windows, Mac OS X, Linux, and other platforms using QuickTime,
VLC or
other compatible players. All video files are signed with an RSA 2048-bit signature to provide tamper protection. This applies to files stored locally, remotely, and downloaded. Quality of previously recorded video depends on the camera’s settings in
“Configuring video profiles” on page 36.
• Click the Lock button to lock the clip so that the operators and viewers will not be able to view it.
4. To scroll through the time line, use your mouse to click and drag.
5. To set the time span of the time line, from Start date, select the beginning date of the recording.
6. To manually control the camera to pause or start recording, in the pane on the right side, click the Control bar to expand it, then click the buttons to pause or record.
7. To adjust the image quality, in the pane on the right side, click the Control bar to expand it, then click the + or - buttons to adjust Brightness, Contrast, Saturation, and Sharpness. Only administrators can use these controls, to prevent operators from accidentally or maliciously blacking-out the view.
| Set these settings with care. After video is recorded, it won’t be possible to adjust the image quality again unless you download the file and use video editing software. Video editing software may not be able to successfully correct for excessively bad image quality |
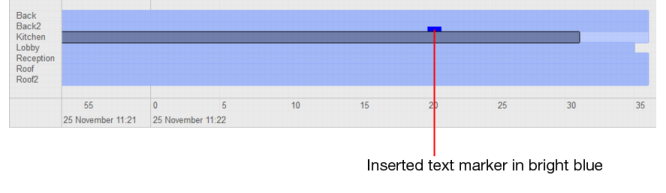
8. To add a note to the video (e.g. “Suspicious light”), in the pane on the right side, click the Control bar to expand it, type your note in the text area, then click the Insert Marker button. A bright blue marker will appear on the clip and the added note will appear as mouse over text. Note that you must zoom in to see the marker. Otherwise it is very small on the time line. See the following picture.
See also