Installing NVR firmware
You can use either the web UI or the CLI to upgrade or downgrade the appliance’s operating system.
Firmware changes are either:
• an update to a newer version
• a reversion to an earlier version
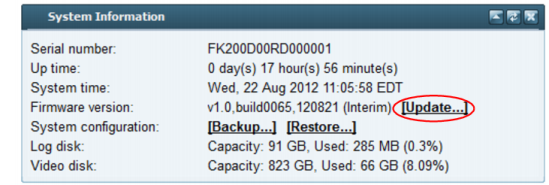
To determine if you are updating or reverting the firmware, go to Monitor > System Status > Status and in the System Information widget, see the Firmware Version row. (Alternatively, in the CLI, enter the command get system status.)
For example, if your current firmware version is:
FortiRecorder-200D v1.0,build0065,120821
changing to
FortiRecorder-200D v1.0,build0066,120824
an earlier build number (65) and date (120821 means August 21, 2012), indicates that you are reverting.
| Back up your configuration before beginning this procedure. Reverting to an earlier firmware version could reset settings that are not compatible with the new firmware. For information on backups, see “Regular backups”. For information on reconnecting to a FortiRecorder appliance whose network interface configuration was reset, see “Connecting to FortiRecorder web UI”. |
| If you are installing a firmware version that requires a different size of system partition, you may be required to format the boot device before installing the firmware by re-imaging the boot device. Consult the Release Notes. In that case, do not install the firmware using this procedure. Instead, see “Restoring firmware (“clean install”)”. |
To install firmware via the web UI
1. Download the firmware file from the Fortinet Technical Support web site:
2. Log in to the web UI of the FortiRecorder appliance as the admin administrator.
3. Go to Monitor > System Status > Status.
4. In the System Information widget, in the Firmware version row, click Update.
The Choose Firmware dialog appears.
5. Click Browse to locate and select the firmware file that you want to install, then click OK.
6. Click OK.
Your management computer uploads the firmware image to the FortiRecorder appliance. The FortiRecorder appliance installs the firmware and restarts. The time required varies by the size of the file and the speed of your network connection, and by the amount of time that the specific model requires to reboot. Over a LAN connection, it should only take a couple minutes until the appliance becomes available again.
| If you are downgrading the firmware to a previous version, and the settings are not fully backwards compatible, the FortiRecorder appliance may either remove incompatible settings, or use the feature’s default values for that version of the firmware. You may need to reconfigure some settings. |
7. Clear the cache of your web browser and restart it to ensure that it reloads the web UI and correctly displays all interface changes. For details, see your browser's documentation.
8. To verify that the firmware was successfully installed, log in to the web UI and go to Monitor > System Status > Status.
In the System Information widget, the Firmware version row indicates the currently installed firmware version.
To install firmware via the CLI
1. Download the firmware file from the Fortinet Technical Support web site:
2. Copy the new firmware image file to the root directory of the TFTP server.
3. Connect your management computer to the FortiRecorder console port using a RJ-45-to-DB-9 serial cable or a null-modem cable.
4. Connect port1 of the FortiRecorder appliance directly or to the same subnet as a TFTP server.
5. Initiate a connection from your management computer to the CLI of the FortiRecorder appliance, and log in as the admin administrator.
6. If necessary, start your TFTP server. (If you do not have one, you can temporarily install and run one such as
tftpd (
Windows,
Mac OS X, or
Linux) on your management computer.)
| Because TFTP is not secure, and because it does not support authentication and could allow anyone to have read and write access, you should only run it on trusted administrator-only networks, never on computers directly connected to the Internet. If possible, immediately turn off tftpd off when you are done. |
7. Verify that the TFTP server is currently running, and that the FortiRecorder appliance can reach the TFTP server.
To use the FortiRecorder CLI to verify connectivity, enter the following command:
execute ping 192.168.1.168
where 192.168.1.168 is the IP address of the TFTP server.
8. Enter the following command to download the firmware image from the TFTP server to the FortiRecorder appliance:
execute restore image tftp <name_str> <tftp_ipv4>
where <name_str> is the name of the firmware image file and <tftp_ipv4> is the IP address of the TFTP server. For example, if the firmware image file name is image.out and the IP address of the TFTP server is 192.168.1.168, enter:
execute restore image tftp image.out 192.168.1.168
One of the following message appears:
This operation will replace the current firmware version!
Do you want to continue? (y/n)
or:
Get image from tftp server OK.
Check image OK.
This operation will downgrade the current firmware version!
Do you want to continue? (y/n)
9. Type y.
The FortiRecorder appliance downloads the firmware image file from the TFTP server. The FortiRecorder appliance installs the firmware and restarts. The time required varies by the size of the file and the speed of your network connection.
| If you are downgrading the firmware to a previous version, the FortiRecorder appliance reverts the configuration to default values for that version of the firmware. You will need to reconfigure the FortiRecorder appliance or restore the configuration file from a backup. For details, see “Connecting to FortiRecorder web UI” and, if you opt to restore the configuration, “Restoring a previous configuration”. |
10. To verify that the firmware was successfully installed, log in to the CLI and type:
get system status
The firmware version number is displayed.
See also