Connecting FortiRecorder to the cameras
After you configure the DHCP server (you do not have to if you already have one), you can connect and configure the cameras.
Once you connect the cameras to the NVR, the NVR can automatically discover the cameras. Then you can configure the discovered cameras.

Requirements
• On your computer, the Apple QuickTime 7.1 or greater plug-in installed for your web browsers
• At the camera’s location on the network, power over Ethernet (PoE)
This could be provided by a FortiSwitch-80-PoE or perhaps your ISP’s cable modem.
To connect FortiRecorder to your cameras
1. If this is the first time you connect to FortiRecorder, change your PC’s IP address to be on the same subnet as the FortiRecorder port1’s default IP address 192.168.1.99. For example, set your PC’s IP to 192.168.1.98.
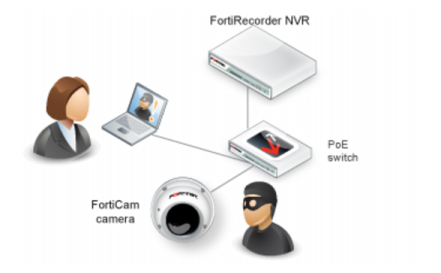
2. Connect your PC and FortiRecorder’s port1to a PoE switch. Do not connect the camera to the switch at this stage.
3. On your PC, open a web browser and connect to https://192.168.1.99. Log in to the admin administrator account with Name: admin and Password: (none).
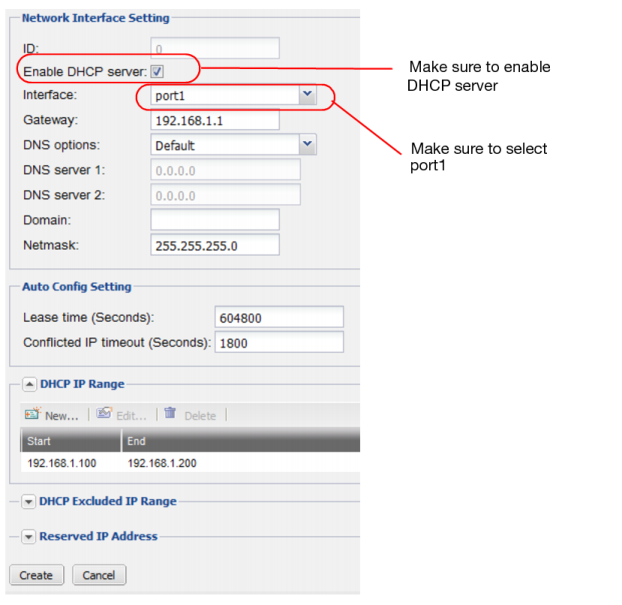
4. If you want to use the FortiRecorder DHCP service, configure the DHCP server as described in the next step. If you already have a DHCP server to use on your network, skip the next step.
5. On the FortiRecorder web UI, go to
System > Network > DHCP, and click
New to create a new DHCP server on port1. 
6. Go to
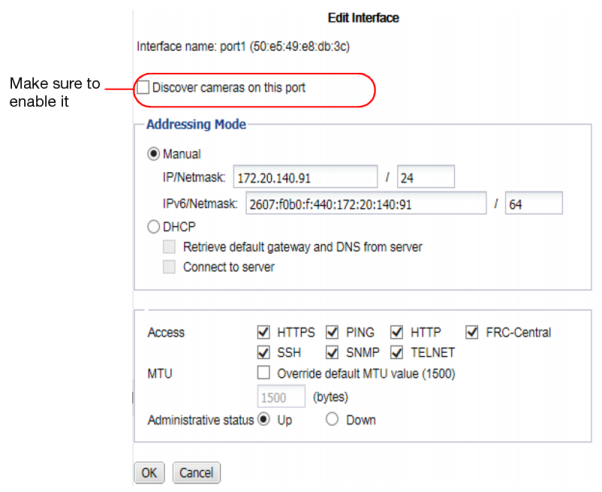
System > Network > Interface. Select port1 and click
Edit. 
7. Make sure Discover cameras on this port is enabled.
8. Connect the camera to the PoE switch now.
| If you connect the camera to the switch before you have configured and enabled the DHCP server on FortiRecorder, the camera will use its default IP address, which might not be working on your network. Therefore, you must reboot the camera to get an IP address from the FortiRecorder DHCP server by unplugging the camera from the switch and plugging it back. |
9. Go to
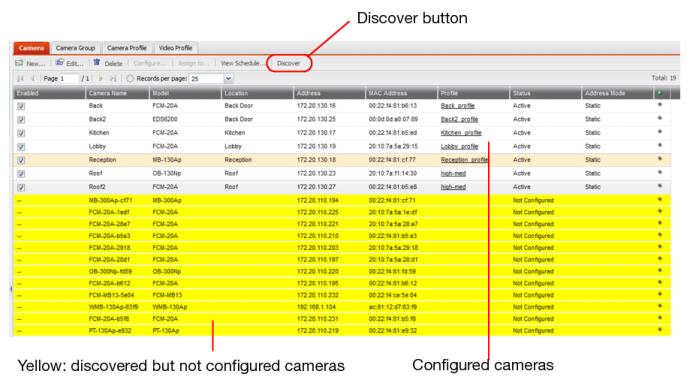
Camera > Configuration > Camera, and click
Discover. After several seconds, a list of discovered cameras should appear. Newly discovered cameras will be highlighted in yellow, and their
Status column will contain
Not Configured.

11. Go to Monitor > Video Monitor to view the live feed from the camera.


