Using IPS to protect your web server
Many companies have web servers and they must be protected from attack. Since web servers must be accessible, protection is not as simple as blocking access. IPS is one tool your FortiGate unit has to allow you to protect your network.
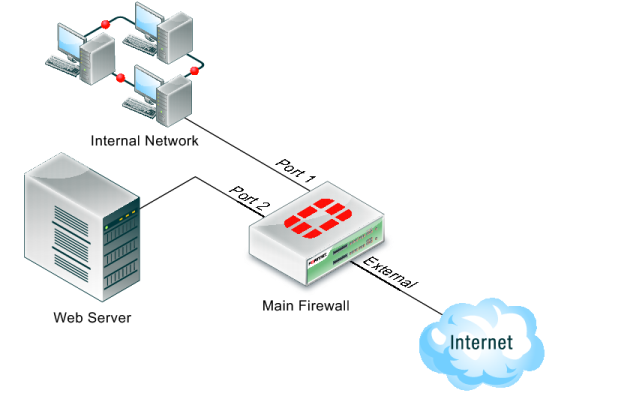
In this example, we will configure IPS to protect a web server. As shown in
Figure 309, a FortiGate unit protects a web server and an internal network. The internal network will have its own policies and configuration but we will concentrate on the web server in this example.
Figure 309: A simple network configuration
The FortiGate unit is configured with:
• a virtual IP to give the web server a unique address accessible from the Internet.
• a security policy to allow access to the web server from the Internet using the virtual IP.
To protect the web server using intrusion protection, you need to create an IPS sensor, populate it with filters, then enable IPS scanning in the security policy.
To create an IPS sensor
1. Go to Security Profiles > Intrusion Protection > IPS Sensors and select Create New.
2. Enter web_server as the name of the new IPS sensor.
3. Select OK.
The new IPS sensor is created but it has no filters, and therefore no signatures are included.
The web server operating system is Linux, so you need to create a filter for all Linux server signatures.
To create the Linux server filter
1. Go to Security Profiles > Intrusion Protection > IPS Sensors and select the web_server IPS sensor and select the Edit icon.
2. Select Add Filter.
3. Enter Linux Server as the name of the new filter.
4. For Target, select Specify and choose server.
5. In the Filter Options choose the following:
a. For Severity: select all of the options
b. For Target: select server only.
c. For OS: select Linux only.
6. Select OK.
The filter is saved and the IPS sensor page reappears. In the filter list, find the Linux Server filter and look at the value in the Count column. This shows how many signatures match the current filter settings. You can select the View Rules icon to see a listing of the included signatures.
To edit the security policy
1. Go to Policy > Policy > Policy, select security policy that allows access to the web server, and select the Edit icon.
2. Enable IPS option and choose the web_server IPS sensor from the list.
3. Select OK.
Since IPS is enabled and the web_server IPS sensor is specified in the security policy controlling the web server traffic, the IPS sensor examines the web server traffic for matches to the signatures it contains.