FortiClient WAN optimization over SSL VPN configuration example
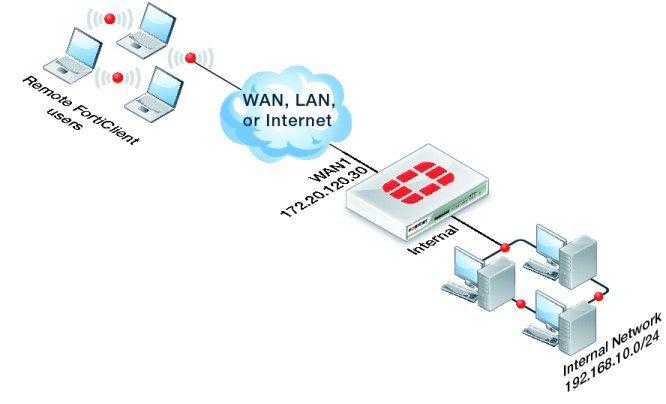
This example shows how to add WAN optimization to a FortiClient SSL VPN. The SSL VPN tunnel allows remote FortiClient users to connect to the internal network behind the FortiGate unit as shown in
Figure 407.
To configure the FortiGate unit
Because computers running FortiClient can have IP addresses that change often, it is usually not practical to add FortiClient peers to the FortiGate WAN optimization peer list. Instead, a FortiGate unit that accepts WAN optimization tunnel requests from FortiClient is usually configured to accept any peer (see
“Accepting any peers”). This example does this by adding a WAN optimization authentication group with
Peer acceptance set to
Accept Any Peer.
In addition this example includes a wanopt to internal policy to allow WAN optimization traffic reach the internal network. Finally passive WAN optimization is added to the ssl.root policy because WAN optimization is accepting traffic from the SSL VPN tunnel.
1. Go to WAN Opt. & Cache > WAN Opt. Peer > Authentication Group and select Create New.
2. Configure the WAN optimization authentication group:
Name | auth-fc |
Authentication Method | Certificate |
Certificate | Fortinet_Firmware |
Peer Acceptance | Accept Any Peer |
3. Select OK.
4. Go to WAN Opt. & Cache > WAN Opt. Profiles > Profiles and select Create New (select the + button).
5. Add a profile for FortiClient WAN optimization sessions:
Name | Fclient_Pro |
Transparent Mode | Select |
Authentication Group | auth-fc |
6. Select any Protocols and any settings for each protocol.
7. Select OK.
8. Go to Firewall Objects > Address > Addresses and select Create New to add a firewall address for the internal network that FortiClient users can access.
Category | Address |
Address Name | Internal-Server-Net |
Type | IP Range |
Subnet / IP Range | 192.168.10.0/24 |
Interface | internal |
9. Go to Policy > Policy > Policy and select Create New to add a WAN optimization tunnel policy.
Policy Type | Firewall |
Policy Subtype | Address |
Incoming Interface | wanopt |
Source Address | all |
Outgoing Interface | internal |
Destination Address | all |
Schedule | always |
Service | ALL |
Action | ACCEPT |
10. Select OK.
11. Select Create New to add an ssl.root policy with passive WAN optimization.
| If you already have an ssl.root to internal policy you can edit it and enable passive WAN optimization as shown in Step 13. |
Policy Type | Firewall |
Policy Subtype | Address |
Incoming Interface | ssl.root |
Source Address | all |
Outgoing Interface | internal |
Destination Address | Internal-Server-Net |
Schedule | always |
Service | ALL |
Action | ACCEPT |
12. Optionally, select the Security Profiles to apply to the WAN optimization traffic.
13. Select Enable WAN Optimization and configure the following settings:
Enable WAN Optimization | passive |
Passive Option | default |
14. Select OK.
To configure FortiClient and start the WAN optimization SSL VPN connection
1. Open FortiClient, configure Advanced settings, and select Enable WAN optimization.
2. Add a new SSL VPN connection.
Set the Server to the WAN1 IP address of the FortiGate unit (172.20.120.30 in this example) and the correct SSL VPN port number (usually 10443 or 443).
No other settings are required for this example. You can add authentication in the form of a user name and password if required by the FortiGate unit.
3. Start the SSL VPN tunnel.
4. Accept the certificate.
You should be connected to the SSL VPN tunnel and traffic in it should be optimized.