Configuring auth policies
Auth policies set the conditions that mandate authentication and reference the user group that has authorization. For example, you can define an auth policy that has the following logic: if the Host header matches example.com and the URI matches /index.html, then the group example-group is authorized. FortiADC supports the Basic Authentication Scheme described in
RFC 2617.
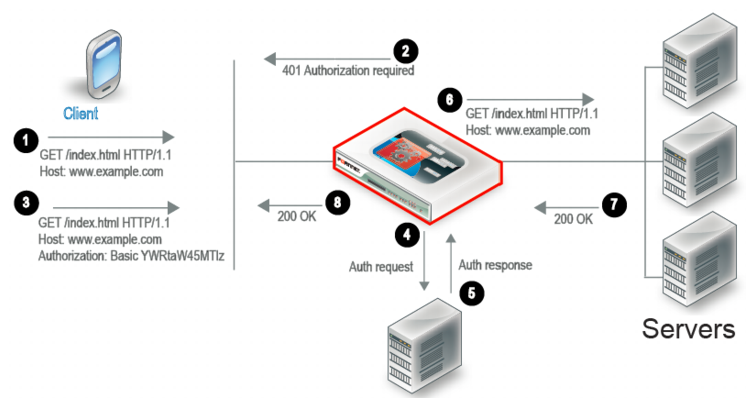
Figure 40 illustrates the client-server communication when authorization is required.
1. The client sends an HTTP request for a URL belonging to a FortiADC virtual server that has an authorization policy.
2. FortiADC replies with an HTTP 401 to require authorization. On the client computer, the user might be prompted with a dialog box to provide credentials.
3. The client reply includes an
Authorization header that gives the credentials.
4. FortiADC sends a request to the server (local, LDAP, or RADIUS) to authenticate the user.
5. The authentication server sends its response, which can be cached according to your user group configuration.
6. If authentication is successful, FortiADC continues processing the traffic and forwards the request to the real server.
7. The real server responds with an HTTP 200 OK.
8. FortiADC processes the traffic and forwards the server response to the client.
Before you begin:
• You must have created the user groups to be authorized with the policy. You also configure users and authentication servers separately. See
“Configuring user groups”.
• You must have read-write permission for Server Load Balance settings.
After you have configured an auth policy, you can select it in the virtual server configuration. Note the following requirements:
• Virtual server type must be Layer 2 or Layer 7.
• Profile type must be HTTP or HTTPS.
• The profile option once-only must be disabled.
To configure an auth policy:
1. Go to Server Load Balance > Virtual Server.
2. Click the Authentication Policy tab.
3. Click Add to display the configuration editor.
4. Complete the configuration as described in
Table 14.
5. Save the configuration.
Table 23: Auth policy configuration
Settings | Guidelines |
Name | Configuration name. Valid characters are A-Z, a-z, 0-9, _, and -. No spaces. You reference this name in the virtual server configuration. Note: After you initially save the configuration, you cannot edit the name. |
Member |
Host Status | If enabled, require authorization only for the specified host. If disabled, ignore hostname in the HTTP request header and require authorization for requests with any Host header. Disabled by default. |
Host | Specify the HTTP Host header. If Host Status is enabled, the policy matches only if the Host header matches this value. Complete, exact matching is required. For example, www.example.com matches www.example.com but not www.example.com.hk. |
User Realm | Realm to which the Path URI belongs. The realm is included in the basic authentication header in the HTTP 401 message sent to the client. If a request is authenticated and a realm specified, the same credentials are deemed valid for other requests within this realm. |
Path | Require authorization only if the URI of the HTTP request matches this pathname. If none is specified, requests to any URI require authorization. The value is parsed as a match string prefix. For example, /abc matches http://www.example.com/abcd and http://www.example.com/abc/11.html but not http://www.example.com/1abcd. |
User Group | Select the user group that is authorized to access the protected resource. |