Configuring source pool
You can configure network address translation (NAT) in a Layer 4 virtual server configuration. You have the following options:
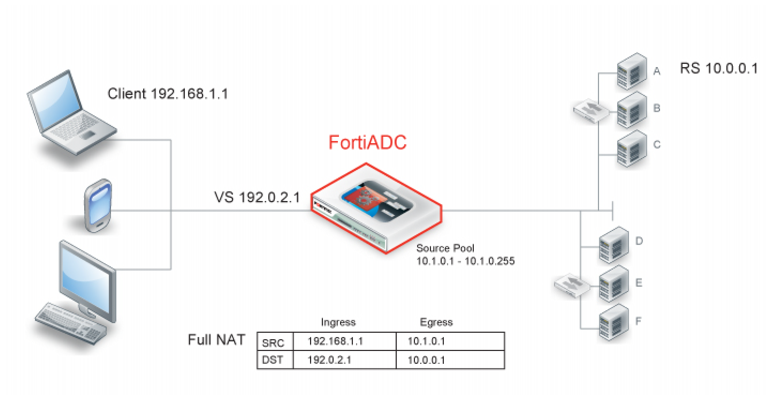
• Full NAT—Rewrites both the source and destination IP addresses.
• Destination NAT—Rewrites the destination IP address for packets before it forwards them.
Figure 25 illustrates full NAT. The source IP / destination IP pair in the packets received is SRC 192.168.1.1 / DST 192.0.2.1. The NAT module translates the source IP address to the next available address in the source pool you configure—in this example, 10.1.0.1. It translates the destination IP address to the address of the real server selected by the load balancer—in this example, 10.0.0.1.
The system maintains this NAT table and performs the inverse translation when it receives the server-to-client traffic.
Figure 26 illustrates destination NAT (DNAT). The NAT module rewrites only the destination IP address. Therefore, if you configure destination NAT, you do not need to configure a source pool. In this DNAT example, the destination IP address in the packets it receives from the client request is the IP address of the virtual server—192.0.2.1. The NAT module translates this address to the address of the real server selected by the load balancer—in this example, 10.0.0.1. The system maintains this NAT table and performs the inverse translation when it receives the server-to-client traffic.
Before you begin:
• You must have a good understanding of NAT. You must know the address ranges your network has provisioned for NAT.
• Be sure to configure the backend servers to use the FortiADC address as the default gateway so that server responses are also rewritten by the NAT module.
• You must have Read-Write permission for Load Balance settings.
After you have configured a source pool IP address range configuration object, you can select it in the virtual server configuration.
To configure a source pool:
1. Go to Server Load Balance > Virtual Server.
2. Click the Source Pool tab.
3. Click Add to display the configuration editor.
4. Complete the configuration as described in
Table 6.
5. Save the configuration.
Table 6: Source pool configuration
Settings | Guidelines |
Name | Unique name. No spaces or special characters. After you initially save the configuration, you cannot edit the name. |
Interface | Interface to receive responses from the backend server. The interface used for the initial client traffic is determined by the virtual server configuration. |
Address Type | • IPv4 • IPv6 |
Address Range | The first address in the address pool. |
To | The last address in the address pool. |