RAID Management
RAID helps to divide data storage over multiple disks, providing increased data reliability. FortiAnalyzer units that contain multiple hard disks can have their RAID array configured for capacity, performance, and availability.
| This menu is only available on devices that support RAID. |
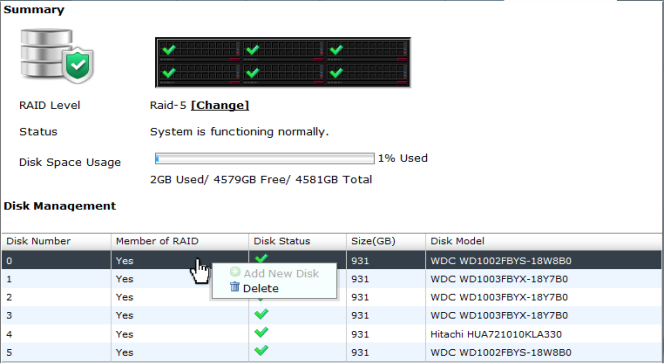
You can view the status of the RAID array from the RAID menu in System Settings > RAID Management. The RAID Management page displays the status of each disk in the RAID array, including the disk’s RAID level. This menu also displays how much disk space is being used.
Under
Disk Management the following information is displayed:
Disk Number,
Member of RAID,
Disk Status,
Size (GB), and
Disk Model. See
Figure 54.
The
Alert Message Console widget, located in
System Settings> Dashboard, will provides detailed information about any RAID array failures. For more information see
“Alert Messages Console widget”.
If you need to remove a disk from the FortiAnalyzer unit, you might be able to hot swap it. Hot swapping means that you remove a failed hard disk and replace it with a new one while the FortiAnalyzer unit is in operation. Hot swapping is a quick and efficient way to replace hard disks. For more information about hot swapping, see
“Hot swapping hard disks”.
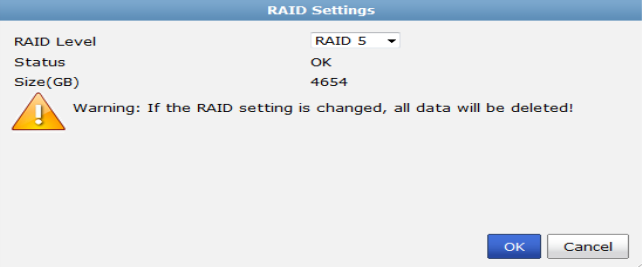
To configure the RAID level:
1. Go to System Settings > RAID Management, in the RAID Level field, select Change.
The RAID Settings dialog box opens.
2. From the RAID Level drop-down list, select the RAID level you want to use, then select OK.
Once selected, depending on the RAID level, it may take a significant amount of time to generate the RAID array.
| If the RAID settings is changed, all data will be deleted. |